Join AWS and ControlMonkey for a technical walkthrough of how to modernize your existing AWS networking using Terraform.

A 30-min meeting will save your team 1000s of hours
A 30-min meeting will save your team 1000s of hours
Author

Resource Blog News Customers Stories
Updated: Aug 19, 2025 Upd: 19.08.251 min read
In this episode of “This is My Offer” we will discusses ControlMonkey’s with Bala KP, WW Sr. Solutions Architec

Resource Blog News Customers Stories
Updated: Jan 02, 2026 Upd: 02.01.266 min read
When you use the AWS Provider, you can handle large deployments. You can break infrastructure definitions into reusable and easy-to-maintain modules.
Terraform is widely used to manage cloud infrastructure as code. It works by using providers, which connect Terraform to different platforms like AWS, Azure, and others. One of the most common providers is the Terraform AWS Provider. It lets you create and manage AWS resources from your Terraform files.
If you’re running Terraform on AWS, this provider is what makes that possible. It helps automate everything from EC2 and S3 to VPCs, IAM roles, and more. In this guide, we’ll walk through what the AWS provider is, how to set it up, and some best practices to follow.
Wide array of organizations heavily utilize Terraform for its ability to support diverse infrastructure needs distributed over different cloud providers. A Terraform Provider is a plugin that serves as Terraform’s interface for managing their external APIs. Depending on your needs, you can pick from official providers like AWS, Azure, and GCP. You can pick providers from third parties and the community. These include platforms like Kubernetes, Oracle, and Alibaba. You can also choose ControlMonkey and others. This flexibility lets you tailor your infrastructure solutions across different technologies and environments.
Terraform uses plug-in-based architecture to work with hundreds of such infrastructure platforms. Terraform providers are distributed by HashiCorp and its publicly available on Terraform registry or OpenTofu Registry. There are 3 tiers of providers.
The Terraform AWS Provider plugin specifically enables interaction with AWS resources. It connects Terraform to the AWS Cloud. This lets you define AWS infrastructure, like EC2 instances, S3 buckets, or VPCs, in your Terraform files.
Terraform AWS provider is central to provisioning and managing cloud resources in an automated way. As a Terraform admin, you will go through the following steps,
Install Terraform CLI on your local computer.
When you run terraform init, Terraform automatically downloads the AWS provider plugin.
In your configuration files (.tf files), specify which AWS resources you want to create.
Use terraform validate, terraform plan, and terraform apply to review and deploy your changes. Terraform communicates with AWS APIs via the provider to create or update infrastructure.
Create a file named main.tf with the AWS provider block.
# Configure the AWS Provider
provider "aws" {
region = "us-east-1"
}
resource "aws_vpc" "demo_vpc" {
cidr_block = "10.0.0.0/16"
tags = {
name = "demo_vpc"
}
}
Step 4: Initialize and Deploy – Run the “terraform init” command for initializing your backend. After that, you can run the plan for infrastructure changes, and finally apply them to AWS.
Provider block helps set up and manage authentication access from the provider plugin to the service provider. Below is a basic example of a provider block for Terraform provider specifying the cloud region. The block configures Terraform to use AWS and create resources in the region specified. For authentication, Terraform will use credentials from your AWS CLI. It can also use environment variables like AWS_ACCESS_KEY_ID and AWS_SECRET_ACCESS_KEY, or IAM roles.
provider "aws" {
 region = "us-east-1"  # Set your AWS region
}With the AWS Provider, it’s easy to specify AWS resources in a few lines of code. Whether you need an EC2 instance, an S3 bucket, or a VPC, you can define everything in a declarative style. This approach makes your infrastructure easy to version, share, and reuse.
# main.tf
provider "aws" {
 region = "us-east-1"

}
# Create a VPC
resource "aws_vpc" "demo_vpc" {
 cidr_block = "10.0.0.0/16"
 tags = {
   Name = "demo-vpc"
 }
}
# Create a Subnet
resource "aws_subnet" "demo_subnet" {
 vpc_id     = aws_vpc.demo_vpc.id
 cidr_block = "10.0.1.0/24"
 tags = {
   Name = "demo-subnet"
 }
}

<strong># Create an EC2 Instance
</strong>
resource "aws_instance" "demo_instance" {
 ami           = "ami-0c55b159cbfafe1f0"
 instance_type = "t2.micro"
 subnet_id     = aws_subnet.demo_subnet.id
 tags = {
   Name = "demo-instance"
 }
}The AWS Provider works seamlessly with Terraform’s state management. You can store your Terraform state in AWS S3. Use DynamoDB for state locking. This stops changes from happening at the same time. It also helps avoid configuration drift. Also note that there are other backend options available, with the default being the local (Read More).
Example Configuration:
<em># backend.tf
terraform {
 backend "s3" {
   bucket         = "terraform-state-bucket" # Pre-existing S3 bucket
   key            = "prod/terraform.tfstate"    # State file path
   region         = "us-east-1"                 # Same as provider region
   dynamodb_table = "terraform-locks"           # Pre-existing DynamoDB table
   encrypt        = true                        # Encrypt state
 }
}</em>Terraform configurations can be organized into modules. When combined with the AWS Provider, you can tackle large-scale deployments by breaking infrastructure definitions into reusable, maintainable modules.
# Configure the AWS Provider (inherited from root module)
resource "aws_vpc" "demo-vpc" {
 cidr_block = var.cidr_block
 tags = {
   Name = var.name
 }
}

resource "aws_subnet" "public" {

 vpc_id     = aws_vpc.demo-vpc.id

 cidr_block = cidrsubnet(var.cidr_block, 8, 1) # Creates subnet from VPC CIDR

 tags = {

   Name = "${var.name}-subnet"

 }

}Export AWS_ACCESS_KEY_ID, AWS_SECRET_ACCESS_KEY, and AWS_REGION in your terminal.
# main.tf (no credentials in code)

provider "aws" {

 region = "us-east-1"  # Optional if AWS_REGION is set

}Terraform can automatically read from the default AWS CLI credentials file (~/.aws/credentials and ~/.aws/config).
provider "aws" {

 region                   = "us-east-1"
 shared_credentials_files = ["~/.aws/credentials"]  # Default path
 profile                  = "dev-profile"           # Non-default profile
}Never put AWS access keys or secrets in Terraform files. Alternatively, use environment variables or shared credentials files.
When you store Terraform state in an S3 bucket, enable server-side encryption (SSE) and use KMS if possible. Also configure DynamoDB for state locking to prevent concurrent modifications.
#backend.tf
terraform {
  backend "s3" {
    bucket         = "terraform-state-bucket"
    key            = "prod/terraform.tfstate"
    region         = "us-east-1"
    dynamodb_table = "terraform-locks"
    encrypt        = true
    kms_key_id     = "alias/terraform-state-key"
  }
}Prevent Terraform from recording sensitive values in plain text.
variable "aws_access_key" {
  type      = string
  sensitive = true  # Hides value in outputs
}

variable "aws_secret_key" {
  type      = string
  sensitive = true  # Hides value in outputs
}

provider "aws" {
  access_key = var.aws_access_key
  secret_key = var.aws_secret_key
  region     = "us-east-1"
}The Terraform AWS Provider is a key tool for managing cloud infrastructure. It helps you easily automate your AWS infrastructure setup and management. It works well with AWS services. You can create a safe and easy-to-manage infrastructure by using best practices. These include remote state management, IAM role-based authentication, and modular configurations.
Terraform AWS Provider can be authenticated using environment variables, shared credentials files, IAM roles, and AWS CLI profiles.
Yes, you can have multiple accounts configured using different provider aliases in Terraform.
Terraform uses state files to track resource changes. It is best to store state files remotely. For example, use AWS S3 with state locking in DynamoDB. This helps prevent conflicts in a team setting.
Terraform modules promote reusability, maintainability, and consistency in infrastructure code, allowing teams to manage complex deployments better.
You can use Terraform with CI/CD tools like GitHub Actions, Jenkins, and AWS CodePipeline. This helps you set up and change infrastructure automatically.
To update the provider, modify the provider version within your Terraform configuration and run terraform init -upgrade. Terraform AWS Provider automates infrastructure management by providing scalability, security, and automation. It can easily integrate with AWS services to offer smooth deployment and management of cloud infrastructure. With Terraform AWS Provider, organizations can achieve consistency, reduce manual intervention, and maximize cloud governance.
Run terraform providers in your project directory. It lists all providers and their versions. To specify or check the required version in your config, use:
terraform {
  required_providers {
    aws = {
      source  = "hashicorp/aws"
      version = "~> 5.0"
    }
  }
}
You can also run terraform init -upgrade to refresh to the latest version that matches constraints.
This usually happens due to one of the following:
Fixes:
Resource Blog News Customers Stories
Updated: Aug 20, 2025 Upd: 20.08.2512 min read
DevOps teams are under pressure to deliver faster, more reliable infrastructure—without sacrificing control. This guide shows how DevOps teams automate infrastructure on AWS with Terraform. It combines the flexibility of Infrastructure as Code (IaC) with the scale and control that AWS environments need. You’ll learn how to streamline provisioning, enforce consistency, and reduce manual errors through automation. By the end, you will know how to build cloud infrastructure that is scalable, strong, and cost-effective using Terraform on AWS.
👉Beginner’s Guide to the Terraform AWS Provider
👉3 Benefits of Terraform with AWS
For DevOps teams, speed, repeatability, and compliance are non-negotiable. Terraform gives you a way to define AWS infrastructure as code—making it easy to version, peer-review, and automate. Unlike imperative scripts, Terraform uses a declarative approach: you define what the infrastructure should look like, and Terraform handles the how. This simplifies deployments, reduces manual error, and helps teams scale cloud environments predictably.
With broad AWS provider support, teams can codify everything from EC2 instances to IAM policies using HCL (HashiCorp Configuration Language), enabling consistent, auditable infrastructure delivery across environments.
Terraform and AWS are a powerful combination for DevOps teams automating infrastructure at scale. Here’s why it works so well:
If you’re starting completely from scratch, your first step is to install Terraform on your local machine or wherever you plan to run Terraform. Since the official Terraform Installation Docs provide a clear, step-by-step guide for each operating system, I recommend following those instructions directly.
Once Terraform is set up, you should be able to interact with Terraform CLI. Here are a few prominent commands that you will use with Terraform on a day-to-day basis and their intended actions.

With Terraform installed, you must ensure Terraform can talk to your AWS account. You have several ways to do this; the key is to pick a method that aligns with your security needs and how you plan to run Terraform.
In the AWS Console, head to IAM → Users → Security credentials. Create a new access key if you don’t already have one. You also need to ensure that the particular user has required IAM policies attached to carry out resource management in AWS.
Set these as environment variables:
export AWS_ACCESS_KEY_ID="YOUR_ACCESS_KEY"
export AWS_SECRET_ACCESS_KEY="YOUR_SECRET_KEY"
export AWS_DEFAULT_REGION="us-east-1"
This is quick and easy if you’re just exploring or running Terraform from a local machine.
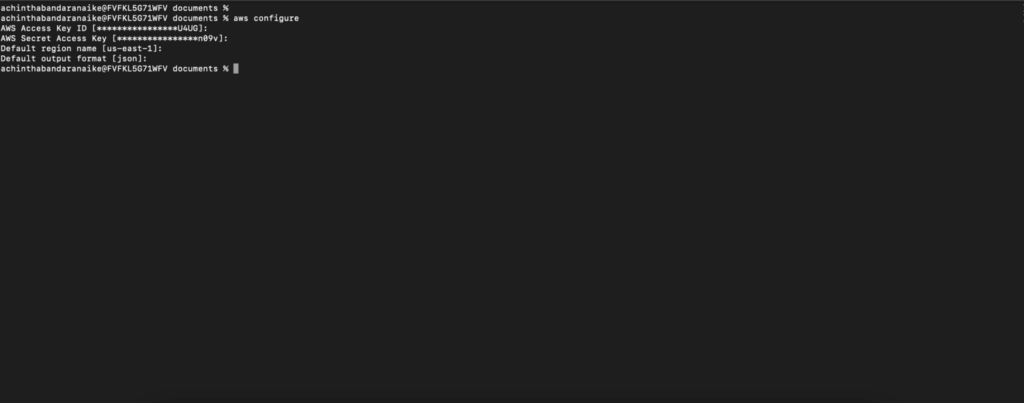
Install the AWS CLI, then run: aws configure
This will create or update your ~/.aws/credentials and ~/.aws/config files. Terraform automatically picks up these files.
Tip: Never commit your AWS keys or secrets to source control. For serious projects, rely on more secure methods (like IAM roles or Vault) to safeguard credentials.
If you’re running Terraform from an AWS EC2 instance, attaching an IAM role to that instance is the most straightforward method.
This is also a good approach if you use services like AWS CodeBuild, AWS CodePipeline, or Fargate to run your Terraform commands in a CI/CD pipeline.
In larger organizations, you might rely on AWS Single Sign-On (SSO) or an external provider like. That way, your team members log in once and assume roles that grant only the privileges they need.
This approach helps enforce short-lived sessions and scope each user’s access more precisely.
Provider configuration is how you tell Terraform that you want to manage AWS resources using Terraform. You can add in your AWS credentials as parameters within the provider configuration block. If its not defined, it will automatically pick variables based on the methods that you have configured above.
Create a main.tf file in your Terraform project folder to define the AWS provider.
provider "aws" {
region = "us-east-1"
}
Be sure to select the AWS region closest to your users or best suited for your workload. We will talk about these .tf files more in the following sections.
In Terraform, you define your infrastructure resources using declarative .tf files. Here’s a basic example of creating an EC2 instance: This example obtains the latest AMI (Amazon Machine Image) for the EC2 instance using a Terraform Data block.
Tip: Data configuration block in Terraform is used to get information from existing resources or external sources.
# Dynamically fetch the latest Ubuntu 22.04 (Jammy) AMI
data "aws_ami" "ubuntu_latest" {
most_recent = true

# Canonical's AWS account ID for official Ubuntu images is 099720109477
owners = ["099720109477"]

filter {
name = "name"
values = ["ubuntu/images/hvm-ssd/ubuntu-jammy-22.04-amd64-server-*"]
}
}

resource "aws_instance" "demo_server_single" {
ami = data.aws_ami.ubuntu_latest.id
instance_type = "t2.micro"

# Basic example user_data to confirm the instance boots
user_data = <<-EOF
#!/bin/bash
echo "Hello from Terraform + Ubuntu!" > /home/ubuntu/hello.txt
EOF
}Once you are ready to apply these changes to infrastructure, you can use terraform planto foresee what changes will be done to the infrastructure, and thenterraform applyto apply those changes.
Terraform uses a state file to keep track of resources you’ve created. This file is crucial because it maps real-world infrastructure to your configuration.
Note that remote backend types are not limited to AWS S3 or local. There are several other options that you can use. Read more about those here.
terraform {
# You can pin a Terraform version range for consistency
required_version = ">= 1.0"

# Storing state in an S3 bucket with DynamoDB table locking
backend "s3" {
bucket = "demo-terraform-state-bucket"
key = "demo-project/terraform.tfstate"
region = "us-east-1"
dynamodb_table = "demo-terraform-lock-table" # You must create this table separately
encrypt = true
}
}
Ensure you enable versioning on your S3 bucket and set up a DynamoDB table for state locking to prevent concurrent writes.
Terraform modules let you encapsulate and reuse infrastructure configurations. Instead of duplicating code across multiple projects, you can create a module that includes, for example, a VPC with subnets and attach it wherever needed.
You can also store these modules in a version control system and refer to those directly.
The following example uses an official AWS VPC Terraform Module from the Terraform registry to create a new VPC in your AWS account’s specified region instead of using your own. But it’s the same concept.
# Using official Terraform Module, You can create your own too
module "vpc" {
source = "terraform-aws-modules/vpc/aws"
version = "~> 4.0" # Use a module version compatible with your Terraform setup

name = "MyDemoVPC"
cidr = "10.0.0.0/16"

# Availability Zones
azs = ["us-east-1a", "us-east-1b"]

# Subnets
public_subnets = ["10.0.1.0/24", "10.0.2.0/24"]
private_subnets = ["10.0.3.0/24", "10.0.4.0/24"]

# NAT Gateways
enable_nat_gateway = true
single_nat_gateway = true

# Tags for the VPC and all child resources
tags = {
Terraform = "true"
Environment = "dev"
}
}
This approach keeps your main configuration files clean and organized, making large-scale infrastructure much easier to maintain.
One of the major advantages of cloud computing is the ability to dynamically scale resources. AWS is known for its highly scalable and reliable backbone cloud infrastructure. Combining Terraform with AWS allows you to even define the ability to scale resources dynamically as Infrastructure as Code (IaC). A few examples are,
Here’s an example snippet for creating an Auto Scaling Group using Terraform. Note that the values are referred to from previously created resources like VPC and the AMI Image ID.
esource "aws_security_group" "demo_sg" {
name = "demo-sg"
vpc_id = module.vpc.vpc_id

ingress {
from_port = 22
to_port = 22
protocol = "tcp"
cidr_blocks = ["0.0.0.0/0"]
}

egress {
from_port = 0
to_port = 0
protocol = "-1"
cidr_blocks = ["0.0.0.0/0"]
}
}

resource "aws_launch_template" "demo_lt" {
name_prefix = "demo-lt-"
image_id = data.aws_ami.ubuntu_latest.id
instance_type = "t2.micro"

vpc_security_group_ids = [aws_security_group.demo_sg.id]
}

resource "aws_autoscaling_group" "demo_asg" {
name = "demo-asg"
max_size = 3
min_size = 1
desired_capacity = 2
vpc_zone_identifier = module.vpc.public_subnets

launch_template {
id = aws_launch_template.demo_lt.id
version = "$Latest"
}
}To fully automate and streamline your infrastructure deployments, consider integrating Terraform with a CI/CD pipeline:
Regardless of the tool, the goal is to ensure that any changes to your .tf files automatically go through version control, tests, and approvals before they’re applied to production environments.
Security is non-negotiable for DevOps teams. A few pointers to keep in mind when using Terraform to manage your AWS cloud infrastructure:
Visibility into resource utilization and cost is essential for AWS environments:
Example of setting CloudWatch alarms via Terraform:
esource "aws_cloudwatch_metric_alarm" "high_cpu" {
alarm_name = "high_cpu_usage"
comparison_operator = "GreaterThanOrEqualToThreshold"
evaluation_periods = 2
metric_name = "CPUUtilization"
namespace = "AWS/EC2"
period = 300
statistic = "Average"
threshold = 80
alarm_description = "Alarm when CPU exceeds 80%"
actions_enabled = true
alarm_actions = [aws_sns_topic.alerts.arn]
dimensions = {
InstanceId = aws_instance.demo_server_single.id
}
}Apply standardized tags (e.g., Environment, Owner) to resources. This helps with cost allocation and environment organization, especially when multiple teams share the same AWS account. Terraform allows you to ensure this is consistent across all your cloud resources and even add additional validation configurations as guard rails to ensure required tags are added and to abort if any tags are missing. This can be done using Terraform custom conditions.
Example of setting custom conditions to ensure whether a required set of tags is specified before creating a resource.
variable "common_tags" {
description = "A map of tags that must be applied to all resources."
type = map(string)

validation {
condition = (
contains(keys(var.common_tags), "Environment") &&
contains(keys(var.common_tags), "Owner")
)
error_message = "You must provide both 'Environment' and 'Owner' keys in the common_tags variable."
}
}

locals {
common_tags = {
Environment = "dev"
Owner = "team-xyz"
}
}

resource "aws_s3_bucket" "demo-bucket" {
bucket = "demo-bucket"

# We apply the validated tags here
tags = var.common_tags
}Terraform and AWS are powerful for DevOps teams aiming to upscale their infrastructure management strategy with Infrastructure as Code (IaC).
Here’s a quick recap of the steps to get started:
Take your infrastructure automation to the next level. With ControlMonkey you can streamline Terraform deployments on AWS using AI-powered code generation, automatic drift detection, smart remediation, and robust compliance enforcement across multi-cloud environments. Eliminate manual errors, accelerate provisioning, and ensure every deployment is production-grade.
Storing state in S3 (or any remote backend) is optional but highly recommended for team-based or production scenarios. It prevents conflicts if multiple people run Terraform at the same time and provides versioning for your state file.
Yes. Terraform is highly modular. You can choose to manage just your EC2 instances and RDS databases, for example, and still provision other services manually in the AWS Console if you prefer.
Avoid storing secrets directly in .tf files. Use AWS Systems Manager Parameter Store, AWS Secrets Manager, or HashiCorp Vault to keep sensitive data secure. This helps prevent accidental exposure in source code repositories.
If you’re using local AWS access keys, you can generate new keys and update your environment variables or AWS CLI config. For IAM roles or AWS SSO, Terraform automatically picks up the new session tokens after you re-authenticate.
Absolutely. Many teams set up pipelines to run terraform plan and terraform apply whenever they push changes to a repository. This promotes consistent deployments and thorough infrastructure reviews.
You can, but it’s generally best to stick with one Infrastructure as Code solution to keep things consistent. If you already have CloudFormation stacks, you might manage them separately or consider migrating them to Terraform over time.
Running terraform destroy removes all resources defined in your Terraform configuration. This is handy for test environments so you don’t incur costs for idle resources.
Use a combination of modules and environment-specific inputs (via .tfvars files or workspaces). Modules let you standardize and reuse core infrastructure patterns, while each environment’s parameters (like CIDR blocks or instance counts) can be passed in separately. This avoids code duplication and ensures consistent configurations across all environments.
Storing your .tf files in a Git-based repository is ideal. You can review changes via pull requests, track history, and enforce quality checks with CI/CD. Tagging releases or using branches for different environments is also a common practice.
Yes. You can configure multiple providers or use different profiles. Each provider block can point to a distinct region or AWS account, letting you manage complex, distributed infrastructure from a single Terraform configuration.
Terraform AWS revolutionizes cloud infrastructure management by enabling Infrastructure as Code (IaC), helping DevOps teams automate, scale, and maintain AWS environments effectively. Terraform’s declarative syntax, automation, and state management make it a powerful tool for effective provisioning and AWS environment management.
Terraform simplifies AWS infrastructure management by using HCL (HashiCorp Configuration Language), which enables automated, consistent provisioning and management. It allows you to integrate into CI/CD workflows and provides a simple mechanism for scaling resources. Terraform provisions and maintains infrastructure automatically and helps organizations minimize human error, improve operational efficiency, and save AWS costs. From provisioning a single EC2 instance to provisioning an entire cloud ecosystem, Terraform simplifies deploying and scaling infrastructure. In this article, we outline three must-have benefits that make Terraform an absolute requirement for DevOps teams working with AWS.
To begin Terraform in AWS Cloud Infrastructure, you may use these following steps:
Terraform configurations use HashiCorp Configuration Language (HCL). These specify Terraform infrastructure elements such as compute instance, network, and storage. With IaC, provisioning of infrastructure is automated and thereby eliminates efforts and provides consistency.
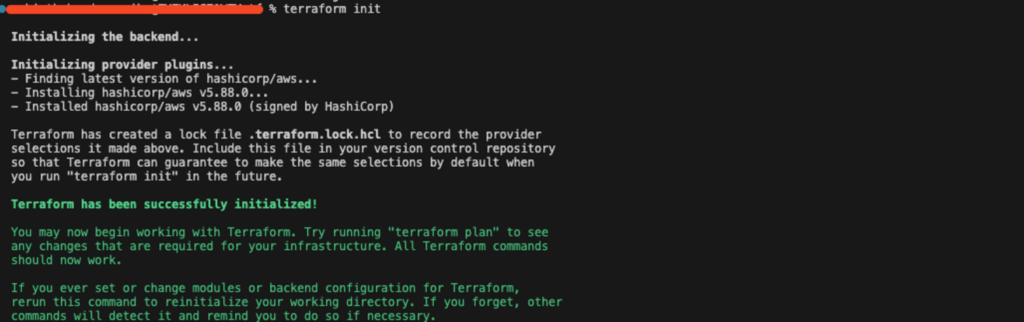
After writing Terraform’s configuration, invoke terraform init to get Terraform set up and install necessary provider plugins. Next, use terraform plan to see what Terraform will do to reach your desired state.
terraform init
terraform planOnce the plan has been approved, terraform apply to build or modify infrastructure as defined in the config.
terraform apply
To streamline and organize Terraform code, reusable infrastructure elements can be encapsulated in modules. Using modules increases code maintainability and avoids redundancy between different projects.
module "network" {
source = "terraform-aws-modules/vpc/aws"
version = "3.0.0"
cidr = "10.0.0.0/16"
}Terraform maintains a state file to keep records for deployed resources. Having a back-end like an AWS S3 bucket to store state files brings consistency to teams and prevents conflict.
terraform {
backend "s3" {
bucket = "terraform-state-bucket"
key = "terraform.tfstate"
region = "us-east-1"
}
}Terraform code has to be versioned using tools like Git. This makes it possible to track history, review code, and integrate with CI/CD processes to deploy automatically.
name: Terraform Deployment
on:
push:
branches:
- main

jobs:
terraform:
runs-on: ubuntu-latest
steps:
- name: Checkout Code
uses: actions/checkout@v2

- name: Setup Terraform
uses: hashicorp/setup-terraform@v1

- name: Terraform Init
run: terraform init

- name: Terraform Plan
run: terraform plan

- name: Terraform Apply
run: terraform apply -auto-approveTerraform allows productive collaboration by implementing policies, regulation rules, and role-based access.
One of Terraform’s main features is how it can declare AWS infrastructure and keep a state file. The state file acts as a single source of truth, which guarantees:
Unlike AWS CloudFormation, Terraform has a provider-agnostic strategy that does not lock you into AWS and makes it easy to extend AWS resources and exit with a backdoor to hybrid or multi-cloud strategies.
Key Advantages:
Example for scaling AWS resources with terraform modules
module "network" {
source = "terraform-aws-modules/vpc/aws"
version = "3.0.0"
cidr = "10.0.0.0/16"
}Terraform’s plan command provides a preview of infrastructure changes before applying them, reducing risks and surprise downtime. Benefits of Predictive Change Planning:
Terraform provides AWS DevOps teams with unparalleled value in infrastructure management. With in-built state management, it ensures consistency, and with multi-cloud flexibility providing it with scalability, and with predictive planning for change, it provides secure, automated deployments. With Terraform’s features, teams can improve cloud infrastructure, improve efficiency, and minimize risks. For further reference, see Terraform’s official AWS documentation.
Want to simplify Terraform management and enforce best practices in your AWS infrastructure. ControlMonkey helps automate Terraform workflows, maintain compliance, and enhance visibility across deployments. Discover how it can streamline your cloud operations today.
Resource Blog News Customers Stories
Updated: Nov 27, 2025 Upd: 27.11.257 min read

With modern software engineering, Terraform Cloud and AWS CloudFormation is becoming increasingly important. For those unfamiliar with it, these are tools in which cloud infrastructure is provisioned and managed using an automated typed language rather than a manual ClickOps approach.
For example, consider the following architecture diagram:
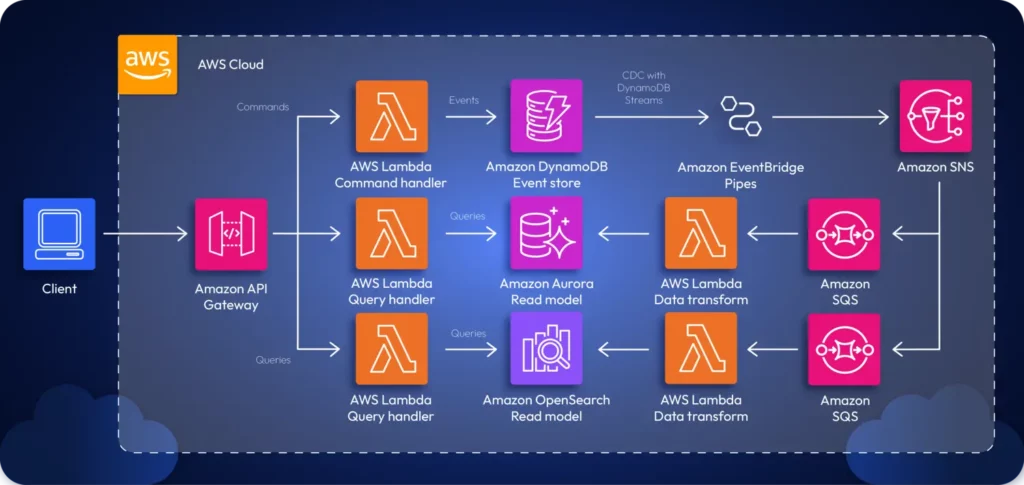
There are two ways to provision the infrastructure for this app:
If you were navigating the GUI, you’d have to manually provision resources one by one, create the interconnectivity requirements necessary, and configure the app manually. This is time-consuming. Instead, you can leverage a typed IaC tool such as Terraform or CloudFormation to define your infrastructure as a code file and automatically provision the infrastructure with a single command.
By using IaC tools, teams can rapidly adopt DevOps, which helps create the necessary synergy between Ops and Dev teams to boost productivity and efficiency.
Two main tools that are heavily used in the industry for IaC are Terraform and AWS CloudFormation. Let’s look at each tool in greater detail to understand what’s right for you.
Terraform is an IaC tool created by Harshicorp that can be used to provision and manage your cloud infrastructure. It doesn’t necessarily have to be cloud infrastructure; Terraform can automate anything. For example, you can write a Terraform script to build a Docker image, create a text file, and more.
When it comes to provisioning cloud infrastructure, Terraform is often sought after. Most companies don’t rely on a single cloud for their applications; most have solutions that span multiple clouds.
In such cases, teams will need to manage infrastructure across several clouds. Terraform is a cloud-agnostic tool that lets teams manage infrastructure across any cloud, including AWS, GCP, Azure, and more.
The snippet below showcases a Terraform script:
provider "aws" {
region = "us-east-1"
}

resource "aws_api_gateway_rest_api" "my_api" {
name = "MyAPI"
description = "API Gateway provisioned via Terraform"
}

resource "aws_api_gateway_resource" "my_resource" {
rest_api_id = aws_api_gateway_rest_api.my_api.id
parent_id = aws_api_gateway_rest_api.my_api.root_resource_id
path_part = "myresource"
}

resource "aws_api_gateway_method" "my_method" {
rest_api_id = aws_api_gateway_rest_api.my_api.id
resource_id = aws_api_gateway_resource.my_resource.id
http_method = "GET"
authorization = "NONE"
}

resource "aws_api_gateway_integration" "mock_integration" {
rest_api_id = aws_api_gateway_rest_api.my_api.id
resource_id = aws_api_gateway_resource.my_resource.id
http_method = aws_api_gateway_method.my_method.http_method
type = "MOCK"
request_templates = {
"application/json" = "{\"statusCode\": 200}"
}
}

resource "aws_api_gateway_deployment" "my_deployment" {
depends_on = [aws_api_gateway_method.my_method]
rest_api_id = aws_api_gateway_rest_api.my_api.id
stage_name = "prod"
}

output "api_gateway_invoke_url" {
value = "https://${aws_api_gateway_rest_api.my_api.id}.execute-api.${var.region}.amazonaws.com/prod/myresource"
}
The snippet above showcases an Terraform script written using HCL that provisions an API Gateway and outputs a deployment that can be invoked via the public internet.
All you’d have to do is deploy the script using terraform apply.
Migrate from CloudFormation to Terraform or OpenTofu in 1-click
AWS CloudFormation is a managed AWS service that lets teams manage their application infrastructure primarily within an AWS ecosystem. However, CloudFormation also offers support for managing third-party resources through the CloudFormation public registry.
Teams can work on their CloudFormation script and upload it to the AWS CloudFormation service to deploy the necessary infrastructure on the AWS Cloud. One good thing about this is that you don’t need to remember the order in which services must be provisioned. AWS CloudFormation will take care of that for you automatically and create the required tree.
The snippet attached below showcases a simple CloudFormation script:
AWSTemplateFormatVersion: '2010-09-09'
Description: CloudFormation template to provision an API Gateway

Resources:
MyApiGateway:
Type: AWS::ApiGateway::RestApi
Properties:
Name: MyAPI
Description: API Gateway provisioned via CloudFormation
FailOnWarnings: true

MyApiGatewayResource:
Type: AWS::ApiGateway::Resource
Properties:
ParentId: !GetAtt MyApiGateway.RootResourceId
PathPart: myresource
RestApiId: !Ref MyApiGateway

MyApiGatewayMethod:
Type: AWS::ApiGateway::Method
Properties:
RestApiId: !Ref MyApiGateway
ResourceId: !Ref MyApiGatewayResource
HttpMethod: GET
AuthorizationType: NONE
Integration:
Type: MOCK
RequestTemplates:
application/json: '{"statusCode": 200}'

MyApiGatewayDeployment:
Type: AWS::ApiGateway::Deployment
DependsOn: MyApiGatewayMethod
Properties:
RestApiId: !Ref MyApiGateway
StageName: prod

Outputs:
ApiGatewayInvokeURL:
Description: Invoke URL for the API Gateway
Value: !Sub "https://${MyApiGateway}.execute-api.${AWS::Region}.amazonaws.com/prod/myresource"
The snippet above provisions an AWS API Gateway, Resource, GET Method and a Deployment of the API using a YAML template and outputs the invocation URL so that users can immediately test out the API upon deployment.
Terraform manages infrastructure state using a state file (terraform.tfstate). This file records the current state of deployed resources, helping Terraform understand what changes need to be applied. The state file can be stored locally or in a remote backend (such as AWS S3 with DynamoDB for locking). This allows teams to collaborate efficiently without conflicts.
Additionally, Terraform’s state management gives users more control over tracking changes, however it also comes with risks. For example:
However, this is where tools like ControlMonkey come into play. Control Monkey is able to spin up, automate and govern your cloud infrastructure while monitoring drift.
CloudFormation, on the other hand, automatically manages the state of resources within AWS. The AWS Management Console provides visibility into stack updates, rollbacks, and deletions. Since CloudFormation keeps track of the entire stack’s history, manual state management is unnecessary.
A major advantage of CloudFormation is built-in drift detection. AWS automatically notifies users when infrastructure deviates from the defined CloudFormation stack, allowing proactive remediation. Since CloudFormation’s state is stored natively within AWS, there’s no risk of losing state files.
Terraform is free to use. However, if teams want enterprise features such as policy enforcement, team collaboration, or remote execution, they may need to use Terraform Standard or Terraform Plus, both of which are paid services.
The costs associated with Terraform mainly come from:
On the other hand, AWS CloudFormation is free to use. Users only pay for the AWS resources they provision through CloudFormation. There are no additional charges for managing infrastructure stacks, updating resources, or using AWS drift detection.
However, one indirect cost of using CloudFormation is the execution time of the overall deployment. CloudFormation stacks sometimes can take a longer to deploy than Terraform due to AWS handling rollback processes. If an update fails, AWS may revert changes, prolonging deployment times and leading to higher infrastructure costs.
Terraform uses HCL (HashiCorp Configuration Language), which is a declarative language designed for infrastructure as code (IaC). HCL is readable, supports variables, loops, and conditionals, and integrates well with modules to promote reusability.
Consider the HCL snippet shown below:
resource "aws_s3_bucket" "my_bucket" {
bucket = "MyBucket"
}
The snippet shown above uses HCL to define an S3 bucket that can be deployed onto AWS.
CloudFormation supports YAML and JSON, which are more verbose, but lack built-in looping constructs (although AWS Macros and AWS CDK help overcome these limitations). Here’s the exact S3 Bucket provisioned using CloudFormation:
Resources:
MyBucket:
Type: AWS::S3::BucketTerraform is multi-cloud, supporting AWS, Azure, GCP, Kubernetes, and on-prem infrastructure. HashiCorp provides official documentation, and there’s a strong community support system, including Terraform Registry modules.
Additionally, for enterprise users, HashiCorp offers paid support with SLAs (Service Level Agreements), security compliance, and team collaboration features.
However, CloudFormation is AWS-only. It is strictly revolving around AWS managed infrastructure and does not let you manage multi-cloud infra.
Well, the answer is simple. If you have a problem in which your solution will span across multiple clouds, you will definitely have to use Terraform given that it lets you manage multi-cloud infrastructure.
But, if your solution is a simple POC that is running on AWS, you can proceed with CloudFormation.
And, that’s everything you need to know about CloudFormation and Terraform.
Both tools are widely accepted infrastructure management tools, while Terraform supports multi-cloud and CloudFormation supports only AWS.
So, it’s important to remember that if you’re working on a multi-cloud solution, you’ll definitely need to look at using Terraform with its module support, declarative approach and multi-cloud support.
With ControlMonkey, you can seamlessly manage your Terraform stack with ease by providing an end-to-end automation platform with AI driven code generation, automated drift detection and remediation across multiple clouds and with strict compliance policies.