
Managing one Meraki network is straightforward. Managing dozens of sites consistently is a different challenge entirely. Meraki configuration templates exist to solve exactly that: a master configuration that many networks can share, so administrators don’t have to rebuild the same VLANs, firewall rules, and switch settings site by site.
This article covers two things. First, how to use Meraki configuration templates to standardize your environment. Second, why standardization should be paired with configuration backup and recovery. Templates define what your configuration should look like. Backup preserves recoverable versions of what it actually looked like at a specific point in time – and those are not the same job.
TL;DR
- Meraki configuration templates apply a common base configuration across multiple bound networks.
- Switch profiles provide reusable, switch-specific configuration within a template-managed environment.
- Local overrides let individual sites differ from the template on supported settings – that’s often intentional, not a mistake.
- Centralizing configuration improves consistency, but it also increases the blast radius of an unwanted change.
- A change log tells you something changed. It doesn’t hand you back a recoverable version of what existed before.
- ControlMonkey provides Meraki configuration backup and recovery, creating known-good recovery points for templates, overrides, and other Meraki configurations that need restoring.
What Are Meraki Configuration Templates?
A Meraki configuration template is a shared base configuration that can be applied to multiple networks within an organization. Networks bound to the template inherit its supported settings, so administrators manage common configuration centrally instead of configuring every site independently.
Organizations typically reach for templates when they run several similar sites – branch offices, retail locations, warehouses – that should behave the same way on the network. Once a network is bound, changes made to the shared template settings propagate out to every bound network automatically. That’s the entire point: change it once, and it applies everywhere it needs to.
Templates don’t remove all local flexibility, though. Certain settings can still be configured per site – these are local overrides, and they exist because not every bound network is truly identical. A branch with a different ISP handoff or a unique VLAN requirement can diverge from the template on that specific setting without breaking the shared configuration everywhere else. An override isn’t automatically a problem; it’s a supported part of the model.
Cisco Meraki Configuration Templates vs. Switch Profiles
| Concept | Scope | Example settings |
|---|---|---|
| Configuration template | Shared configuration across bound networks | VLANs, SSIDs, firewall/traffic rules, alerts, and other supported network-wide settings |
| Switch profile | Switch-specific configuration within a template-managed environment | Port settings, VLAN/voice VLAN behavior, QoS, ACLs, STP, and access policies |
A configuration template operates at the network level – it’s the shared foundation. A switch profile lives inside that template and handles the switch-specific detail: which port belongs to which VLAN, how QoS is applied, which access policy a port uses. Think of the template as the site-wide blueprint and the switch profile as the per-model wiring diagram that sits underneath it. (Exact settings available can vary by device family and firmware – verify against current Cisco Meraki configuration templates documentation before making changes in production.)
How to Set Up Meraki Configuration Templates for Standardization
Setting up Meraki templates is a practical, repeatable process. This is a working overview, not a replacement for Cisco’s complete product documentation – link out for the exhaustive version.
- Go to Organization > Configuration templates in the Meraki Dashboard.
- Create a new template and name it something that identifies its intended site or network type – “Retail – Small Format” reads a lot better six months from now than “Template 3.”
- Where it makes sense, use an existing network as the starting point so you’re not rebuilding settings from scratch.
- Configure the shared settings the target networks need: VLANs, SSIDs, firewall and traffic-shaping rules, alerts.
- For switching environments, build out the relevant switch profiles and switch-specific settings under Switching > Configure > Switch templates.
- Bind the appropriate networks to the template – bound networks inherit the configuration immediately.
- Review which settings remain centrally controlled and which support site-specific overrides, so nobody is surprised later.
- Validate the configuration on one site before applying broad changes across production.
Meraki Configuration Best Practice: Design Templates Around Repeatable Site Types
One universal template rarely fits every network well. A better approach groups sites by genuinely similar requirements – same device mix, same VLAN structure, same general purpose – and accepts that some local differences will always need to be maintained outside the template. Planning “one template per site type” up front avoids a lot of override sprawl later.

Make Your Meraki Configuration Recoverable
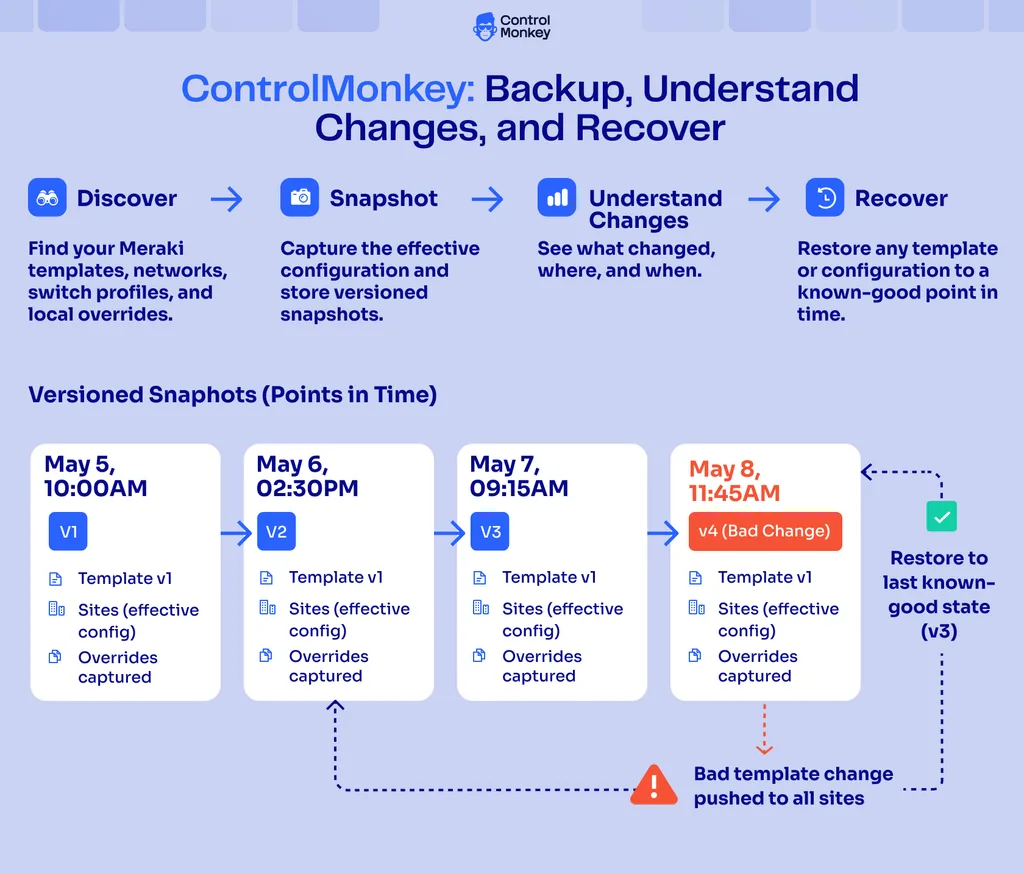
When a Meraki configuration is changed, deleted, or corrupted, you need a way back. ControlMonkey provides Cisco Meraki configuration backup and recovery, helping you restore from known-good recovery points.
What Happens When Networks Are Bound to a Meraki Template?
Once a network is bound, it inherits the template’s supported configuration, and future changes to those centrally managed settings can propagate to every other bound network at the same time. Some settings can still be overridden locally, which means the effective configuration running at a given site is really the template plus whatever local overrides exist on top of it – both pieces matter when you’re troubleshooting or auditing a site.
Unbinding a network is its own decision point. Cisco Meraki’s configuration templates documentation describes two paths: unbind while retaining the current configuration, or unbind and clear it back toward the network’s pre-binding state. Even in the “clear” path, some settings – addressing and VLANs among them – tend to persist, while most others revert. Worth noting for anyone planning this: updating the template itself does not clear a network’s existing local overrides. If the goal is to actually reset those overrides, the network needs to be unbound and rebound to the template, not just left in place while the template changes underneath it.
Template Changes and Blast Radius
The same centralization that makes templates efficient also means a configuration mistake can affect multiple sites at once. This isn’t a flaw – templates are working exactly as designed. The operational takeaway is that teams running centralized configuration need a recovery strategy that matches the blast radius they’ve created, whether the affected setting was pushed from the template or introduced through a workflow no one meant to run in production.
Firmware and Template Constraints
Template-managed environments introduce firmware-management constraints worth planning around. For switch networks specifically, when a network is attached to a template, firmware is controlled by that template – a bound network can’t run a different firmware version than the one the template specifies, and Staged Upgrades (which let you roll firmware to a subset of switches first) aren’t available for template-bound networks.
Exact behavior can vary by Meraki product line and deployment model, so confirm current firmware and staged-upgrade support for your specific device families before finalizing a template strategy. Scheduling a firmware upgrade on the template upgrades every bound network together, each within its own local timezone. Teams planning a phased rollout across many sites should verify current firmware and staged-upgrade behavior for their specific device families in the Meraki firmware documentation before finalizing a template strategy.
Where Meraki Templates Fall Short as a Recovery Strategy
Templates aren’t intended to be a disaster recovery system – that was never their job. Their purpose is centralized configuration and standardization, and they do that well. Recovery is a separate problem, and it’s worth being precise about where the gap actually sits.
A Change Log Is Not a Recovery Point
Meraki does provide some rollback capability – firmware upgrades, for instance, can be rolled back to the previous version within 14 days directly from the dashboard. That’s useful, but it’s a firmware rollback, not a configuration one. Meraki also provides change and audit visibility that can show a setting was modified and who modified it.
An audit trail answering “what changed and who changed it” is genuinely useful, but it isn’t the same as a versioned configuration snapshot that can be restored as a known-good state. During an incident, the operational question isn’t only “what changed?” – it’s “what did this configuration look like before the change, and how do we get back there?” Those two questions call for different tools, and conflating them is where recovery plans quietly fall apart.
3 Meraki Configuration Recovery Risks
- A bad template change propagates to every bound network before anyone notices something’s wrong.
- A problematic site-specific change – a local override that needs to return to its previous state – has no built-in “undo” beyond manual reconstruction.
- An unauthorized or unintended change, made through an administrator, the API, or an automation, alters production configuration in a way nobody planned.
Standardization answers how configuration should be managed going forward. Recovery answers how the organization gets back to a known-good state after something goes wrong. They’re different questions, and an organization needs both answered – not one standing in for the other.
How to Back Up and Recover Meraki Configurations
To back up and recover Meraki configurations, ControlMonkey captures configuration states as versioned recovery points that can be restored when needed. This helps teams track changes over time, identify the last known-good version, and restore critical Meraki configurations after an incident.
Meraki Configuration Backup with ControlMonkey
ControlMonkey is complementary to Meraki’s configuration-management model – it doesn’t replace configuration templates, and it isn’t meant to. It sits alongside the template engine as the recovery and change-visibility layer: continuously discovering and capturing Meraki configuration, maintaining versioned snapshots, and helping teams understand what changed and identify a known-good recovery point when they need one.
For a Meraki deployment specifically, that means:
- Configuration backup and recovery across template-driven and locally-overridden settings alike.
- Versioned configuration snapshots, not just a log of what changed.
- Historical change context that goes beyond “a change occurred.”
- Known-good recovery points to restore to after an unwanted or unauthorized change.
- Reduced dependence on manually reconstructing a configuration from memory during an incident.
The broader ControlMonkey flow looks like this: Discover → Snapshot → Recover → Review & Govern.
Meraki templates help teams standardize configuration. ControlMonkey helps make that configuration recoverable.
Put another way: traditional backup restores data. ControlMonkey restores the configuration required to operate.

A 30-min meeting will save your team 1000s of hours
A 30-min meeting will save your team 1000s of hours
Author