Join our next Live Demo on July 16th!

Resource Blog News Customers Stories

Updated: Apr 03, 2026 Upd: 03.04.26

6 min read

Simplifying Multi-Cloud IaC: Manage AWS, Azure & GCP

Daniel Alfasi

Daniel Alfasi

Backend Developer and AI Researcher

Simplifying Multi-Cloud IaC: Manage AWS, Azure & GCP

Managing infrastructure across AWS, Azure, and GCP gets messy fast when every team uses different patterns, state layouts, and release processes. Terraform and OpenTofu give you a consistent way to provision resources across clouds, including OpenTofu AWS, OpenTofu Azure, and OpenTofu GCP workflows through providers.


The hard part is operating that IaC at scale: preventing drift, enforcing standards, and keeping deployments safe across dozens of accounts and subscriptions.

ControlMonkey adds governance, visibility, and automated guardrails on top of Terraform/OpenTofu so multi-cloud doesn’t become multi-chaos.

Why is multi-cloud challenging?
Why is multi-cloud challenging

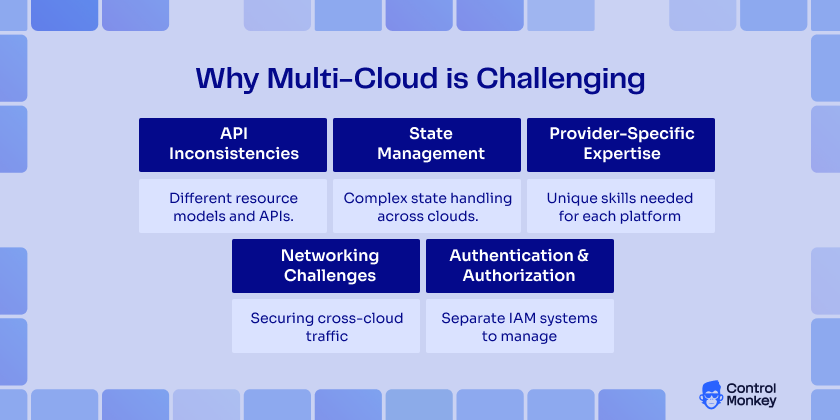
Managing multi-cloud infrastructure has its complexities. Some of it include:

  1. API Inconsistencies: Each cloud provider has unique resource models, naming conventions, and capabilities. AWS’s EC2 instances, Azure’s Virtual Machines, and GCP’s Compute Engines serve similar purposes but have different configuration parameters, lifecycle management, and integration patterns.
  2. State Management Complexity: When managing stateful infrastructure and a resource utilization path involving multiple cloud providers, the complexity of the environment is increased. For example, dependencies across provider resources, dealing with drift/failure scenarios, and other consistency during updates can present challenges in orchestration.
  3. Provider-Specific Expertise: Teams need deep knowledge of each cloud platform’s behaviors, limitations, and best practices. Missing experiences within the provider stack can result in security misconfigurations, over-provisioning cloud resources, or inconsistent architectural patterns.
  4. Networking Challenges: Establishing secure, performant connections between resources across different cloud providers requires an understanding of each platform’s networking model, VPN capabilities, and peering options.
  5. Authentication and Authorization: Each cloud provider has distinct identity and access management systems, requiring separate credential management, role definitions, and security policies.

How OpenTofu and Terraform Supports AWS, Azure, and GCP – Provider abstraction and compatibility

OpenTofu and Terraform architecture provides excellent multi-cloud support through its provider system. Each cloud platform is supported by dedicated providers that abstract the underlying APIs while maintaining full feature compatibility.

AWS Provider Configuration:

terraform {
  required_providers {
    aws = {
      source  = "hashicorp/aws"
      version = "~> 5.0"
    }
  }
}

provider "aws" {
  region = var.aws_region
  
  default_tags {
    tags = {
      Environment = var.environment
      Project     = var.project_name
      ManagedBy   = "ControlMonkey"
    }
  }
}

# AWS resources
resource "aws_vpc" "controlmonkey-vpc" {
  cidr_block           = "10.0.0.0/16"
  enable_dns_hostnames = true
  enable_dns_support   = true
}
Azure Provider Configuration :
terraform {
  required_providers {
    azurerm = {
      source  = "hashicorp/azurerm"
      version = "~> 3.0"
    }
  }
}

provider "azurerm" {
  features {
    resource_group {
      prevent_deletion_if_contains_resources = false
    }
  }
}

# Azure resources
resource "azurerm_resource_group" "control-monkey-rg" {
  name     = "${var.project_name}-rg"
  location = var.azure_location

  tags = {
    Environment = var.environment
    Project     = var.project_name
    ManagedBy   = "ControlMonkey"
  }
}
Google Cloud Provider Configuration :
terraform {
  required_providers {
    google = {
      source  = "hashicorp/google"
      version = "~> 5.0"
    }
  }
}

provider "google" {
  project = var.gcp_project_id
  region  = var.gcp_region
}

# GCP resources
resource "google_compute_network" "control-monkey-network" {
  name                    = "${var.project_name}-network"
  auto_create_subnetworks = false
  labels = {
    environment = var.environment
    project     = var.project_name
    managed_by  = "ControlMonkey"
  }
}

Best Practices for Multi-Cloud Projects – Organizing your codebase
Best Practices for Multi-Cloud Projects

When you’re working with multi-cloud IaC, organizing your codebase logically and effectively is paramount.

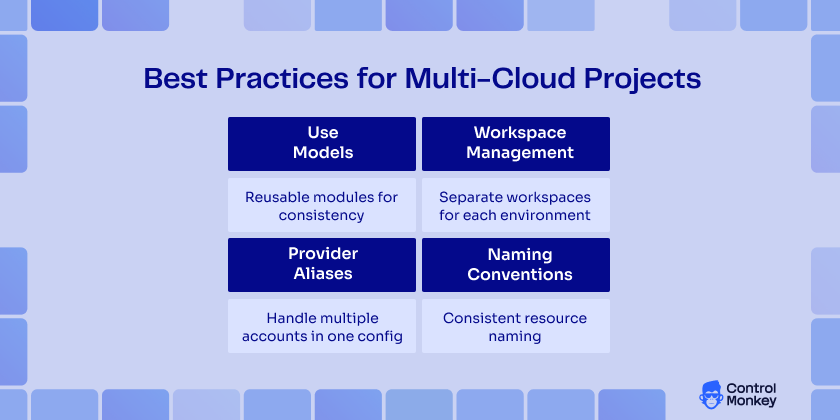
So, here are some best practices for multi-cloud projects:

  • Use Modules: OpenTofu recommends using modules to reuse code. Modular code allows you to share code between different cloud environments very easily. For example, a module to deploy a virtual machine can easily work in AWS, Azure, and GCP with very few changes.
module "vm" {
  source = "./modules/vm"
  cloud_provider = var.cloud_provider
  instance_type = "t2.micro"
}
  • Workspace Management: Use workspaces to manage development, staging, and production environments. This helps separate configurations and states for various environments.
# Use workspaces for environment separation
locals {
  workspace_configs = {
    dev = {
      instance_count = 1
      instance_size  = "small"
    }
    staging = {
      instance_count = 2
      instance_size  = "medium"
    }
    prod = {
      instance_count = 5
      instance_size  = "large"
    }
  }
  config = local.workspace_configs[terraform.workspace]
}
  • Provider Aliases: Employing provider aliases when managing resources on multiple clouds assures that you can easily differentiate between AWS, Azure, and GCP resources in the codebase.
# Configure multiple AWS regions
provider "aws" {
  alias  = "us_east"
  region = "us-east-1"
}

provider "aws" {
  alias  = "eu_west"
  region = "eu-west-1"
}

# Use aliased providers in resources
resource "aws_s3_bucket" "controlmonkey_us_backup" {
  provider = aws.us_east
  bucket   = "${var.project_name}-us-backup"
}

resource "aws_s3_bucket" "controlmonkey_eu_backup" {
  provider = aws.eu_west
  bucket   = "${var.project_name}-eu-backup"
}
  • Naming Conventions: Also, take the time to define consistent naming conventions for resources across cloud providers. This way, you instantly know what a resource is if you need to manage infrastructure in a multi-cloud context.

Real-World Use Cases – Scenarios where multi-cloud IaC is the right fit

Multi-cloud strategies solve specific business challenges that single-cloud approaches cannot address effectively. Here are the key scenarios where multi-cloud becomes essential.

Disaster Recovery and Business Continuity

Organizations adopt multi-cloud to eliminate single points of failure at the provider level.

For example, the financial services and healthcare industries typically run primary workloads on one cloud and keep staging backup infrastructures on another. This method protects from provider-wide outages, regional disasters, and political or geopolitical events that single cloud strategies can’t protect against.

icon

Learn About ControlMonkey DR Solution

Rollback with time machine to the previous state to fix mistakes or in case of disaster

Regulatory Compliance and Data Sovereignty

Global organizations face varying regulatory requirements based on geography and industry. Some companies use Azure for GDPR-regulated data while leveraging AWS for non-regulated workloads. Banking sectors often separate customer data (strict regulations), analytics systems (relaxed requirements), and development environments across different providers based on compliance needs.

Vendor Lock-in Avoidance in multi-cloud IaC

A multi-cloud approach provides negotiable leverage and options. Customers will be in a more favorable position at the time of renewal, with insurance against pricing increases or vendor service discontinuance. This approach often results in better pricing and service levels while reducing dependency on any single vendor’s roadmap.

Performance Optimization

Providers have varying strengths across regions and services. For example, some gaming companies use AWS in North America, Azure in Europe, and Google Cloud in Asia for best overall performance. Likewise, content delivery companies will use the strongest provider in a given region for the lowest latency and best user experience.

Cost Optimization

Organizations exploit pricing variations between providers for significant savings. Batch processing runs on Google Cloud’s preemptible instances, steady-state applications use AWS reserved instances, and storage-intensive workloads leverage Azure’s competitive pricing. This strategic approach can save 20-40% compared to single-cloud deployments.

Best-of-Breed Services

Each provider has developed specific strengths. Data analytics companies use Google Cloud for BigQuery, AWS for application hosting, and Azure for Microsoft integration. This allows organizations to leverage each provider’s innovations without being constrained by single-provider limitations.

3 Multi-Cloud IaC Mistakes that slow down multi-cloud projects

1. State Management Anti-Patterns

  • Pitfall: Using a single state file for all cloud providers
# Single monolithic state file
terraform {
  backend "s3" {
    bucket = "controlmonkey-terraform-state"
    key    = "controlmonkey-infrastructure/all-clouds.tfstate"
    region = "us-east-1"
  }
}
  • Solution: Separate state files by environment and provider
# Separate state files
terraform {
  backend "s3" {
    bucket = "controlmonkey-terraform-state"
    key    = "icontrolmonkey-infrastructure/${var.environment}/aws.tfstate"
    region = "us-east-1"
  }
}

2. Over-Abstraction

  • Pitfall: Creating overly generic modules that obscure provider-specific features

module "generic_compute" {
  source = "./modules/compute"
 
  provider_type = "aws"
  compute_size  = "medium"
}

  • Solution: Provider-specific modules with clear interfaces

module "aws_compute" {
  source = "./modules/aws/compute"
 
  instance_type     = "t3.medium"
  placement_group   = aws_placement_group.cluster.name
  enhanced_networking = true
}

3. Inconsistent Naming Conventions

  • Pitfall: Different naming patterns across providers
# Inconsistent naming
resource "aws_s3_bucket" "control-monkey-s3" {
  bucket = "control-monkey-s3"
}

resource "azurerm_storage_account" "control-monkey_storage_account" {
  name = "control-monkey_storage_account"
}

resource "google_storage_bucket" "gcp-control-monkey-bucket" {
  name = "gcp-control-monkey-bucket"
}
  • Solution: Standardized naming conventions
# Consistent naming pattern
locals {
  naming_convention = "${var.project_name}-${var.environment}-${var.component}"
}

resource "aws_s3_bucket" "control-monkey-s3" {
  bucket = "${local.naming_convention}-aws"
}

resource "azurerm_storage_account" "control-monkey_storage_account" {
  name = replace("${local.naming_convention}-azure")
}

resource "google_storage_bucket" "gcp-control-monkey-bucket" {
  name = "${local.naming_convention}-gcp"
}
icon

Ready to scale multi-cloud IaC without losing control?

See how ControlMonkey helps teams govern Terraform and OpenTofu across AWS, Azure, and GCP from a single dashboard. Request a demo and take control of your multi-cloud infrastructure

Why ControlMonkey helps in Multi-Cloud IaC
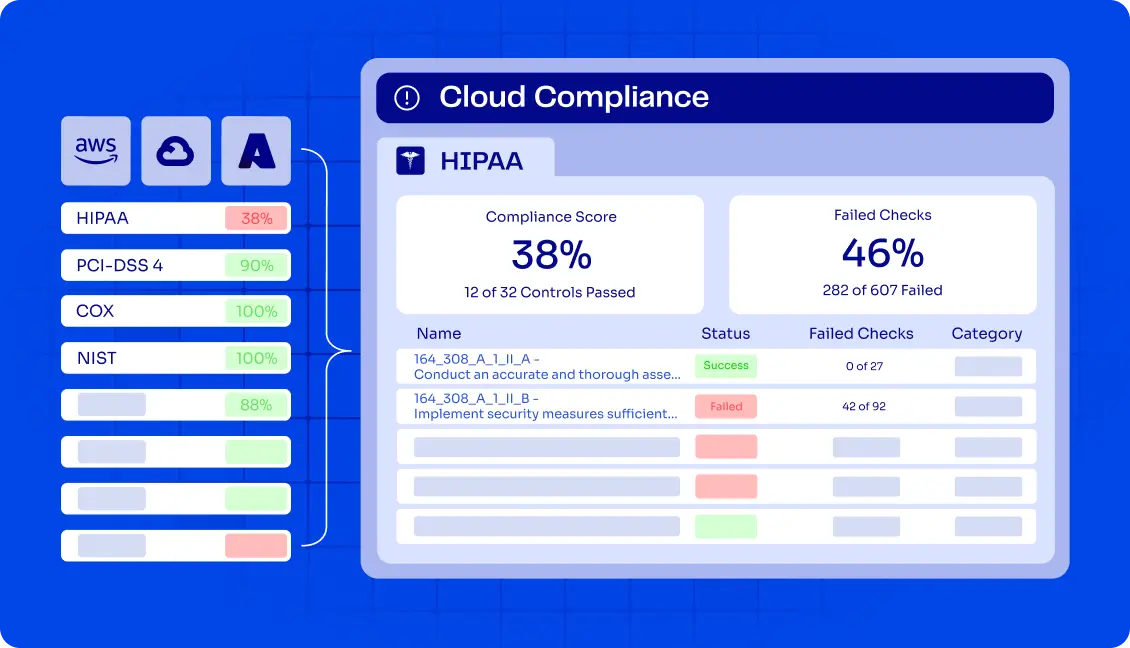
Cloud Compliance Dashboard showing HIPAA compliance score of 38% with failed checks and detailed control breakdown.

Running multi-cloud IaC with Terraform and OpenTofu gets harder as environments grow. What starts as a few shared configs quickly turns into multiple states, inconsistent standards, and limited visibility across AWS, Azure, and GCP. Keeping changes safe without slowing teams down becomes a real challenge.

ControlMonkey sits on top of Terraform and OpenTofu to help teams keep multi-cloud IaC under control. It adds a governance layer that makes deployments easier to track, policies easier to enforce, and changes easier to audit – without forcing teams to change how they write infrastructure code.

Instead of stitching together scripts and manual checks, teams use ControlMonkey to standardize multi-cloud IaC, catch risky changes earlier, and scale across cloud providers with fewer surprises.

icon

Ready to streamline Atlantis plan multiple directories with ControlMonkey’s automation

FAQ’s

OpenTofu uses each provider’s native authentication methods. You can configure credentials through environment variables, credential files, or IAM roles. The best practice is to use cloud-native credential providers like AWS IAM roles, Azure Managed Identity, or GCP Service Accounts.

While it is technically possible to use provider version constraints, it’s recommended to use consistent OpenTofu versions across your infrastructure to avoid compatibility issues and ensure predictable behavior.

Use outputs from one configuration as inputs to another or leverage remote state data sources. Consider using external data sources or custom providers that query cloud resources for complex dependencies.

Use cloud-native secret management services (AWS Secrets Manager, Azure Key Vault, GCP Secret Manager) and reference them in your configurations. Avoid hardcoding secrets in your infrastructure code or state files.

Bottom CTA Custom Background

A 30-min meeting will save your team 1000s of hours

A 30-min meeting will save your team 1000s of hours

Book Intro Call

Author

Daniel Alfasi

Daniel Alfasi

Backend Developer and AI Researcher

Backend Developer at ControlMonkey, passionate about Terraform, Terragrunt, and AI. With a strong computer science background and Dean’s List recognition, Daniel is driven to build smarter, automated cloud infrastructure and explore the future of intelligent DevOps systems.

    Sounds Interesting?

    Request a Demo

    Resource Blog News Customers Stories

    Updated: Aug 20, 2025 Upd: 20.08.25

    9 min read

    Self-Service Terraform AWS for DevOps Teams

    Self-Service Terraform AWS for DevOps Teams

    If you’ve worked with AWS, you’ve likely had to provision cloud infrastructure — maybe databases, storage buckets, or compute instances. Many teams start by using the AWS Console for these tasks. But manual provisioning doesn’t scale — especially when managing multiple environments like development, QA, staging, and production. That’s where Self-Service Terraform AWS workflows come in — enabling teams to provision infrastructure autonomously, securely, and at scale.

    That’s where Self-Service Terraform AWS comes in. By integrating Infrastructure as Code (IaC) principles with Terraform’s HCL scripting, teams can create reusable and modular infrastructure that scales reliably across different environments.

    In this guide, we’re going to explore how to set up Self-Service Terraform AWS environments. We’ll also cover how to incorporate Git workflows, CI/CD pipelines, and cost governance into your provisioning strategy.

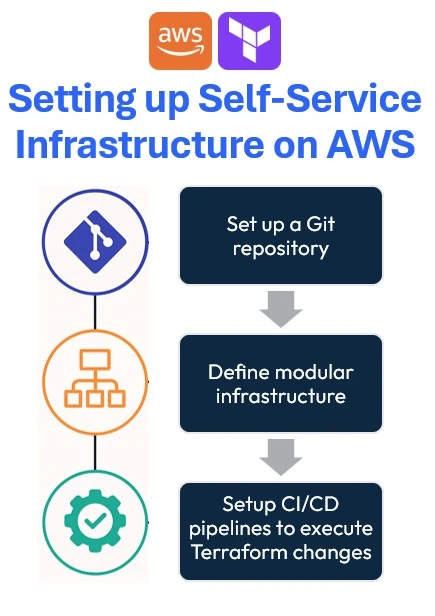
    Setting up Self-Service Infrastructure on AWS

    Setting up Self-Service Terraform AWS infrastructure helps provision resources autonomously, securely, and consistently. These are the steps you would have to follow:

    1. Set up a Git repository
    2. Define modular infrastructure
    3. Setup CI/CD pipelines to execute Terraform changes

    Set up a Git repository

    Start creating a Git repository using services like GitHub, GitLab, or Bitbucket to track and version control Terraform code. This helps teams to manage all changes made to the cloud infrastructure over time.

    Additionally, it automates the provisioning of the infrastructure using CI/CD for Terraform.

    Define modular infrastructure

    It’s important to create the Terraform code for better readability and long-term maintenance. Defining modular infrastructure involves breaking down infrastructure resources into reusable Terraform modules, each encapsulating specific AWS components like VPCs, EC2 instances, or RDS databases.

    By using Terraform modules, teams can abstract complex configurations to easily deploy consistently across multiple environments (development, staging, production).

    Setup CI/CD pipelines to execute Terraform changes

    Creating a pipeline to execute Terraform changes involves automating infrastructure deployments. You can either build (and maintain) pipelines on your ownusing CI/CD tools such as GitHub Actions, and AWS CodePipeline or you can use a dedicated tool for that.
    We believe that software-dedicated pipelines are not good enough for infrastructure.

    These pipelines automate the complete Terraform lifecycle:

    1. Initialization
    2. Validation
    3. Planning
    4. Applying configurations automatically upon each code commit.

    For large-scale cloud environments, set up an AWS Terraform infrastructure governance tool integrated into your pipeline for continuous infrastructure drift detection and validation.

    This ensures infrastructure changes are thoroughly tested and reviewed before deployment, preventing errors or configuration drift.

    Implementing Self-Service Terraform AWS Environments

    Start by creating an IAM User and a Secret access key with the necessary permission to provision your infrastructure in AWS. After that, proceed with the next section.

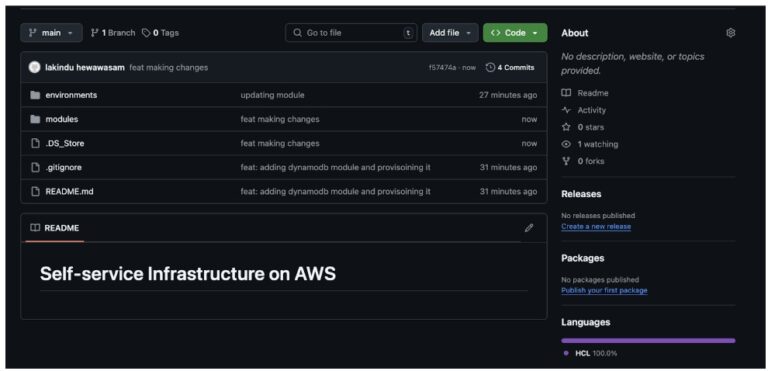
    Step 01: Initialize Terraform AWS Boilerplate for Self-Service

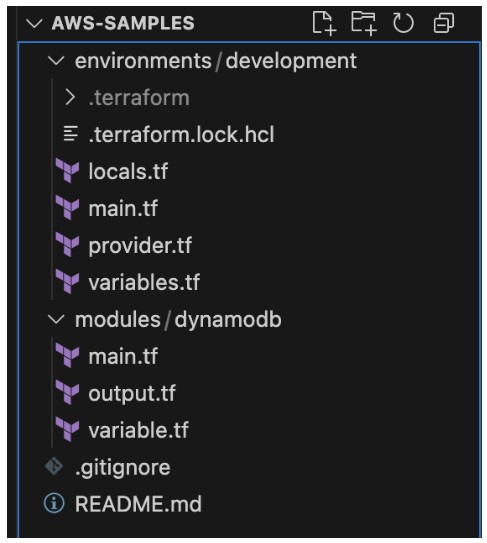
    In this article, let’s create one module infrastructure component – DynamoDB, and maintain one environment – Development. To do so, create the folder structure showcased below:

    The project structure enforces self-service:

    1. environments/ keeps each deployment (dev, staging, prod) isolated—so you don’t accidentally apply prod changes to dev.
    2. modules/ houses composable building blocks you can reuse (e.g. your DynamoDB module) across environments.
    3. A clean root with .gitignore & README.md helps onboard new team members.

    Step 02: Defining self-service infrastructure

    You can define the providers for your infrastructure. In this case, you’ll need to configure the AWS provider with S3 backed state:

    terraform {
     required_providers {
       aws = {
        source = "hashicorp/aws"
        version = "~> 4.16"
       }
     }
     backend "s3" {
       bucket = "lakindus-terraform-state-storage"
       key = "development/terraform.tfstate"
       region = "us-east-1"
     }
     required_version = ">= 1.2.0"
    }
    
    provider "aws" {
     region = "us-east-1"
    }

    Note: Ensure that the S3 bucket that you are using to manage your Terraform State is already created.

    Next, you’ll need to define your tags that can help better track your infrastructure. Part of building a self-service infrastructure is to keep reusability and maintainability high. To do so, you can define your tags as a local variable scoped to your particular development environment, like so:

    locals {
     tags = {
       ManagedBy = "Terraform"
       Environment = "Development"
     }
    }

    Next, you can specify these tags by referencing locals.tags onto any resource you wish to tag.

    Afterwards, you can start defining the module for DynamoDB. You’ll see three files:

    1. main.tf: This holds the resource declaration
    2. output.tf: This holds any output that will be generated from the resource
    3. variable.tf: This defines all inputs required to configure the resource.

    For instance, to provision a DynamoDB table, you’ll need:

    1. Table name
    2. Tags
    3. Hash key
    4. Range key
    5. GSIs
    6. LSIs
    7. Billing Mode
    8. Provisioned capacity – if billing mode is PROVISIONED

    To accept these values, you can define the variables for the module:

    variable "table_name" {
     description = "The name of the DynamoDB table"
     type = string
    }
    
    variable "hash_key" {
     description = "The name of the hash key"
     type = string
    }
    
    variable "hash_key_type" {
     description = "The type of the hash key: S | N | B"
     type = string
     default = "S"
    }
    
    variable "range_key" {
     description = "The name of the range key (optional)"
     type = string
     default = ""
    }
    
    variable "range_key_type" {
     description = "The type of the range key: S | N | B"
     type = string
     default = "S"
    }
    
    variable "billing_mode" {
     description = "Billing mode: PROVISIONED or PAY_PER_REQUEST"
     type = string
     default = "PROVISIONED"
    }
    
    variable "read_capacity" {
     description = "Read capacity units (for PROVISIONED mode)"
     type = number
     default = 5
    }
    
    variable "write_capacity" {
     description = "Write capacity units (for PROVISIONED mode)"
     type = number
     default = 5
    }
    
    variable "global_secondary_indexes" {
     description = "List of global secondary index definitions"
     type = list(object({
     name = string
     hash_key = string
     range_key = optional(string)
     projection_type = string
     non_key_attributes = optional(list(string))
     read_capacity = optional(number)
     write_capacity = optional(number)
     }))
     default = []
    }
    
    variable "tags" {
     description = "Tags to apply to the DynamoDB table"
     type = map(string)
     default = {}
    }
    Next, you can define the module:
    resource "aws_dynamodb_table" "this" {
     name = var.table_name
     billing_mode = var.billing_mode
     hash_key = var.hash_key
     range_key = var.range_key == "" ? null : var.range_key
    
     attribute {
     name = var.hash_key
     type = var.hash_key_type
     }
    
     dynamic "attribute" {
       for_each = var.range_key == "" ? [] : [var.range_key]
       content {
        name = range_key.value
        type = var.range_key_type
       }
     }
    
     dynamic "global_secondary_index" {
      for_each = var.global_secondary_indexes
      content {
       name = global_secondary_index.value.name
       hash_key = global_secondary_index.value.hash_key
       range_key = lookup(global_secondary_index.value, "range_key", null)
       projection_type = global_secondary_index.value.projection_type
       non_key_attributes = [global_secondary_index.value.non_key_attributes]
       read_capacity = lookup(global_secondary_index.value, "read_capacity", var.read_capacity)
       write_capacity = lookup(global_secondary_index.value, "write_capacity", var.write_capacity)
      }
     }
    
     read_capacity = var.billing_mode == "PAY_PER_REQUEST" ? null : var.read_capacity
     write_capacity = var.billing_mode == "PAY_PER_REQUEST" ? null : var.write_capacity
    
     tags = var.tags
    }

    Next, you can define the module:

    resource "aws_dynamodb_table" "this" {
     name = var.table_name
     billing_mode = var.billing_mode
     hash_key = var.hash_key
     range_key = var.range_key == "" ? null : var.range_key
    
     attribute {
     name = var.hash_key
     type = var.hash_key_type
     }
    
     dynamic "attribute" {
       for_each = var.range_key == "" ? [] : [var.range_key]
       content {
        name = range_key.value
        type = var.range_key_type
       }
     }
    
     dynamic "global_secondary_index" {
      for_each = var.global_secondary_indexes
      content {
       name = global_secondary_index.value.name
       hash_key = global_secondary_index.value.hash_key
       range_key = lookup(global_secondary_index.value, "range_key", null)
       projection_type = global_secondary_index.value.projection_type
       non_key_attributes = [global_secondary_index.value.non_key_attributes]
       read_capacity = lookup(global_secondary_index.value, "read_capacity", var.read_capacity)
       write_capacity = lookup(global_secondary_index.value, "write_capacity", var.write_capacity)
      }
     }
    
     read_capacity = var.billing_mode == "PAY_PER_REQUEST" ? null : var.read_capacity
     write_capacity = var.billing_mode == "PAY_PER_REQUEST" ? null : var.write_capacity
    
     tags = var.tags
    }

    As shown above, you now have a blueprint for a DynamoDB table that anyone can use to create a table. By doing so, you enforce consistency in your project. Different developers can provision a table using this module and guarantee the same configurations to be applied.

    Finally, you can define your outputs:

    utput "table_name" {
     description = "The name of the DynamoDB table"
     value = aws_dynamodb_table.this.name
    }
    
    output "table_arn" {
     description = "The ARN of the DynamoDB table"
     value = aws_dynamodb_table.this.arn
    }
    
    output "hash_key" {
     description = "The hash key name"
     value = aws_dynamodb_table.this.hash_key
    }
    
    output "range_key" {
     description = "The range key name"
     value = try(aws_dynamodb_table.this.range_key, "")
    }

    This helps you access values that will be made available only upon resource creation.

    Finally, you can provision the resource by configuring the module in your main.tf :

    module "db" {
     source = "../../modules/dynamodb"
     table_name = "sample-table"
     billing_mode = "PAY_PER_REQUEST"
     hash_key = "id"
     hash_key_type = "S"
     tags = local.tags
    }

    As shown above, it’s extremely simple to create a table using the module. You don’t need to define the resource and all the properties every single time. All you need to do is fill in the input variables defined in your module.

    Final Step: CI/CD for Self-Service Terraform AWS Deployments

    Once you’re ready to provision the infrastructure, you can push changes to your repository:

    Next, you will need to create the following:

    1. GitHub Actions Workflow to deploy your changes using CI/CD
    2. IAM Service Role that authenticates via OIDC to help the GitHub Runner communicate with AWS.

    Note: To learn about creating an OIDC Role with AWS, check this out.

    Once you’ve created an IAM Role that can be assumed using OIDC, you can create the following GitHub Workflow:

    name: Terraform Deployment with AWS OIDC

    name: Terraform Deployment with AWS OIDC
    
    on:
      push:
        branches:
          - main
      pull_request:
    
    permissions:
      id-token: write # Needed for OIDC token
      contents: read # To checkout code
    
    jobs:
      terraform:
        name: Terraform OIDC Deploy
        runs-on: ubuntu-latest
    
        env:
          AWS_REGION: us-east-1
    
        steps:
          - name: Checkout Repository
            uses: actions/checkout@v4
    
          - name: Configure AWS Credentials via OIDC
            uses: aws-actions/configure-aws-credentials@v4
            with:
              role-to-assume: ${{ secrets.AWS_ROLE_ARN }}
              aws-region: ${{ env.AWS_REGION }}
    
          - name: Change Directory to Environment
            run: cd environments/development
    
          - name: Setup Terraform
            uses: hashicorp/setup-terraform@v3
            with:
              terraform_version: "1.7.4"
    
          - name: Terraform Init
            run: terraform init
            working-directory: environments/development
    
          - name: Terraform Plan
            run: terraform plan -out=tfplan
            working-directory: environments/development
    
          - name: Terraform Apply
            if: github.ref == 'refs/heads/main'
            run: terraform apply -auto-approve tfplan
            working-directory: environments/development

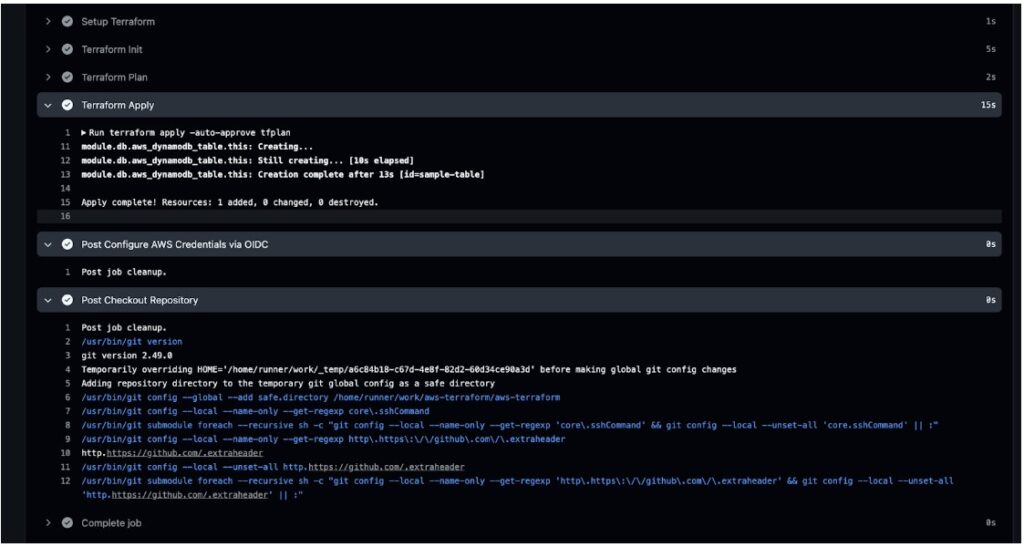
    With this workflow, the GitHub actions workflow will:

    1. Assume the IAM role using OIDC
    2. Perform a Terraform plan and auto apply the changes.

    After you run it, you should see the status in the GitHub actions workflow:

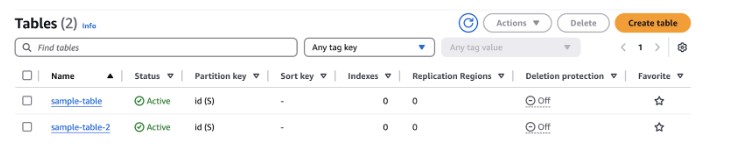
    Next, you can view your resource in the AWS Console:

    And that’s all you need. Next, all your pushes to the repository will trigger plans that will be applied automatically.

    Pricing & cost management

    After you start managing infrastructure with Self-Service Terraform AWS, it’s important to understand the techniques to adopt to efficiently manage costs:

    1. Enforce Consistent Tagging for Cost Allocation

    Tag every resource with a common set of metadata so AWS Cost Explorer and your billing reports can slice & dice by team, project or environment.

    # variables.tf
    variable "common_tags" {
      type = map(string)
      default = {
        Project     = "my-app"
        Environment = "dev"
        Owner       = "team-backend"
      }
    }
    
    # main.tf (example)
    resource "aws_dynamodb_table" "users" {
      # … table settings …
    
      tags = merge(
        var.common_tags,
        { Name = "users-table" }
      )
    }

    Benefits:

    1. Chargeback/showback by team or cost center
    2. Easily filter unused or mis-tagged resources

    2. Shift-Left Cost Estimation with Infracost

    Catch cost surprises during code review by integrating an open-source estimator like Infracost.

    Install & configure infracost

    brew install infracost
    infracost setup –aws-project=your-aws-credentials-file

    Generate a cost report

    infracost breakdown --path=./environments/dev \ --format=json --out-file=infracost.json

    Embed in CI (e.g. GitHub Actions) to comment on pull requests with line-item delta.

    That way every Terraform change shows you “this will add ~$45/month.” This helps teams take a more proactive approach to cost management.

    3. Automate Cleanup of Ephemeral Resources

    This is critical for Self-Service Terraform AWS pipelines where dev environments are short-lived it Prevent “zombie” resources from quietly racking up bills. To do so, you can:

    1. Leverage Terraform workspaces or separate state buckets for short-lived environments.
    2. Use CI/CD triggered destroys for feature branches. This helps remove unnecessary costs that could incur for infrastructure created for feature branches.
    3. TTL tags + Lambda sweeper: tag dev stacks with a DeleteAfter=2025-05-12T00:00:00Z and run a daily Lambda that calls AWS APIs (or Terraform) to tear down expired resources.
    4. Drift & Orphan Detection: Regularly run terraform plan in a scheduler to detect resources that exist in AWS but not in state, then review and remove them.

    4. Tie into AWS Cost Controls

    Even with perfect tagging and cleanup, you need guardrails:

    1. AWS Budgets & Alerts: Create monthly budgets per tag group (e.g. Project=my-app) with email or SNS notifications.
    2. Cost Anomaly Detection: Enable AWS Cost Anomaly Detection to catch sudden spikes.

    Securing Self-Service Terraform AWS Projects

    In addition to cost management, you’d need to consider best practices for securely managing your infrastructure with Terraform. To do so, you can leverage the following:

    1. Enforce Least-Privilege IAM

    Always provision IAM roles using principles of least privilege. This means that you should only define access control policies for actions that a user will perform.

    Additionally, consider using IAM Assume Role rather than access keys as the tokens are not long-lived. By doing so, any leaks in credentials will not result in a large-scale attack as the credentials will expire quickly.

    2. Secure & Version Terraform State

    Consider managing your state in DynamoDB consistency control with encryption in rest and in transit using KMS Keys. By doing so, you ensure security in your Terraform state.

    Concluding Thoughts

    Building Self-Service Terraform AWS environments is a powerful way to scale cloud provisioning while keeping control in the hands of your developers. With the right modular approach, CI/CD pipelines, and cost visibility, you can eliminate bottlenecks and reduce operational overhead.

    Want to take it further?

    ControlMonkey brings intelligence and automation to every step of your Self-Service Terraform AWS lifecycle. From AI-generated IaC modules to drift detection and policy enforcement, we help you govern infrastructure without slowing down innovation.

    👉 Book a Self-Service Terraform AWS demo to see how ControlMonkey simplifies Terraform at scale.

    Bottom CTA Custom Background

    A 30-min meeting will save your team 1000s of hours

    A 30-min meeting will save your team 1000s of hours

    Book Intro Call

      Sounds Interesting?

      Request a Demo

      FAQs

      Self-Service Terraform on AWS enables developers and DevOps teams to provision infrastructure—like VPCs, databases, or compute—without waiting on central platform teams. By using Terraform modules, version-controlled Git repositories, and CI/CD pipelines, organizations can scale infrastructure provisioning securely and consistently across environments.

      To secure Self-Service Terraform AWS environments, use IAM Assume Roles instead of long-lived access keys, enforce least-privilege permissions, and store state securely in S3 with encryption and DynamoDB state locking. You should also integrate drift detection and apply guardrails via CI/CD pipelines for safer deployments.

      Yes. ControlMonkey automates every step of the Self-Service Terraform AWS lifecycle – from generating reusable Terraform modules to enforcing policies, detecting drift, and integrating with your CI/CD workflows. It’s designed to give DevOps teams autonomy without sacrificing governance, visibility, or security.

      Resource Blog News Customers Stories

      Updated: Aug 19, 2025 Upd: 19.08.25

      1 min read

      Cheat Sheet: Optimize AWS Costs with Terraform

      Cheat Sheet: Optimize AWS Costs with Terraform

      What You Need to Know about cost Optimization with Terraform and AWS Provider

      Bottom CTA Custom Background

      A 30-min meeting will save your team 1000s of hours

      A 30-min meeting will save your team 1000s of hours

      Book Intro Call

        Sounds Interesting?

        Request a Demo

        Resource Blog News Customers Stories

        Updated: Aug 24, 2025 Upd: 24.08.25

        5 min read

        Terraform AWS Automation: Scalable Best Practices

        Terraform AWS Automation: Scalable Best Practices

        Terraform has become essential for automating and managing AWS infrastructure. It is a tool called Infrastructure as Code (IaC). It helps DevOps teams manage and set up AWS assets in a cost-effective way.

        Terraform AWS provider is designed to interact with AWS, allowing teams to use code to provision AWS resources such as EC2 instances, S3 buckets, RDS databases, and IAM roles. This eliminates the possibility of human misconfigurations and makes the infrastructure scalable and predictable.

        Terraform’s use of code to manage infrastructure has many benefits, including easy version control, collaboration, and continuous integration and delivery (CI/CD).

        Using Terraform on AWS accelerates resource deployment and simplifies complex cloud configurations to be easier to manage. You can advance your cloud automation projects by applying best practices in your workflow.

        New to Terraform on AWS?

        👉Beginner’s Guide to the Terraform AWS Provider

        👉3 Benefits of Terraform with AWS

        Best Practices for Terraform on AWS

        1. Managing AWS Resources through Terraform Automation

        Managing AWS resources with Terraform is efficient. However, it is important to provision them well for cost and performance efficiency.

        Below are some of the best practices for optimizing resource provisioning.

        • Use Instance Types Based on Demand: You are running the correct size of instances in AWS that match your expected workloads. For example, Auto-scaling groups ensure the right number of EC2 instances based on the load.
        • Tagging AWS Resources: Tag your AWS resources to manage them efficiently. Tags assist you in tracking costs, grouping resources, and automating management.

        Terraform Example: Tagging an EC2 Instance:

        resource "aws_instance" "control-monkey_instance" {
          ami           = "ami-0e449927258d45bc4"
          instance_type = "t2.micro"
          tags = {
            Name        = "control-monkey_instance EC2 Instance"
            Environment = "Production"
          }
        }
        • Use Spot Instances for Cost-Efficient AWS Deployment:. Utilize Spot Instances to handle flexible and non-critical workloads. These are usually cheaper than on-demand instances and can be readily allocated through Terraform.

        2. Handling State Files and Remote Backends

        Terraform employs a state file (terraform.tfstate) to store and track the state of the infrastructure resources. This file should be handled carefully, especially in multi-team environments.

        • Remote Backends Use: Storing state files locally can lead to collaboration issues. You can use a remote storage service like Amazon S3 to store state files. DynamoDB can help with state locking and keeping things consistent.

        Example Terraform Configuration of Remote Backend with S3 and DynamoDB:

        terraform {
          backend "s3" {
            bucket         = "control-monkey-terraform-state-bucket"
            key            = "state/terraform.tfstate"
            region         = "us-east-1"
            encrypt        = true
            dynamodb_table = "terraform-lock-table"
          }
        }
        • State Locking: Enable state locking to prevent concurrent operations with the risk of corrupting the state file. Use DynamoDB with the s3 backend to accomplish that.

        3. Modularizing Terraform Code for AWS

        Breaking up Terraform code into modules is a best practice for deploying on AWS. This is especially helpful for large and complex environments.

        Organizing your Terraform code as reusable modules simplifies management, reduces duplicates, and improves collaboration.

        • Create Reusable Modules: Each Terraform module should be a single AWS resource or a group of related resources. This reduces the effort of maintaining and updating the code in the long run.

        Example Module for EC2 Instance (file: ec2_instance.tf)

        variable "instance_type" {
          default = "t2.micro"
        }
        
        resource "aws_instance" "control-monkey_instance" {
          ami           = "ami-0e449927258d45bc4"
          instance_type = var.instance_type
        }
        Main Configuration File (file: main.tf):
        module "ec2_instance" {
          source        = "./modules/ec2_instance"
          instance_type = "t2.medium"
        }
        • Use Input Variables and Outputs: Input variables let you reuse modules. Outputs give you important information, like instance IDs or IP addresses. You can use this information in other parts of your infrastructure.

        4. Automating Terraform Workflows in AWS Environments

        Setting Up CI/CD Integrating Terraform with your CI/CD pipeline allows you to automate infrastructure provisioning and management. By utilizing Terraform with AWS in your pipeline, you can streamline the speed and consistency of deployments.

        • CI/CD for Infrastructure as Code:
          • Use Jenkins, GitLab CI, or AWS CodePipeline. These tools will automatically run Terraform updates when configuration files change. This ensures that the infrastructure is always and securely updated.
        • Automate Terraform Validation:
          • Add terraform validation to your CI pipeline. This will check your configuration files before you apply them to AWS.

        terraform validate

        5. Troubleshooting Terraform AWS Automation

        Terraform deployments fail due to issues such as wrong configurations, AWS limits on the services, or provider-related problems. Below are some of the problems and what you can do to troubleshoot them.

        • Authentication Issues:
          • Ensure that your AWS credentials are set up correctly, either through the AWS_ACCESS_KEY_ID and AWS_SECRET_ACCESS_KEY environment variables or through an AWS profile in ~/.aws/credentials. If you’re utilizing AWS IAM roles, ensure the role has the correct access permissions.
        • Resource Conflicts:
          • Search for existing similar-named resources or conflicting configurations.
          • If Terraform cannot create the resource because another one already exists, use the Terraform state rm command. This will remove the current resource from the Terraform state file. You can then reapply it later.
        • Service limits: AWS has limits on certain services (such as EC2 instances and S3 buckets). Terraform will fail if you hit a limit. Visit the AWS Service Limits page and request a limit increase from AWS support if needed.
        • Debugging Terraform logs: 
          • If Terraform does not provide enough details to fix the problem, enable debugging. Set TF_LOG to DEBUG
        export TF_LOG=DEBUG
        terraform apply

        Final Thoughts on Automating with Terraform

        Using the Terraform in AWS and cloud automation makes infrastructure management more effortless. Organizations can build reliable and scalable cloud deployments by following best practices. These include managing state files with remote backends, using modular Terraform code, and implementing Terraform with CI/CD pipelines. You can find and fix deployment issues by checking Terraform logs and reviewing configurations. This will help improve the reliability of your cloud infrastructure.

        If you’re looking for automated policy enforcements and Terraform scanning integration, consider adopting ControlMonkey. It can bring your AWS assets into compliance with the latest security and operational best practices.

        Additionally, by reducing the need for human intervention and policy enforcement automation, ControlMonkey optimizes cloud automation to be faster, more trustworthy, and easier to manage with the confidence that your Terraform-based deployments are compliant and secure.

        Bottom CTA Custom Background

        A 30-min meeting will save your team 1000s of hours

        A 30-min meeting will save your team 1000s of hours

        Book Intro Call

          Sounds Interesting?

          Request a Demo

          FAQs: Terraform Automation in AWS

          Terraform AWS Automation uses code to automatically deploy, manage, and scale AWS infrastructure for faster, consistent, and secure cloud operations.

          To successfully manage AWS resources using Terraform, keep these best practices in mind:

          • Use modules to break down complex configurations into reusable and manageable.
          • Tag your resources for better organization and cost tracking.
          • Optimize instance sizes and use auto-scaling to adjust resources based on demand.
          • Leverage remote backends like AWS S3 for state management, ensuring team collaboration and consistency.

          Use Terraform variables to parameterize configurations and make your code more flexible.

          Terraform state configuration is crucial to achieve consistency in infrastructure. Using remote backends like AWS S3 for state files and DynamoDB for locking state is recommended for AWS deployments. This setup will safely store your state files in an accessible repository and facilitate collaboration.

          Example remote backend configuration:


          terraform {
            backend "s3" {
             bucket = "control-monkey-terraform-state-bucket"
             key = "state/terraform.tfstate"
             region = "us-east-1"
             encrypt = true
             dynamodb_table = "terraform-lock-table"
            }
          }
          

          Modularizing your Terraform code is an effective way to organize resources and improve code reusability. Creating modules for common AWS resources, like EC2 instances, VPCs, and S3 buckets, helps you organize your work. This makes the code easier to manage and allows you to reuse settings in different environments.

          Example module for creating an EC2 instance:

          # ec2_instance.tf
          variable "instance_type" {
            default = "t2.micro"
          }
          resource "aws_instance" "control-monkey_instance" {
            ami = "ami-0e449927258d45bc4"
            instance_type = var.instance_type
          }
          In the main configuration file:
          module "ec2_instance" {
            source = "./modules/ec2_instance"
            instance_type = "t2.medium"
          }
          
          • Authentication Errors: Ensure your AWS credentials are correctly set up in the environment variables or through AWS CLI profiles.
          • Resource Conflicts: Check for conflicting resources (e.g., names) in AWS or the Terraform state file. If necessary, use terraform state rm to remove resources from the state.
          • IAM Permission Issues: Terraform requires the appropriate permissions to provision resources. Ensure that the IAM user or role has sufficient permission to perform the actions Terraform attempts to execute.
          • Service Limits: If you hit AWS service limits (e.g., max number of EC2 instances), you may need to request a limit increase through AWS support.

          Resource Blog News Customers Stories

          Updated: Jan 20, 2026 Upd: 20.01.26

          5 min read

          AWS Atlantis at Scale: How to Streamline Terraform Workflows

          AWS Atlantis at Scale: How to Streamline Terraform Workflows

          As cloud infrastructure becomes increasingly complex, many DevOps teams use AWS with Atlantis to automate Terraform workflows. This open-source tool links Git pull requests to Terraform operations. It helps teams improve Infrastructure as Code practices across different environments. It also helps maintain governance on a large scale.

          Terraform is widely adopted for provisioning AWS infrastructure—but as environments grow, teams encounter new layers of complexity:

          • Multiple DevOps teams making concurrent changes
          • Hundreds of thousands of resources across accounts
          • Complex dependencies between modules and services
          • Security, IAM, and compliance constraints
          • Need for consistent, auditable deployments at scale

          Many teams start with Atlantis—but as infrastructure scales, so do the limitations. This post is your deep-dive guide to scaling Terraform on AWS with Atlantis—and making it work in high-scale, multi-team environments.

          👉 Want to explore alternative tools beyond Atlantis? Read our comparison blog

          What is Atlantis?

          Atlantis is an open-source tool that automates the Terraform workflow using pull requests. It bridges your version control system (GitHub, GitLab, or Bitbucket) and Terraform execution and enables collaborative infrastructure development.

          How Atlantis Works with Terraform

          Atlantis listens for webhook events in your repository hosting service. When a pull request modifies Terraform configuration files, Atlantis automatically:

          1. Runs terraform plan on the changed files
          2. Post a comment directly on the pull request
          3. Provides a mechanism to deliver changes by commenting
          4. Lock workspaces to prevent multiple concurrent changes

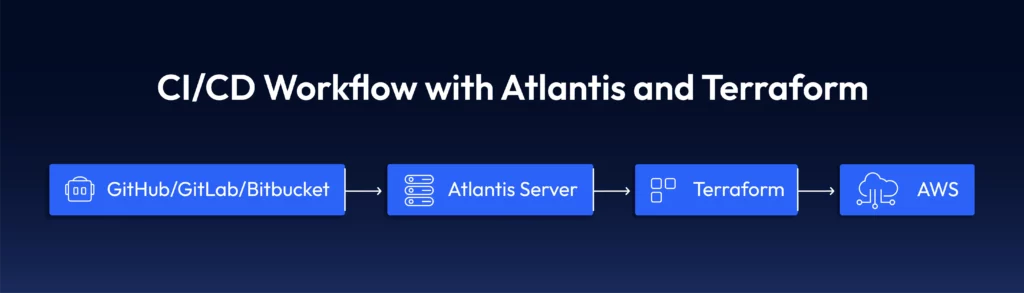
          Here’s a typical diagram of where Atlantis fits within your workflow:

          Key Features of Atlantis:

          • Pull Request-based Workflow: Atlantis syncs your Git repository and automatically triggers Terraform runs on open or updated pull requests.
          • Approval Process: Atlantis integrates support for approval workflow so that teams may audit Terraform plans before deployment to guarantee that modifications are compliant and secure.
          • Multi-Tenant Support: It enables multiple Terraform configurations for different environments so that multiple teams are unaffected by each other.
          • State Locking: Terraform handles state locking internally to prevent concurrent runs from overriding each other.

          To see how Atlantis compares to other Terraform automation tools, check out our in-depth Atlantis alternatives guide.

          5 Best Practices for Scaling Terraform with AWS Atlantis

          Before diving into Terraform scaling on AWS with Atlantis, you need to understand some basics about the tool. Here are five key points about Atlantis to help you start scaling your Terraform workflow:

          1. Use Terraform Workspaces for Multi-Environment

          When dealing with large AWS infrastructures, you must split your Infrastructure into multiple environments (e.g., dev, staging, production). Terraform workspaces fit well in Atlantis. You can have multiple state files for different environments. This allows you to keep one large codebase.

          Example of Workspace Configuration:

          terraform workspace new dev
          terraform workspace select dev
          terraform apply -var="environment=dev"

          2. Custom Workflows for Complex Pipelines

          Atlantis’s default workflow (plan → apply) works for simple cases, but complex Infrastructure often requires custom steps:

          Custom workflow definition in atlantis.yaml:

          workflows:
            custom:
              plan:
                steps:
                - run: terraform init -input=false
                - run: terraform validate
                - run: terraform plan -input=false -out=$PLANFILE
                - run: aws s3 cp $PLANFILE s3://terraform-audit-bucket/plans/$WORKSPACE-$PULL_NUM.tfplan
              apply:
                steps:
                - run: terraform apply -input=false $PLANFILE
                - run: ./notify-slack.sh "Applied changes to $WORKSPACE by $USER"

          3. Handling State Files Securely

          Scaling and managing Terraform state becomes critical and Atlantis works best with remote state storage:

          terraform {

          terraform {
            backend "s3" {
              bucket         = "terraform-state-${var.environment}"
              key            = "network/terraform.tfstate"
              region         = "us-east-1"
              dynamodb_table = "terraform-locks"
              encrypt        = true
            }
          }

          4. Security and Access Control for Atlantis

          Atlantis also facilitates using SSH and IAM roles to secure AWS communications. Atlantis also allows you to lock down who will approve and execute Terraform plans as a security and accountability mechanism. You also can establish AWS IAM roles in Atlantis to communicate with AWS resources securely.

          resource "aws_iam_role" "atlantis" {
            name = "atlantis-execution-role"
            
            assume_role_policy = jsonencode({
              Version = "2012-10-17"
              Statement = [{
                Action = "sts:AssumeRole"
                Effect = "Allow"
                Principal = {
                  Service = "ec2.amazonaws.com"
                }
              }]
            })
          }
          
          resource "aws_iam_role_policy_attachment" "atlantis_policy" {
            role       = aws_iam_role.atlantis.name
            policy_arn = "arn:aws:iam::aws:policy/PowerUserAccess"
          }

          Assuming Different Roles for Different Environments

          #In your provider configuration
          provider "aws" {
            region = "us-west-2"
            
            assume_role {
              role_arn = "arn:aws:iam::${var.account_id}:role/TerraformExecutionRole"
            }
          }

          5. Automating Terraform Plans and Applies

          Using Atlantis after you set up Atlantis on your Git repository, the Terraform plan runs automatically. This happens for all updated or opened PRs. Atlantis also has a provision to apply Terraform changes directly once the PR has been approved. This removes the necessity for Terraform to run within the CI/CD pipeline.

          AWS Atlantis Challenges When Scaling Terraform

          1. Slow Plan and Apply Times

          When the Infrastructure grows, Terraform operations begin to slow. Large infrastructures have 5-10-min or longer plans that act as bottlenecks.

          Solution: Use Workspace Splitting

          Divide monolithic designs into separate, focused work areas:

          atlantis.yaml with parallel execution:

          version: 3
          parallel_plan: true
          parallel_apply: true
          projects:
          - name: networking
            dir: networking
          - name: databases
            dir: databases
          - name: compute
            dir: compute

          2: Managing Permissions Across Multiple AWS Accounts

          In the case of multiple AWS accounts, managing permissions becomes complex.

          Solution: Use Cross-Account Role Assumption

          Create roles in each account that Atlantis can assume

          resource "aws_iam_role" "terraform_execution_role" {
            name = "terraform-execution-role"
            
            assume_role_policy = jsonencode({
              Version = "2012-10-17"
              Statement = [{
                Action = "sts:AssumeRole"
                Effect = "Allow"
                Principal = {
                  AWS = "arn:aws:iam::${var.atlantis_account_id}:role/atlantis-role"
                }
              }]
            })
          }

          #In your provider configuration

          provider "aws" {
            alias  = "production"
            region = "us-west-2"
            
            assume_role {
              role_arn = "arn:aws:iam::${var.production_account_id}:role/terraform-execution-role"
            }
          }

          3: Managing Terraform Version Compatibility

          As your Infrastructure expands, it becomes challenging to manage Terraform version updates.

          Solution: Use Terraform Version Control with Atlantis

          #atlantis.yaml
          version: 3
          projects:
          - name: legacy-system
            dir: legacy
            terraform_version: 0.14.11
            
          - name: new-system
            dir: new
            terraform_version: 1.5.7

          4: Sensitive Variable Control

          Managing secrets securely with Terraform and Atlantis requires careful consideration.

          Solution: AWS Secrets Manager Integration

          Create a wrapper script for Terraform that fetches secrets:

          #!/bin/bash
          fetch-secrets.sh
          
          Get database password from Secrets Manager
          DB_PASSWORD=$(aws secretsmanager get-secret-value --secret-id db/password --query SecretString --output text)
          
          Export as environment variable for Terraform
          export TF_VAR_db_password="$DB_PASSWORD"

          Execute terraform with all arguments passed to this script

          terraform "$@"
          Then update your Atlantis workflow:
          workflows:
            secure:
              plan:
                steps:
                - run: ./fetch-secrets.sh init -input=false
                - run: ./fetch-secrets.sh plan -input=false -out=$PLANFILE
              apply:
                steps:
                - run: ./fetch-secrets.sh apply -input=false $PLANFILE

          How Teams Automate Workflows to Scale Terraform Deployments on AWS

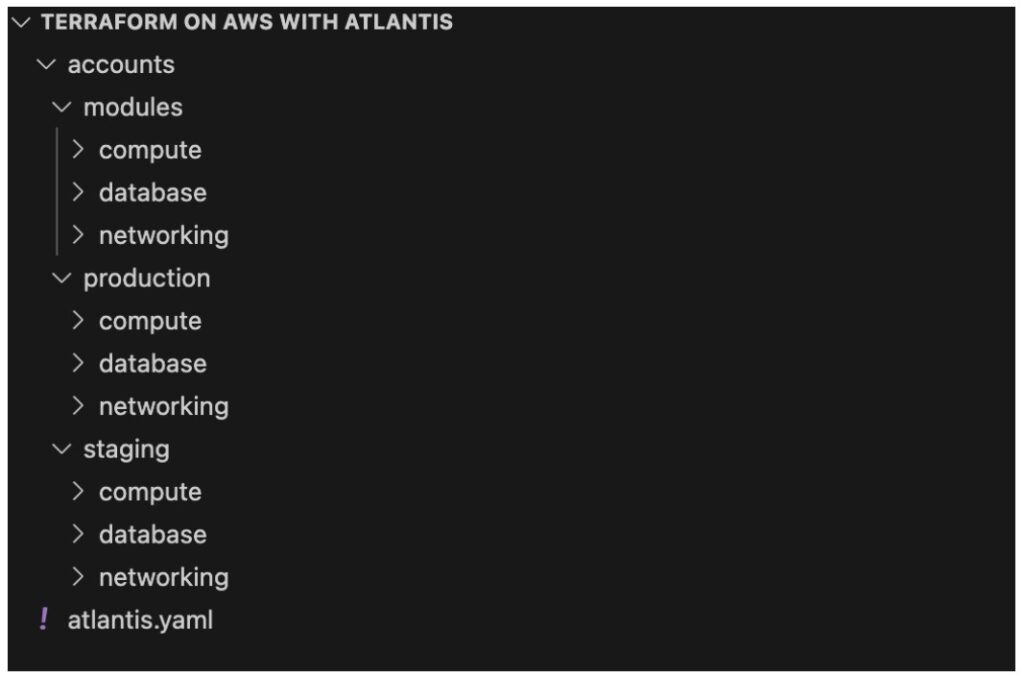
          Step 1: Implement Repository Structure for Scale

          Organize your Terraform code for maximum parallelization and clear ownership:

          Step 2: Set Up Advanced Atlantis Configuration

          #atlantis.yaml
          version: 3
          automerge: true
          delete_source_branch_on_merge: true
          parallel_plan: true
          parallel_apply: true
          
          workflows:
            production:
              plan:
                steps:
                - run: terraform init -input=false
                - run: terraform validate
                - run: terraform plan -input=false -out=$PLANFILE
                - run: ./policy-check.sh
              apply:
                steps:
                - run: ./pre-apply-checks.sh
                - run: terraform apply -input=false $PLANFILE
                - run: ./post-apply-validation.sh
                - run: ./notify-teams.sh "$WORKSPACE changes applied by $USER"
          
          projects:
          - name: prod-network
            dir: accounts/production/networking
            workflow: production
            autoplan:
              when_modified: ["*.tf", "../../../modules/networking/**/*.tf"]
            apply_requirements: ["approved", "mergeable"]
          
          - name: prod-databases
            dir: accounts/production/databases
            workflow: production
            autoplan:
              when_modified: ["*.tf", "../../../modules/database/**/*.tf"]
            apply_requirements: ["approved", "mergeable"]
          
          #Additional projects would be defined similarly

          Step 3: Implement Dependency Management

          Create a script to manage dependencies between projects:

          #!/bin/bash
          dependency-manager.sh
          
          Define dependencies
          declare -A dependencies
          dependencies["prod-compute"]="prod-network prod-databases"
          dependencies["staging-compute"]="staging-network staging-databases"
          
          Check if dependencies have been successfully applied
          check_dependency() {
            local dependency=$1
            local status=$(curl -s "http://atlantis-server:4141/api/projects/$dependency" | jq -r '.status')
            
            if [[ "$status" == "applied" ]]; then
              return 0
            else
              return 1
            fi
          }
          
          Check all dependencies for the current project
          PROJECT_NAME=$1
          if [[ -n "${dependencies[$PROJECT_NAME]}" ]]; then
            for dep in ${dependencies[$PROJECT_NAME]}; do
              if ! check_dependency "$dep"; then
                echo "Dependency $dep is not in applied state. Cannot proceed."
                exit 1
              fi
            done
          fi
          
          If we get here, all dependencies are met
          echo "All dependencies satisfied, proceeding with Terraform operation"
          exit 0

          Step 4: Implement Drift Detection

          Create a scheduled task to detect infrastructure drift:

          resource "aws_cloudwatch_event_rule" "drift_detection" {
            name                = "terraform-drift-detection"
            description         = "Triggers Terraform drift detection"
            schedule_expression = "cron(0 4   ? *)"  # Run daily at 4 AM
          }
          
          resource "aws_cloudwatch_event_target" "drift_detection_lambda" {
            rule      = aws_cloudwatch_event_rule.drift_detection.name
            target_id = "DriftDetectionLambda"
            arn       = aws_lambda_function.drift_detection.arn
          }
          
          resource "aws_lambda_function" "drift_detection" {
            function_name = "terraform-drift-detection"
            role          = aws_iam_role.drift_detection_lambda.arn
            handler       = "index.handler"
            runtime       = "nodejs16.x"
            timeout       = 300
            
            environment {
              variables = {
                ATLANTIS_URL = "https://atlantis.controlmonkey.com"
                GITHUB_TOKEN = "{{resolve:secretsmanager:github/token:SecretString:token}}"
              }
            }
          }

          Step 5: Implement Approval Workflows with AWS Services

          resource "aws_lambda_function" "approval_notification" {
            function_name = "terraform-approval-notification"
            role          = aws_iam_role.approval_lambda.arn
            handler       = "index.handler"
            runtime       = "nodejs16.x"
            
            environment {
              variables = {
                SNS_TOPIC_ARN = aws_sns_topic.terraform_approvals.arn
              }
            }
          }
          
          resource "aws_sns_topic" "terraform_approvals" {
            name = "terraform-approval-requests"
          }
          
          resource "aws_sns_topic_subscription" "approval_email" {
            topic_arn = aws_sns_topic.terraform_approvals.arn
            protocol  = "email"
            endpoint  = "[email protected]"
          }
          
          resource "aws_api_gateway_resource" "webhook" {
            rest_api_id = aws_api_gateway_rest_api.atlantis_extensions.id
            parent_id   = aws_api_gateway_rest_api.atlantis_extensions.root_resource_id
            path_part   = "webhook"
          }
          
          resource "aws_api_gateway_method" "webhook_post" {
            rest_api_id   = aws_api_gateway_rest_api.atlantis_extensions.id
            resource_id   = aws_api_gateway_resource.webhook.id
            http_method   = "POST"
            authorization_type = "NONE"
          }

          What If Atlantis with AWS Isn’t Enough?

          If your team is managing thousands of Terraform resources, dozens of AWS accounts, or struggling with policy enforcement and visibility—you may have outgrown Atlantis.

          While Atlantis is a solid open-source tool for automating Terraform plans and applies through pull requests, it wasn’t designed for enterprise-scale cloud governance. Teams scaling Terraform on AWS often face challenges around:

          • Large, complex configurations
          • Multi-account IAM permissions
          • Policy enforcement and compliance gaps
          • ClickOps and infrastructure drift

          This is where a platform like ControlMonkey comes in—offering full visibility, automated drift detection, real-time policy enforcement, and Terraform CI/CD that works across cloud and code.

          Infrastructure automation should grow with your cloud footprint. If Atlantis is slowing you down, it’s time to explore what’s next.

          👉 Book a demo and see how ControlMonkey scales what Atlantis started.

          Bottom CTA Custom Background

          A 30-min meeting will save your team 1000s of hours

          A 30-min meeting will save your team 1000s of hours

          Book Intro Call

            Sounds Interesting?

            Request a Demo

            FAQs

            Atlantis helps DevOps teams automate Terraform workflows by triggering plan and apply via pull requests. When used with the AWS provider, it allows teams to apply changes across AWS accounts consistently—without embedding Terraform directly into CI/CD pipelines.

            Atlantis wasn’t designed for large-scale, multi-account AWS environments. Teams often run into slow plan times, complex IAM role setups, and limited policy enforcement. For advanced use cases, many teams adopt additional tools to handle drift detection, security, and governance at scale.

            Cookies banner

            We use cookies to enhance site navigation, analyze usage, and support marketing efforts. For more information, please read our. Privacy Policy