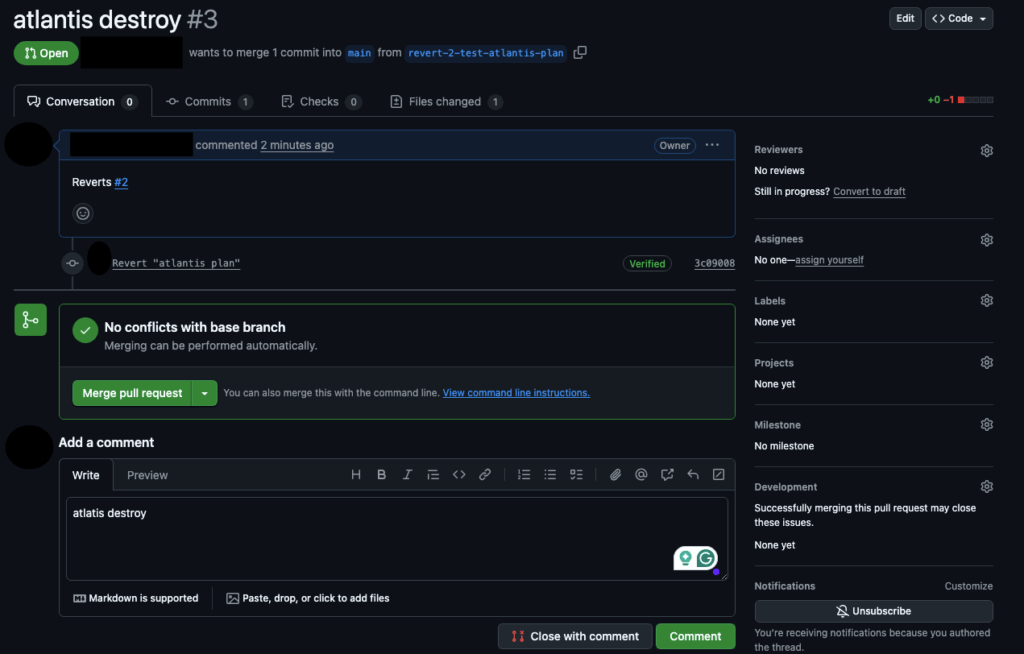
Running Atlantis destroy in a shared Terraform workflow can wipe entire environments in minutes if it isn’t properly controlled. Even inside Atlantis, a simple comment like atlantis plan -- -destroy can queue a full destruction plan across a project or workspace. One unreviewed action can trigger outages, data loss, or permanent resource deletion—especially when multiple teams contribute to the same repository. This is why destructive actions need explicit approvals, enforced RBAC, and dedicated workflows that separate safe operations from high-risk ones. When configured correctly, Atlantis lets teams handle Atlantis destroy Terraform operations in a predictable, reviewed, and fully transparent way instead of relying on ad-hoc manual checks.
Disclaimer: ControlMonkey is a commercial product that enhances Terraform and OpenTofu governance. It provides additional safeguards for destructive Terraform workflows, including automated pre-destroy snapshots, environment-wide visibility, and recovery points for Atlantis-managed workspaces.
Identify Gaps in Your Terraform Coverage
Our free IaC Coverage Assessment shows what parts of your infrastructure are managed, untracked, or vulnerable to destructive workflows—before something breaks.
How to Configure Atlantis Destroy Workflows Safely
The safest approach is to go with “opt-in only”: set up a dedicated workflow with the -destroy and only grant permission to review by admin-only users. Here is how your repo-level .atlantis.yaml might look like:
# atlantis.yaml
version: 3

workflows:
  admin-destroy:
    plan:
      steps:
        - init
        - plan:
            extra_args: ["-destroy"]   # generate destroy plan
    apply:
      steps:
        - apply:
            extra_args: ["-destroy", "-auto-approve"]

projects:
  - name: infra
    dir: .
    workflow: default                 # normal CI/CD path
    apply_requirements: [approved]

  - name: infra-destroy
    dir: .
    workflow: admin-destroy           # uses the special workflow
    allowed_overrides: []
    require_reviewers: ["platform-admins"]  # only this GH team can run it
When to Use Atlantis Destroy Terraform in Admin Workflows
For regular engineers, they can use the default plan and apply, and the destroy workflow never shows up.
Platform admins can target infra-destroy in a PR and then run atlantis plan -w prod -- -destroy after it’s been peer reviewed.
Branch protection and require_reviewers means at least one admin has to sign off.
Atlantis can also control permissions centrally with --gh-team-allowlist, or you can use an external auth script. This gives you control over the entire org without needing to change every repo.
Best Practices for Atlantis Destroy in Production Environments
Even when there are admin-only workflows, bad outcomes can happen due to human errors. Admins can accidentally, in a rush, or by accident, merge a PR that could destroy the entire environment. One of the best practices is to create an automatic tagging (e.g GitHub Issue Labels added using a GitHub Action that evaluates the plan) that adds a label like “destructive” in Red clearly into the PR.
Regarding destructive plans, follow these steps at the bare minimum.
Multi-factor approvals – Ensure that one other maintainer signs off on a destroy PR, then combine that with branch protection, so that Atlantis only runs after reviews are complete.
Environment rings – Ensure that all destruction taking place in production environments is locked and only allowed in sandboxes or during scheduled maintenance windows.
Timeboxed plans – Set your CI to automate the invalidation of destroy plans after set time intervals so that approvals that were granted a long time ago can’t be used.
State backups and drift detection – Before Atlantis destroys something, export the most recent remote state to a safe place. Look out for unbalanced resource counts in PRs. ControlMonkey automated state snapshot can do this automatically before any destructive change.
Observability hooks – Send Atlantis webhooks to Slack/SIEM to observe and note every attempted destroy in real-time. You can also link ControlMonkey’s alerting to autonomously rollback pre-defined actions and receive real-time alerts if anything goes wrong.
These are some guardrails that allow your Terraform workflows to be compliant without causing unnecessary friction for your teams.
Conclusion: Making Atlantis Destroy Safer and Controlled
Combining automated control with manual processes lets DevOps teams execute terraform destroy with control. Atlantis provides admin-scoped workflows with a simple control model and automated peer-approval processes to address this common challenge. And with automated deletion policies to create backups before destruction, deletion becomes a deliberate and managed process instead of a catastrophic accident.
Yet even the greatest security controls won’t eliminate all risks. ControlMonkey provides disaster-recovery on-demand snapshots and one-click rollback functionality integrated with Atlantis. So if something goes wrong, you can quickly recover your cloud infrastructure and continue delivering.
A 30-min meeting will save your team 1000s of hours
A 30-min meeting will save your team 1000s of hours
Backend Developer at ControlMonkey, passionate about Terraform, Terragrunt, and AI. With a strong computer science background and Dean’s List recognition, Daniel is driven to build smarter, automated cloud infrastructure and explore the future of intelligent DevOps systems.
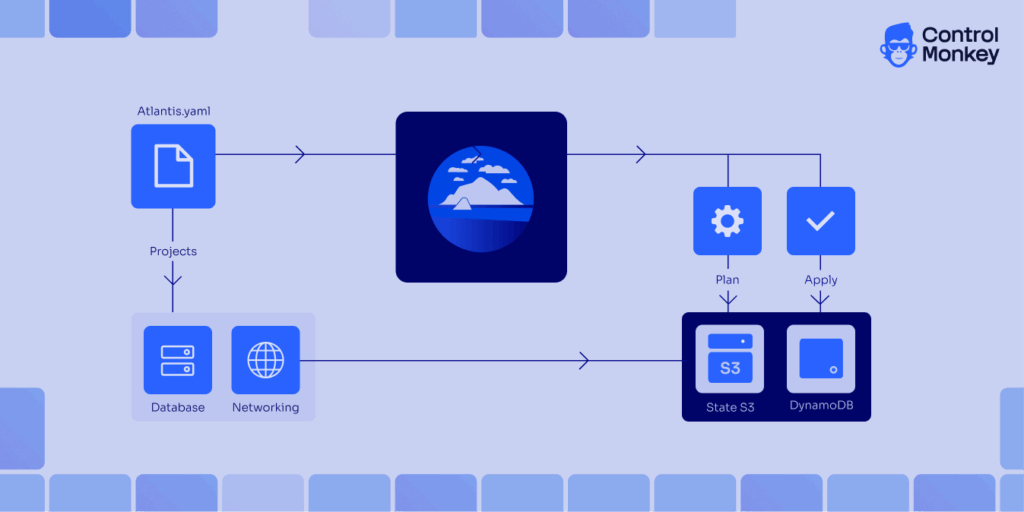
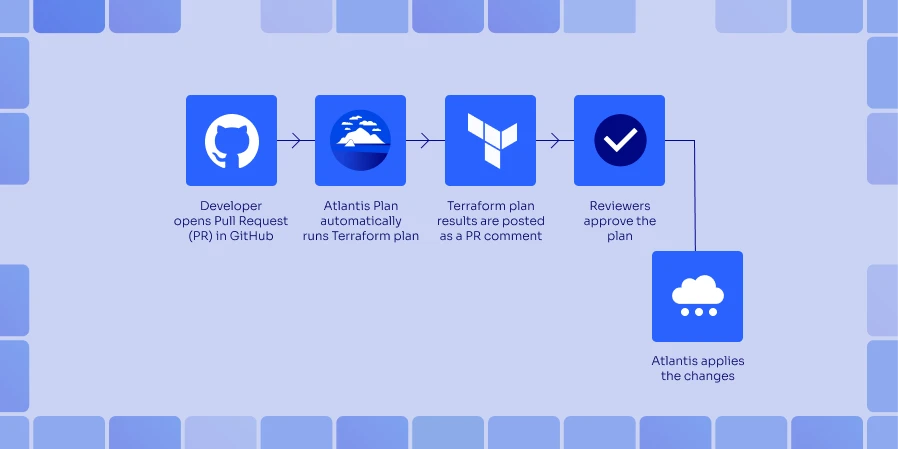
When teams adopt infrastructure as code (IaC), they need tools that can blend into existing Git workflows while automating Terraform plan and execution. Terraform Atlantis has emerged as a go-to bridge between GitOps and infrastructure teams, providing a plug-in solution that directly supports reviewing any infrastructure modifications.With Atlantis automation integrated into the pull-request cycle, you can listen to webhook events from Pull Requests and run terraform plan commands automatically. After verifying the output, a reviewer can add a comment to execute atlantis apply without ever leaving your Pull Request. This guide shows a complete overview of how Terraform Atlantis fits into the Git-based IaC workflows.
3 Reasons DevOps Still Use Atlantis Terraform
Faster, safer PR automation
Consistent, auditable workflow
Centralized, conflict-free execution
When Atlantis Might Not Be the Right Fit for You
Atlantis shines at Git-driven Terraform automation, yet it isn’t a one-size-fits-all platform. Ask yourself these seven questions before you commit. If several answers are “no,” you may need a more enterprise-grade IaC solution.
1. Can you run, secure, and maintain your own remote-state backend and own uptime for the service itself?
Atlantis makes provision and hardens S3 + DynamoDB (or Azure Blob, etc.) and manages upgrades, monitoring, and 24×7 availability.
2. Do you have a strategy to scale high PR traffic and parallel workloads?
Atlantis executes sequentially where large monorepos or surge periods can create queues, whereas ControlMonkey runs plans/applies in parallel across dedicated runners.
3. Will basic CODEOWNERS reviews and hook-based checks meet your compliance needs?
Atlantis offers only simple locks and PR reviews where fine-grained RBAC, multi-team boundaries, and policy gates require extra tooling, while ControlMonkey bakes them in.
4. Can you operate without a centralized dashboard for drift, cost, and job visibility?
Atlantis keeps all feedback in PR comments on real-time drift alerts, cost views, or job boards so you’ll need additional tools for observability.
Does Atlantis Terraform Automation Have an Alternative?
The alternative for Atlantis Terraform is ControlMonkey, a fully-managed SaaS that fills the gaps self-hosted Atlantis leaves open. ControlMonkey keeps the familiar pull-request workflow but layers enterprise-grade governance, visibility, and resilience on top.
ControlMonkey Key advantages as an Atlantis Terraform alternative
Built-in governance & compliance: Fine-grained RBAC, policy gates, and real-time drift detection are native features with no custom hooks required.
Scale without bottlenecks: Parallel runners execute multiple Terraform plans and apply simultaneously, eliminating the single-threaded queue that slows Atlantis in busy repos or monorepos.
AI-powered “cloud-to-code” onboarding: Automatically generates Terraform code and state files from existing cloud resources, speeding migration and expanding coverage.
Resilience baked in: Daily IaC backups, instant rollback, and disaster-recovery workflows protect production environments capabilities Atlantis lacks.
Full cloud inventory & cost visibility: Dashboards surface unmanaged resources, drift, and spend insights, giving teams a complete picture of their IaC posture.
Struggling with Atlantis limitations?
ControlMonkey enhances governance, visibility, and automation instantly
Atlantis has built-in support for Monorepos allowing you to use multiple projects in a single Git repository. You can define multiple Terraform projects in an atlantis.yaml file and set up dependencies across them. This lets you create your own custom workflows, use pre‑ and post- hooks, and run things in parallel.
The example above, adapted from Scalr’s best practices, stores the configuration in version control; setting parallel_plan and parallel_apply enable concurrent runs only for independent workflows or projects. If you define project dependencies or execution order groups, those workflows will run sequentially.
How to integrate Atlantis Terraform with CI/CD
Let’s look into a step by step guide on how to setup Atlantis Terraform Pull Request autom parallel_plan and paraation, where every plan and apply is fully traceable inside the PR.
First you may need to setup Atlantis server with access to your Git Repsitory with access tokens and CI workflow using Webhooks.
Integrating Atlantis TerraformStep 1: Create or Update a Pull Request
When a developer pushes Terraform changes and opens (or updates) a PR in GitHub, GitLab, Bitbucket, or Azure DevOps, the Atlantis webhook instantly detects the event.
Atlantis runs terraform plan for the code modified by the commits in the PR and posts the full plan as a comment right inside the PR thread. This allow reviewers to inspect every change without leaving the PR section in your Git repository.
See the official Atlantis Terraform Pull Request automation docs and ControlMonkey’s companion guide on extending these workflows.
Teammates discuss the changes in the PR, request for modifications, and can push additional commits as needed. Each push to the PR branch automatically triggers a fresh plan and comment, ensuring the review cycle stays in sync.
Once the plan looks good, an authorized reviewer types atlantis apply (or a custom command you configure) in a PR comment. Atlantis locks the workspace, executes terraform apply, and comments the result back to the PR.
After a successful apply, the PR can be merged by the reviewer. Atlantis releases its state lock so other jobs can proceed, and the workflow is complete. Atlantis Terraform Pull Request automation, the merge button only lights up once the reviewed plan has been safely applied.
Connecting Atlantis Terraform to Git Platforms
Atlantis has Webhooks, so you can connect it to basically any Git platform. It’s a piece of cake to link your Git platform to Asturias, all you have to do is set up personal access tokens, a webhook secret, and allow access to the specific repositories you need. When you set up, you need to put in your secret values and token to the environment which is where the secrets will stay. Atlantis keep tabs on Pull Requests and uses tokens to comment on them on the platform.
How to Connect Atlantis Terraform to GitLab/Bitbucket/Azure DevOps
For the integrations create an access token or set up an OAuth app. Then you can follow the same steps to set up your Atlantis webhook by providing the base url to your CI pipeline.
How to Connect Atlantis Terraform to GitHub
To connect Terraform Atlantis with GitHub, create a personal access token(PAT) with repository scope and provide it accessible to the Atlantis container. After that you can set a Webhook from your GitHub repository that points to the Atlantis server URL.
Atlantis can use Terraform Cloud as a remote state backend. Terraform Cloud’s remote execution mode is not used here and Terraform commands run inside Atlantis.
You can also deploy Atlantis using a Helm chart in Kubernetes. Current installation instructions and Helm charts can be found in the GitHub repo runatlantis/atlantis.
Or, just as with Atlantis, you can set up ControlMonkey for the same Git repositories and remote-state backends. It will take in every plan/apply event, incorporate drift detection and cost insights on top of the runs, and provide a dashboard, and policy gates which are not available in Atlantis. ControlMonkey also has a SaaS offering so, if you want to completely offload operations, you can have the same Pull Request workflow without the hassle of managing tokens, upgrades, or uptime by replacing the self-hosted Atlantis container with ControlMonkey’s SaaS runners.
Dive Into the ControlMonkey Operational Scaling Manual
Each Git repository by convention should contain an atlantis.yaml file at its root. This file defines projects, specifies directories, sets Terraform versions and defines workflows, forming the backbone of your Terraform workflows.
Important fields include: YAML format version (currently 3).
projects: list of project blocks defining name, directory (dir), workspace, Terraform version, dependencies and autoplan settings.
autoplan.when_modified: patterns used to trigger Atlantis when matching files change.
parallel_plan/parallel_apply: enable concurrent plans and apply operations across independent Terraform projects.
workflows: define custom workflows, pre/post hooks and policy checks.
By tailoring atlantis.yaml to your repository structure, you ensure that only relevant parts of a Monorepo run on each plan. Therefore, it is recommended to group related resources together, using modules for reusable components and separating environments to limit the impact.
Atlantis Terraform at Scale: Best Practices
Structure repos clearly
Group modules by component and environment, and in Atlantis, define each environment as a project.yaml makes it easier to manage Terraform.
Use remote state & locks
Store state in a backend (like S3 and DynamoDB) and use Atlantis project locks to keep Terraform state safe and avoid race conditions.
Least‑privilege IAM:
Set up a separate role for Atlantis with the least amount of permissions. Then, set up the runtime environment to use the right AWS roles (for example, using AWS_ROLE_ARN) to keep infrastructure management safe.
Tight authorization controls:
Limit who can run commands via team allowlists or external auth scripts especially for production apply so that you perform Terraform actions only when approved.
Plan only what matters:
Use when_modified patterns to make sure that plans only run when files that are important change. This will help Atlantis work better.
Limitations of Atlantis Automation
Atlantis streamlines Terraform with PR-driven workflows that focuses on IaC workflow automation. When it comes to governance and observability you need different tooling for compliance, scale, and visibility.
Self-hosting overhead: Those self-hosting their instance of Atlantis will need to handle maintenance, site stability, configuration of webhook integrations, and managing security integrations to state backends themselves. That operational overhead can quite possibly cancel out the velocity gain of Atlantis Terraform automation as those Terraform automation integrations bring operational automation to the lean SRE teams.
Governance gaps: More granular RBAC, approval gating, policy disengagement need to rely on other external frameworks, additional tools, or hand built glue logic.
PR-comment UI: There is no central place to see all the history of the runs, the costs, or the drift status. Most of the context is in PR comments.
Scaling constraints: Concurrency is limited to the project’s workflow design. If there are many PRs or a heavy Monorepo, then there is a queue and it will take time to execute all of them.
No native drift handling: If there is drift, you will need additional services, as detection and remediation are not built in.
What to choose instead of Atlantis Terraform Automation?
Below is a detailed comparison of how ControlMonkey enhances and extends what Atlantis offers for Terraform automation and infrastructure governance:
Feature
ControlMonkey Terraform automation
Atlantis Terraform automation
Cloud Asset Inventory & Terraform Coverage
Provides full cloud scanning & Terraform coverage insights. See all unmanaged resources.
Atlantis does not offer cloud account scanning for Terraform coverage, leaving users without a clear view of unmanaged resources.
Terraform Code Generation (Cloud to Code)
Automatically generates Terraform code & state files from your existing cloud resources.
No built-in Terraform code generation; engineers must manually create and maintain configurations.
Daily Cloud Backups
Disaster recovery ready. Instant rollback for misconfigurations.
Lacks infrastructure backup capabilities, increasing the risk of configuration loss and longer recovery times.
Drift Remediation
2-way drift remediation: Fix code to match live environment or reconcile.
Does not detect or remediate drift.
ClickOps Scanner
Automatically identifies unsupervised manual operations performed in the cloud console.
No visibility into manual operations or console-based changes.
Terraform Modules Insights
Identifies outdated or insecure Terraform modules across your codebase.
Does not provide visibility into modules usage or versions.
Periodic scans of Terraform code for compliance vulnerabilities
Scans existing IaC code for misconfigurations and policy violations.
Cannot scan existing Terraform code for compliance or security vulnerabilities.
Support
Dedicated enterprise-grade support with SLAs and fast troubleshooting.
Community-only support; no guaranteed response times or enterprise assistance.
Scalability
Made for large businesses with multiple processes, cloud coordination, and various customizations.
Has difficulty with large teams because of line-by-line task completion and is missing enterprise functions like role-based access control and audit tracking.
Conclusion
Atlantis automates Terraform through a plan–review–apply loop that create a solid quality gate for IaC review. With clear repo layout, selective plans, solid remote state, and least-privilege IAM, Atlantis delivers plenty of value. But its one-run-at-a-time model, DIY state upkeep, and missing perks like parallel jobs, drift detection, and granular RBAC can nudge scaling companies toward a managed IaC platform.
Therefore, if your team is starting to outgrow that foundation, explore our ControlMonkey vs. Atlantis comparison to see how enterprise-grade features stack up.
A 30-min meeting will save your team 1000s of hours
A 30-min meeting will save your team 1000s of hours
Ori Yemini is the CTO and Co-Founder of ControlMonkey. Before founding ControlMonkey, he spent five years at Spot (acquired by NetApp for $400M). Ori holds degrees from Tel Aviv and Hebrew University.
Terraform Plan Made Simple: What It Does + Examples
Daniel Alfasi
Backend Developer and AI Researcher
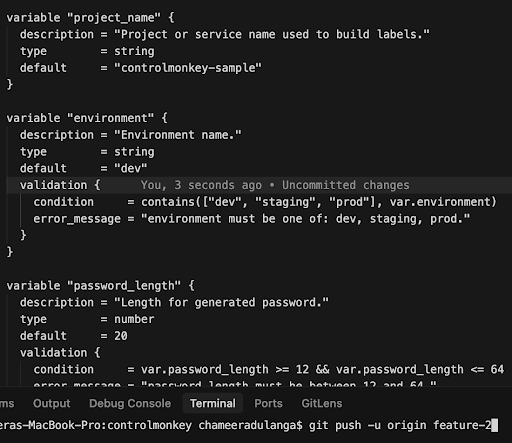
Terraform plan is the guardrail between your code and live infrastructure. It compares the desired configuration with the current state and previews the exact actions Terraform will take. You should use ‘Terraform plan’ before every apply to catch destructive changes, environment drift, and misconfigured variables.
This post breaks down how the plan engine works, how to read the output, and how to automate checks in your CI/CD pipeline. We’ll finish with copy/paste examples and practical tips to keep plans stable in teams.
Terraform Plan Basics
Terraform plan creates an execution plan without changing resources. It refreshes state (unless told not to), reads provider data, compares desired vs. current state, and prints the diff with proposed actions.
Common Terraform Plan flags you’ll actually use:
out=plan.tfplan: save a binary plan file for apply
refresh=true|false: control state refresh before diff
var/-var-file: pass inputs consistently across runs
target=addr: focus planning on specific resources only for break-glass fixes; don’t use it for normal workflows because it can bypass dependencies
Exit handling with -detailed-exitcode:
0: no changes
1: error
2: changes present
See the official command reference for exact behavior and flags: terraform plan command reference. [Link to Hashicorp plan command]
State is the main building block that anchors the comparison. Whether stored locally or in a remote backend, Terraform loads the state file, optionally refreshes it from providers, and computes the diff.
The refresh action calls the provider’s API to fetch the latest configuration of the actual resources. Terraform then compares this real-world state with the desired state defined in the code.
Each Terraform Provider defines the schemas and CRUD operations for Resources and Data Sources.
Data sources perform read operations during the plan phase to fetch information that is often needed by other resources. Resources, on the other hand, manage real infrastructure objects and are associated with actions such as create, update (in-place), replace, or destroy.
Reading Terraform Plan Output: Add, Change, Destroy
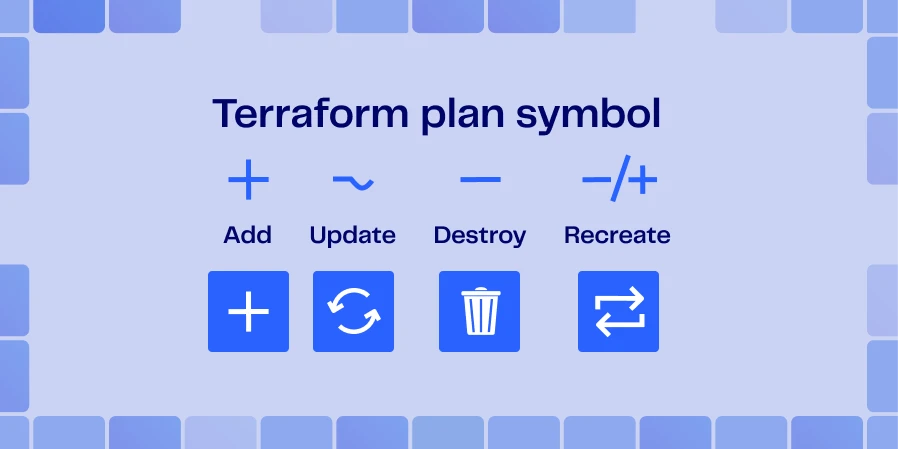
The key symbols:
+ create
– destroy
~ update in-place
-/+ replace (destroy then create)
After running ‘plan’, Terraform prints “Plan: X to add, Y to change, Z to destroy.” You should treat destroys in production with extra scrutiny and always ask for a second reviewer.
Modifying a variable or changing a module version can trigger a chain reaction: even a small input change can cascade into a resource replacement, potentially impacting production functionality.
For example, changing a default parameter might result in replacing a production database. By carefully reviewing the plan output – and watching for indicators like “-/+ replace” – you can often prevent unnecessary downtime.
Replaces vs. in-place updates matter. Any change forcing new resource creation (e.g., immutable attributes) shows as “-/+”. That’s your red flag.
Plan Files and JSON for Automation
Canonical snippet:
```bash
# Save a plan and export JSON
terraform plan -out=plan.tfplan
terraform show -json plan.tfplan > plan.json

# Example: count destroys and replaces
jq '[.resource_changes[] | select(.change.actions|index("delete"))] | length' plan.json
jq '[.resource_changes[] | select(.change.actions|index("replace"))] | length' plan.json
```
You should save the plan output and export JSON for automated guardrails. Here is how to do it:
Once you have the JSON in hand, there are several types of policies you might want to validate against it. For example:
Deny destroy in prod unless an approval label is present
Enforce required tags/owners before apply
Block if predicted cost exceeds a budget
Post PR annotations that highlight risky actions and affected resources
Terraform Plan Examples: Local CLI to CI/CD
Local workflow:
terraform init
terraform plan -out=plan.tfplan
terraform show plan.tfplan (or use the plan snippet above)
Apply only after review
Minimal GitHub Actions gate using -detailed-exitcode:
```yaml
name: terraform-plan
on: pull_request
jobs:
  plan:
    runs-on: ubuntu-latest
    steps:
      - uses: actions/checkout@v4
      - uses: hashicorp/setup-terraform@v3
        with:
          terraform_version: 1.6.6
      - run: terraform init
      - id: plan
        run: |
          set +e
          terraform plan -detailed-exitcode -out=plan.tfplan
          echo "code=$?" >> $GITHUB_OUTPUT
          set -e
      - name: Upload Plan Artifact
        uses: actions/upload-artifact@v4
        with:
          name: tfplan
          path: plan.tfplan
      - name: Fail If Changes Present
        if: steps.plan.outputs.code == '2'
        run: exit 1
```
Troubleshooting and Best Practices for Terraform Plan
Here are some best practices to avoid surprises when running ‘Terraform plan’:
Pin provider versions;
run terraform init -upgrade deliberately, not on every run.
Reduce plan churn: stabilize data sources, add explicit dependencies (depends_on), and keep var-files consistent across environments.
Keep providers and Terraform versions aligned across developer machines and CI containers .
Where ControlMonkey Fits: Safer, Faster Plans
ControlMonkey adds context to Terraform plan so reviewers focus on what matters. It surfaces risky actions (destroys/replaces), drift indicators, and improvement hints before apply. Organization-wide guardrails and approvals span repos and environments.
It classifies safe vs. risky items to reduce noise and complements your GitHub/GitLab/Bitbucket/Azure DevOps workflows and existing Terraform stacks.
Wrap-Up and Next Step: Review Terraform Plans With Confidence
Terraform plan is your preview of infrastructure change and your best defense against surprises. Use it consistently, export JSON for policy checks, and gate merges in CI.
If you want faster reviews and stronger guardrails across teams, ControlMonkey can help with risk-aware plan insights and centralized policies. Request a demo to see it in action.
A 30-min meeting will save your team 1000s of hours
A 30-min meeting will save your team 1000s of hours
Backend Developer at ControlMonkey, passionate about Terraform, Terragrunt, and AI. With a strong computer science background and Dean’s List recognition, Daniel is driven to build smarter, automated cloud infrastructure and explore the future of intelligent DevOps systems.
Atlantis with GitHub Actions for Terraform: How to Integrate
Daniel Alfasi
Backend Developer and AI Researcher
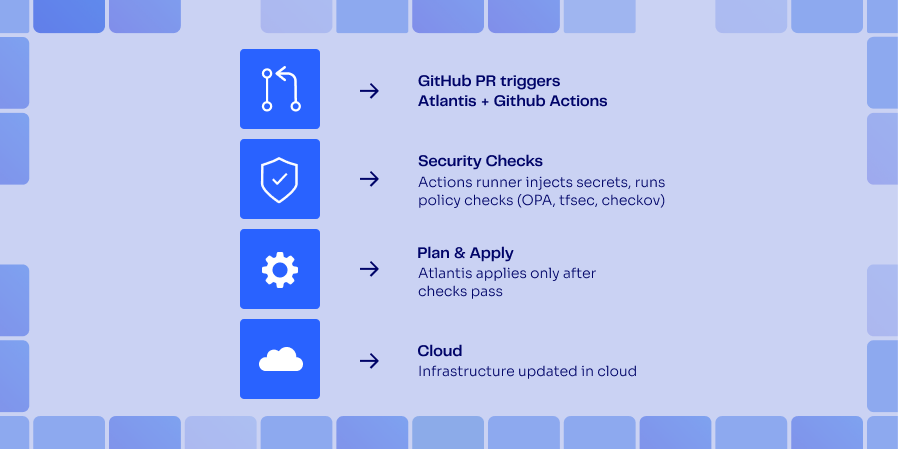
Modern Infrastructure as Code (IaC) is tightly integrated with CI/CD. If you use GitHub Actions, it’s possible to set up a complete workflow from code reviewing to provisioning for your IaC. In this workflow Atlantis tracks pull request changes so that every IaC change is reviewed and approved directly from GitHub.
By integrating GitHub Actions with runners, secrets, and policy gates, you make safe infrastructure delivery fully automated and streamlined. Also, you can combine it with ControlMonkey for drift detection, transparency around costs, and to enforce policy guardrails around Atlantis runs, so reviewers see risks
before merging a PR.
Want to strengthen your Atlantis workflow with cost insights and policy guardrails?
See how ControlMonkey adds automation, visibility, and drift detection on top of your existing setup.
Bringing Atlantis into your GitHub workflow and learning how to configure Atlantis is straightforward. It involves a few steps, generating secure credentials, wire up webhooks, add webhook signatures, and adding a .atlantis.yaml so every pull request runs a reproducible Terraform plan across projects.
1. Generate and store GitHub tokens
Atlantis needs Git host access credentials and short-lived tokens so it can;
Read PR events and post plan/apply statuses
Clone repository code.
There are two options in generating short-lived tokens that GitHub supports.
1. GitHub App – Create an organization-level GitHub App with:
Repository contents: Read-only
Pull requests: Read & write
Metadata: Read-only
Install the App on every repository that Atlantis needs to manage. Here, when app is used you generate an installation token every hour. This removes the need of keeping long-lived secrets defined in your pipelines.
2. Personal Access Token (PAT) – Create a service account and generate a PAT and assign only the minimal scopes, repo, read:org, and workflow. Keep the PAT short-lived fine-grained scoping to specific branches and repositories.
For both approaches, here is the process you need to follow:
Protect the secrets properly – You can set the tokens as secrets in GitHub → Settings → Secrets → Actions (or in an external store like AWS Secrets Manager) to protect it when GitHub Actions injects it into the Atlantis container file.
Pass It To Terraform/Atlantis – When you bootstrap Atlantis, reference the same secret via variables (e.g. github_token = var.github_token) to give the Atlantis server access.
Rotate and audit – Schedule automatic rotation (hourly for GitHub Apps and at least quarterly for PATs) and monitor access logs for anomalies to reduce the risk of access errors.
By treating the token like any other production secret, you restrict one of the easiest attack vectors in a GitOps pipeline.
2. Configure webhooks
Atlantis must receive webhook events from pull_request, issue_comment, and push actions to automate the execution of infrastructure changes. To set the webhook navigate to Webhooks under GitHub settings and add a new webhook pointing to your Atlantis server URL with the below configuration.
Content type: application/json
Secret: Use the same value you’ll pass to the webhook secret variable in Terraform.
Once saved, GitHub will deliver a ping event to validate its reachability and display the status for each individual event. For a successful verification, you will receive a 200 OK response.
3. Minimal .atlantis.yaml
Create a file named .atlantis.yaml in the root of each repository or in a shared parent folder that holds your Terraform code:
When reviewers want to promote a plan to an apply in Atlantis, they leave an apply comment on any pull request. The plan output, in this case, stays attached to the pull request via the run command steps. Atlantis also validates branch-protection rules and required-review settings as defined.
4. Wiring it through GitHub Actions
You can run Atlantis as its own service pod (e.g., an ECS task or EC2 instance). While it’s technically possible to run Atlantis inside a GitHub Actions, it works best as a long-running service so that webhook deliveries always have a live target environment.
The GitHub Actions is still useful when running tests and for small teams. ControlMonkey can act as a pre-merge gate to block non-compliant, over-budget Terraform changes before running apply.
This workflow launches Atlantis in a Docker container. YOu can dispatch it manually or upon main branch changes. For this to work Webhooks must target a stable, publicly accessible Atlantis URL. For production infrastructure, it’s better to run Atlantis on a server (e.g ECS/Fargate, EC2, or Kubernetes) with a load balancer and a custom domain.
5. How comments trigger plans & applies
Atlantis treats comments on pull requests as commands with a meaning. These commands are then interpreted by Atlantis to execute relevant actions. For example with just a single comment, your changes code shifts from “proposed” to “applied”. This makes things simple and helps to manage the entire Terraform lifecycle inside GitHub without the need to move across different systems. Let’s look at how this works step by step.
First a developer needs to open a pull request.
GitHub triggers the PR webhook.
Atlantis clones the repository at the PR SHA, runs terraform init and plan, and posts the output back to the PR.
The reviewer types a comment with Atlantis apply.
Then Atlantis checks for branch protections and the state of approvals.
With success, terraform apply runs and the result is posted with a comment.
This makes the entire lifecycle of events and its live infrastructure, captured in GiHub history included in comments.Example: Bootstrapping Atlantis on AWS with the terraform-aws-atlantis Module
Let’s look at how to set up Atlantis for provisioning an ECS Fargate cluster with an ALB that serves HTTPS requests.
After running terraform apply, the module outputs the Load Balancer DNS name. You can use it as the webhook target in GitHub. Atlantis runs inside a Fargate task, configured to scale with demand, and support communication using TLS via ACM. ControlMonkey simultaneously centralizes drift monitoring and cost visibility over configured Atlantis repositories.
Want full visibility into your Atlantis-driven infrastructure?
Enhance your pipeline with automated drift detection and cost insights from ControlMonkey.
To verify the setup, you can create a new branch with a basic main.tf file (like making an S3 bucket). Then to test, create a pull request. Once the Atlantis Plan comment shows up, check the diff to verify the changes.
The terraform-aws-atlantis module automatically keeps the plan files in S3 to inspect later. Comment Atlantis apply on auto-merge to approve and merge at the same time when the apply is done. You now have a fully managed Atlantis server in under 30 minutes, integrated with GitHub.
Best Practices for GitOps at Scale
When setting up GitOps for Atlantis and Terraform you need to follow several best practices to defend against unauthorized access, securing credentials, enforce peer review on IaC changes, and keep environments in sync.
1. Tokens are considered secrets too
GitHub Tokens are configured to self-rotate every 90 days. However Personal Access Tokens (PAT) doesn’t have the same auto-rotation. Therefore you need to handle them carefully. Any long living token should be kept in AWS Secrets Manager or Vault, and retrieve them through Terraform variable environment references. Secrets should never be printed in CI logs, and the jobs should fail if secrets are not excluded.
2. Align PR approval policies with atlantis apply
Atlantis respects GitHub branch protection rules. Therefore, enforce at least one code-owner review on sensitive workspaces. For critical resources (e.g., IAM, VPCs) that could disrupt the operation, you can configure it to require two approvals and use signed commits for an extra layer of trust.
3. Use separate workspaces for impact control (reducing the blast-radius)
Following practices such as project-per-directory with Terraform workspaces allows you to separate staging, prod, and sandbox stacks. That means a misconfigured terraform apply in a sandbox environment will be limited in impacting a production environment.
4. Audit everything, continuously
Enable GitHub Audit Log to track webhook deliveries and comment history. ControlMonkey complements this by aggregating run history, policy decisions, and cloud-state snapshots for end-to-end auditability. Since Atlantis uses GitHub Comments for managing its workflow, it will be useful for better traceability in the long run. Also you can ship Atlantis container logs to CloudWatch for higher durability. You can also periodically diff Terraform state (terraform show) against cloud APIs to detect infrastructure drift.
5. Complement Atlantis with policy and governance tools
Atlantis is made deliberately simple. Therefore you can combine it with other tools such as;
Open Policy Agent (OPA) or HashiCorp Sentinel in a GitHub Action as a layer on top for the pre-merge step.
You can use Infracost for comments that impact the budget.
6. Limit for approved repositories and enforce via repo_allowlist
Limit Atlantis to approved repositories to guard against malicious executions and to avoid running terraform apply in wrong unintended cloud accounts.
Conclusion
When combining Atlantis and GitHub Actions, you can set up a complete review driven CI/CD setup. Since the workflow steps are also captured in GitHub comments, it acts as an unchangeable history that’s easier to track when needed.
Want even more streamlining? ControlMonkey combines Atlantis, drift detection, cost visibility, and policy gates all in one platform. So you can concentrate on building rather than pipeline maintenance. Schedule a demo and discover how painless GitOps can be.
A 30-min meeting will save your team 1000s of hours
A 30-min meeting will save your team 1000s of hours
Backend Developer at ControlMonkey, passionate about Terraform, Terragrunt, and AI. With a strong computer science background and Dean’s List recognition, Daniel is driven to build smarter, automated cloud infrastructure and explore the future of intelligent DevOps systems.
How to Use Atlantis Plan as a Quality Gate – 101 Guide
Daniel Alfasi
Backend Developer and AI Researcher
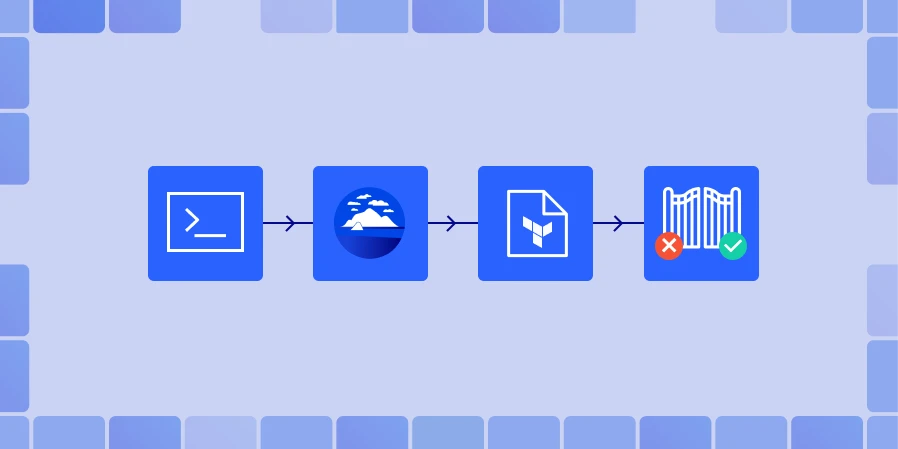
Merging a Terraform pull request should not feel like a gamble. Since it is infrastructure-as-code, every change can affect live cloud resources where all changes must be previewed and validated. Atlantis Plan automates Terraform plan on each pull request by listening to version control system webhooks, to execute the plan, and posting the Terraform plan output as a comment. This combination turns a standard pull request into a gated Terraform workflow, where reviewers can see every resource that will be created, modified, or destroyed.
How Atlantis Plan Executes Terraform Workflows
Atlantis Plan operates as a self-hosted Atlantis server, which can integrate with GitHub, GitLab, Bitbucket, or even Azure DevOps through custom workflows that are supported through webhooks.
Automatic plan:
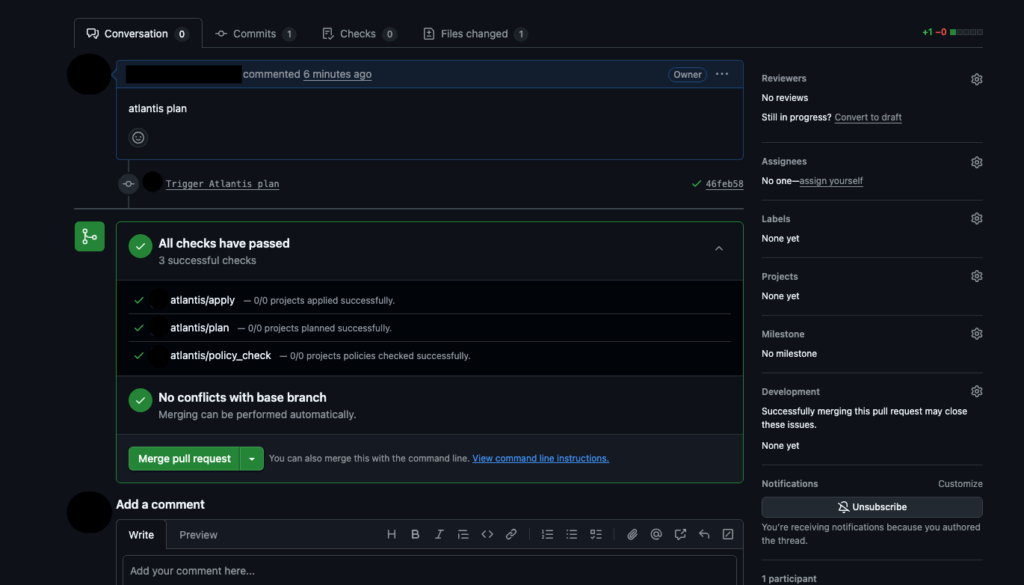
For automatic planning, when a pull request touches Terraform code on the base branch, Atlantis receives the webhook, checks out the branch, and runs terraform init. Next, it runs terraform plan (run plan) for any directories specified in the atlantis.yaml file in each project. The plan output gets posted back as a comment in the lightweight Atlantis UI, and Atlantis locks the workspaces to prevent state conflicts.
Manual re-plan:
When reviewers want to do manual re-planning, they can use the Atlantis plan command executed manually to recalculate the plan again after any modifications. This will help in drift detection when new code and extra commits are pushed.
Controlled apply:
After reviewing and approving the Atlantis Terraform plan, you can use the command atlantis apply that in turn executes terraform apply on the base branch. And if you need terraform pull, it will run terraform refresh beforehand. It updates the comment after completion, recording it to the Atlantis log for state management and to capture the audit trail.
While Atlantis automatically runs the Terraform plan, when a pull request is created, developers can also manually trigger a plan by adding a comment in the pull request. This is extremely useful when additional commits are pushed to a branch after the initial plan, or re-validating infrastructure changes before approval.
Open a Pull request and create a PR from your feature branch.
Trigger a Plan via Comment Atlantis listens for this comment through the GitHub webhook, checks out the PR branch, and runs:
terraform init
terraform plan
After that, Atlantis replies directly in the pull request thread with a summary of the Terraform plan.
Ran Plan for dir: . workspace: default
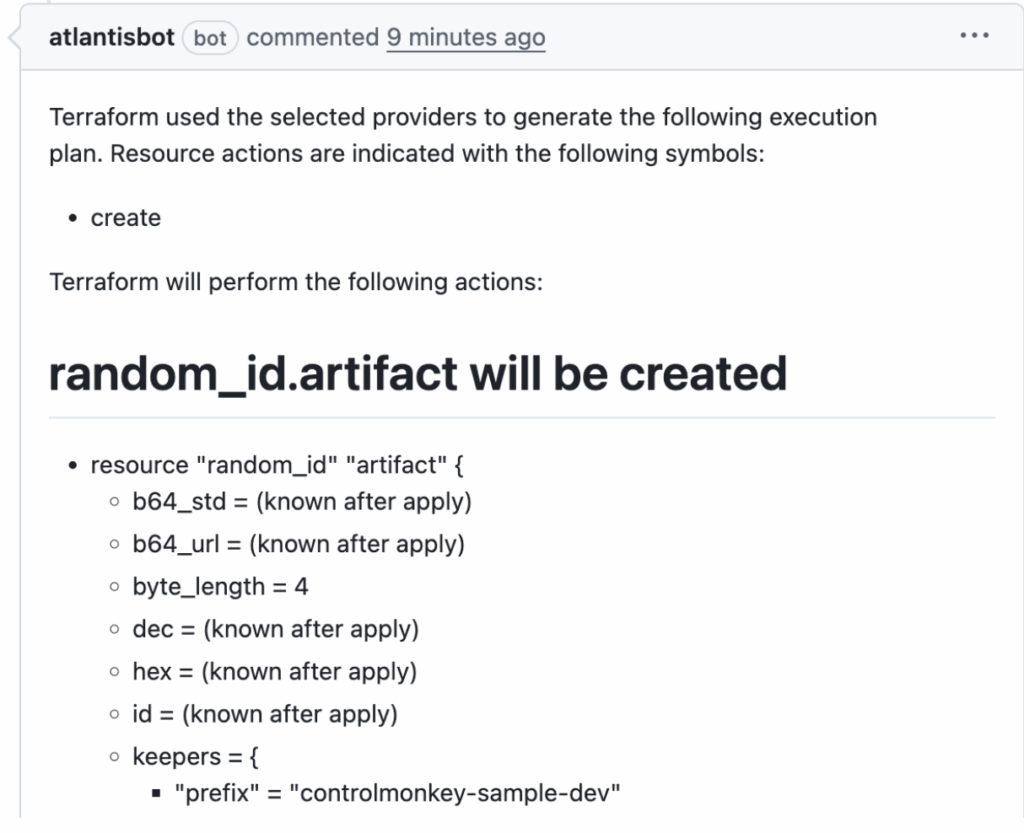
Terraform will perform the following actions:
# aws_s3_bucket.demo_bucket will be created
+ resource "aws_s3_bucket" "control-monkey_demo_bucket" {
arn = (known after apply)
bucket = "control-monkey_demo_bucket"
tags = {
"Environment" = "control-monkey-iac"
"Name" = "control-monkey_demo_bucket"
}
}
Plan: 1 to add, 0 to change, 0 to destroy.
To apply this plan, comment:
atlantis apply
Reviewing Terraform Plans with Atlantis Plan
Understanding the actions taken on resources configured through the Terraform commands can be understood through the execution plan created by Terraform. Learning these signs is important for identifying problems early on. In Terraform, a resource lifecycle is denoted by symbols; created (+), destroyed (–), recreated (-/+), or updated in place (~). When a plan summary is generated, Terraform also summarizes the total changes made, for example, ‘2 to add, 1 to change, and 0 to destroy’, giving a clear picture on ‘blast radius’ for the reviewer.
Reviewing these sections with the Atlantis Plan enables drift detection, catching of typos, and removing the need to run terraform commands locally to validate variables in the code. However it’s important to manually verify changes to sensitive resources like production load balancers, databases, and ensure they are not deleted.
ControlMonkey automates these audits by applying policy-as-code guardrails to each Atlantis plan, auto approve changes deemed safe, and mark changes that require additional examination. It reduces the burden on tiresome manual checks, fosters uniform standards, streamlining Terraform workflows, and ensuring sustained compliance of the infrastructure.
Did you know you can to streamline Atlantis plan with ControlMonkey’s automation? ControlMonkey can integrate with your existing Atlantis pipeline.
Once executed, the Terraform plan displays the changes affecting the resources. Yet it has limited capability in catching policy violations and risks. Therefore, it’s important to incorporate security and policy governance platforms designed for IaC that can be connected with the CI/CD pipeline.
Checkov
Checkov is a code analysis tool created by Prisma Cloud. It uses a graph-based engine for Terraform, CloudFormation, and Kubernetes misconfigurations checking and compliance violations. Checkov has more than 1,000 policies, is integrated with CI/CD pipelines and can be used for code analysis and compliance checking. Developers can quickly resolve false positives with inline comments.
Trivy
Trivy is an integrated scanner tool for both containers and infrastructure code. The scanner estimates containers’ images, filesystems, and also examines misconfigurations in Kubernetes, CloudFormation, and Terraform, providing reports as JSON, SARIF, and HTML. The container and infrastructure code vulnerability database is fetched from an updated database, in which the scanner is continuously maintained.
KICS
KICS (Keeping Infrastructure as Code Secure) scanning uses standard query techniques for scanning infrastructure definitions. It has more than 1,500 prompts and is compatible with Terraform, Kubernetes, Docker, CloudFormation, Ansible, and Bicep. To ease KICS’ assistance for teams with proprietary markup, It recentralizes language for CI/CD integration definitions.
ControlMonkey
ControlMonkey works in tandem with these scanners. It automatically aggregates the output from scanners, enforces a suite of organization-specific policy-as-code rules for every Atlantis plan, and blocks merges when high-severity issues exceed a predefined threshold. It makes the scanner output actionable as PR comments, automatically approves plans that are all compliant, and unifies a team around a central dashboard to track remediation progress.
Running these tools after an atlantis plan (for example, via GitHub Actions) will post their findings as additional PR comments or status checks. This brings attention to insecure configurations that may not be readily apparent from the plan diff. You can stop the build if the security report has high-severity findings, which guarantees that misconfigurations will not get to terraform apply.
Best Practices for Atlantis Plan
Execute an Atlantis plan on every PR, even when tweaking documentation. Terraform might encounter stray state changes or detect drift and autoplan guarantees that there will be no surprises at apply time.
Enforce pre-apply Atlantis approval rules – This is understandable using branch protections and one reviewer to implement the four-eyes principle. You may also want to enforce pre-commit hooks to clean the plan using terraform fmt and terraform validate.
Use projects to handle several directory trees – Setup Atlantis to separate each Terraform root module as its own project within atlantis.yaml and set when_modified paths to only trigger the relevant plans. For large monorepos, refer to the multiple-directories section in the Atlantis documentation to avoid creating “mega-plans”.
Understand your constraints – Since Atlantis Plan is self-hosted, you will be responsible for running the server, state file locking, and scaling your system. Also, it doesn’t support wildcard directories, high availability, and serial run processing. This makes it more suitable for small teams, and only in the Plan you can expose sensitive data. Basic access controls leave it to you to mitigate the gaps or use other, potentially managed, solutions.
Conclusion
Incorporating Atlantis Terraform Plan as the bare minimum quality control requirement helps to lift Terraform from ad-hoc version and command-line control to a structured workflow that is auditable. This makes each adjustment automatically prepared, contextually reviewed, and security scanned, and is only applied following approval.
This method enhances uniformity, quickens deployment cycles, and leaves an unambiguous audit trail. For scaling this method, refer to the multiple-directories guide in the Atlantis documentation and understand the tool limitations.
When your team needs to establish IaC governance along with Atlantis Plan, use ControlMonkey Platform to confidently scale workflows and for strict policy enforcements/
Backend Developer at ControlMonkey, passionate about Terraform, Terragrunt, and AI. With a strong computer science background and Dean’s List recognition, Daniel is driven to build smarter, automated cloud infrastructure and explore the future of intelligent DevOps systems.
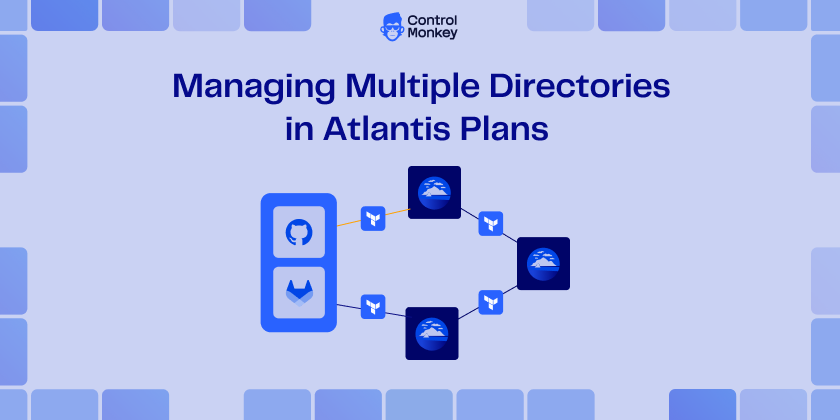
Choosing Monorepos vs multiple repos is still a debate among software professionals. Many large infrastructure teams still choose Monorepos – a single Git repository that houses multiple directories for different parts of the codebase. Configuring Atlantis to plan multiple directories helps isolate each Terraform project, reduce plan noise, and accelerate peer review. However, without proper directory-level configuration, atlantis may still plan the entire repo even when only one directory changes – a workflow issue solved through project-level configuration.
Configuring Multiple Projects for Atlantis Plan Multiple Directories
You configure Atlantis with a projects array in a root-level .atlantis.yamlfile, dividing the repo into discrete projects each tied to a directory or glob:
When a pull request changes files under env/prod, Atlantis matches the path (the directory path) to the prod project and runs atlantis plan effectively a run terraform plan command just for that folder. If nothing changes inside env/dev, no plan is triggered there. Behind the scenes, the Atlantis server computes changed files → matches a dir pattern → executes the plan/apply workflow linked to that project.
How the Atlantis Plan Multiple Directories Workflow Operates in Pull Requests
Developer commits a change to env/prod/variables.tf (tf files in the same dir).
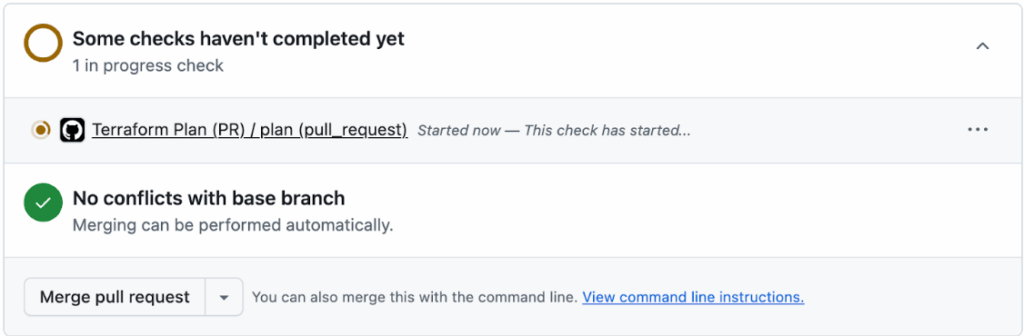
GitHub PR opens – Atlantis webhook fires. The robust VCS integration shows a pending Atlantis plan check within seconds, confirming the webhook fired and the project scan started.
Atlantis inspects the diff, finds only env/prod/** touched. It compares each changed file path against every dir: entry in .atlantis.yaml.
Matches env/prod – selects the prod project and its specific workspace tied to that terraform dir.
Ignores env/dev and env/stage projects because no files under those paths have changed.
4. It posts a single status check:
atlantis plan - project: prod
Terraform will perform the following actions...
The check name includes the project to make multi-project PRs readable; the detailed plan output is posted as a comment so reviewers can jump straight to the resource diff.
5. The dev and stage projects stay green and untouched, which keeps the conversation on track. GitHub marks the dev and stage checks as Skipped (no changes), which saves reviewers from having to look at output that isn’t relevant and saves CI time for both the staging and production workflows.
6. Once approved, the reviewer comments atlantis apply -p prod, and Atlantis applies only to the production workspace.
Atlantis:
First, Atlantis uses reliable Atlantis locks to lock the backend key for prod.
After that, it runs terraform apply with the plan file it made and then unlocks the lock.
Want to automate and govern your Terraform workflows? Explore ControlMonkey’s Total Automation for full CI/CD visibility.
Best Practices for Managing Multiple Directories in Atlantis
1. Design a Predictable Directory Layout for Atlantis Plan Multiple Directories
A clean tree is the first guardrail against chaos. Start with a root-level env/ folder and mirror your environments (dev, stage, prod). Beneath each, break out by region or system (us-east-1/network, europe/rds, and so on). Keep reusable code in a top-level modules/ directory and follow Terraform’s standard module structure main.tf, variables.tf, outputs.tf, plus examples/ and a README per module. Group related resources in files like network.tf or instances.tf; don’t scatter one resource per file unless there’s a compelling reason to keep everything in the same dir.
2. Establish Consistent Naming Conventions
Poor names ripple into every plan. A few field-tested rules from the community guide:
Use underscores, not dashes, for Terraform identifiers.
Keep names lowercase and avoid repeating the resource type (aws_subnet.public, not aws_subnet.public_subnet).
Stick to singular nouns and add an environment/region suffix only when it clarifies intent (alb_public_eu, vpc_core_us). These conventions make diffs self-explanatory and reduce refactors when you modularize later.
3. Isolate & Lock State Per Project
Every Atlantis project should map to a unique backend key (for example, prod/network/terraform.tfstate) so that no two directories can overwrite each other. Store remote terraform state in an S3 bucket or equivalent, enable DynamoDB locking, and never share the same workspace across projects.
The AWS prescriptive guide shows why atlantis locks and separate state files protect multiple states during parallel applies.
4. Harden Your Atlantis Plan Multiple Directories Workflows
Autoplan scopes – Define explicit when_modified glob patterns so only the touched directory triggers a plan.
Concurrency limits – Use workflows:<name>:plan:steps with run: atlantis plan -p $PROJECT -- -lock-timeout=300s if you expect long-running operations.
Full-repo catch-up – For occasional drift sweeps, teams enable the plan-all flag to run terraform plan across every directory without extra commits. These settings rely on core atlantis commands and familiar terraform commands like init, plan, and apply, letting teams run plan jobs confidently. Atlantis works best when its workflows are explicit and repeatable.
5. Branch & Review Hygiene
Make a new branch for each environment change. Don’t make omnibus PRs that affect both dev and prod at the same time. Before merging, you need green Atlantis checks, and you can’t push directly to main. This strict VCS integration makes it easy to check and roll back your CI/CD timeline.
6. Automate Validation & Testing
Set up pre-commit hooks for terraform fmt, tflint, and terraform validate. Add unit tests with Terratest or OpenTofu for important modules. Quick local feedback helps developers find syntax and policy mistakes long before Atlantis starts a costly cloud plan. This keeps automation running smoothly and protects dependencies that come after.
Conclusion: Streamline Atlantis Plan Multiple Directories with ControlMonkey
Setting up multiple directories in Atlantis is less about YAML syntax and more about guardrails, such as having a clear repo layout, strict state isolation, and planning only what has changed.
Ready to streamline Atlantis plan multiple directories with ControlMonkey’s automation
Ori Yemini is the CTO and Co-Founder of ControlMonkey. Before founding ControlMonkey, he spent five years at Spot (acquired by NetApp for $400M). Ori holds degrees from Tel Aviv and Hebrew University.
Terraform Projects for GCP: Real Examples and Starter Repos
Daniel Alfasi
Backend Developer and AI Researcher
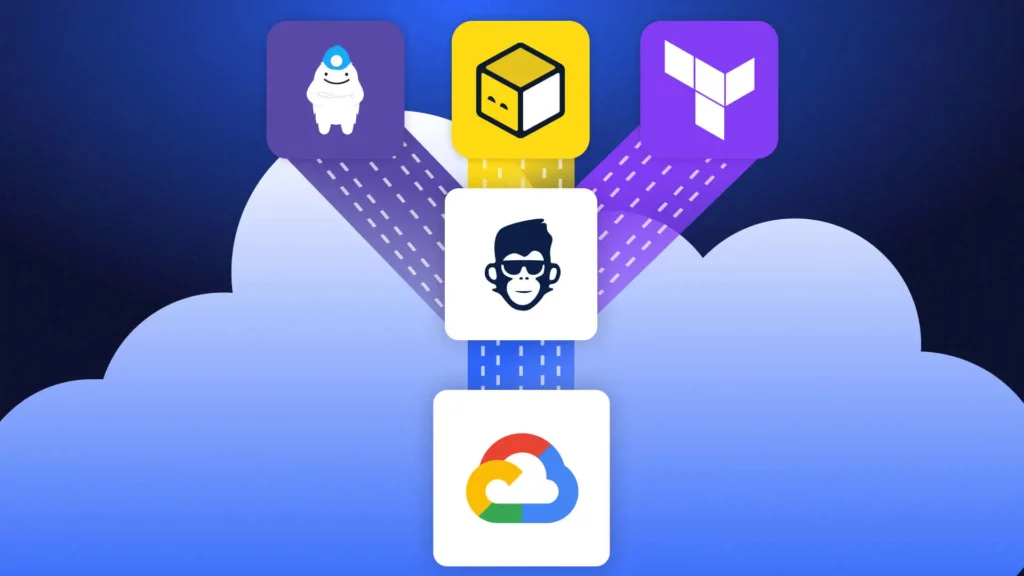
If you want to understand Google Cloud quickly, terraform projects for gcp are a perfect on-ramp. Short, focused repos let you see how real resources get created, destroyed, and version-controlled. Browsing a few gcp terraform example shows exactly which arguments, APIs, and IAM roles are required—and which are optional. For anyone searching “beginner terraform gcp,” compact codebases keep cognitive load low while still demonstrating the power of Iac and GCP.
Before diving into real-world examples, it helps to master the basics in our GCP Terraform Provider Best Practices Guide. Once you understand how providers and state files work, terraform projects for GCP become the perfect on-ramp to hands-on learning.
Project Ideas for GCP with Terraform
Below are four starter-friendly ideas you can finish in an afternoon. Each one scales nicely into a larger portfolio of terraform projects for gcp, and every repo doubles as ready-made gcp terraform examples you can share with recruiters or teammates:
1. Provision a Compute Engine VM with Terraform
Launch a micro VM running Debian, attach a static external IP, and expose port 22. Great for “hello world” networking and firewall rules – classic beginner terraform gcp material.
2. Create and Secure a GCS Bucket
Build a regional bucket, enable uniform bucket-level access, and add a lifecycle rule. This reinforces storage fundamentals and illustrates infrastructure as a code gcp for data durability.
3. Deploy a Static Website with Cloud Storage + Cloud CDN
Combine the previous bucket project with a load-balanced HTTPS front end. It’s still a small repo, yet it highlights production-grade patterns and more advanced gcp terraform examples.
4. Configure Custom IAM Roles in Terraform
Define a minimal-privilege role and bind it to a service account. The pattern is reusable in all Terraform projects for gcp and cements identity-and-access basics for any beginner terraform gcp practitioner.
How to Structure Terraform Project Repos for GCP
A predictable layout keeps every collaborator (including future you) happy:
Pin providers and Terraform versions at the top of main.tf so your infrastructure as code gcp experiments stay reproducible. Treat each folder as a standalone unit; when you finish, you can cherry-pick pieces into bigger terraform projects for gcp without refactoring.
Tips for Iterating and Learning TF Projects for GCP:
3 Things that I personally recommend are:
Embrace modules early
Even tiny repos gain clarity when repetitive blocks move into modules/. Many public gcp terraform examples started as one-file proofs of concept and evolved the same way.
Use version control
Commit every change so you can diff state files, tag milestones, and roll back disaster – a habit every beginner terraform gcp coder needs.
Manage state deliberately
For solo hacks, local backends are fine; for team demos, migrate to Cloud Storage with locking. Sound state hygiene is essential for maintainable infrastructure as code gcp and for scaling your collection of terraform projects for gcp.
Conclusion – Keep Building, Keep Sharing
Small repos turn curiosity into confidence. Start with the ideas above, iterate, and publish your own gcp terraform examples to show progression from “beginner terraform gcp” to seasoned builder.
Backend Developer at ControlMonkey, passionate about Terraform, Terragrunt, and AI. With a strong computer science background and Dean’s List recognition, Daniel is driven to build smarter, automated cloud infrastructure and explore the future of intelligent DevOps systems.
For anyone starting out, the best Terraform projects for GCP are small and self-contained: like creating a Compute Engine VM, provisioning a Cloud Storage bucket, or deploying a static website with Cloud CDN. These beginner Terraform GCP projects help you understand core concepts like IAM roles, resource dependencies, and provider configuration without the risk of large-scale errors.
Yes. Terraform can manage multiple GCP projects through provider aliasing, workspaces, and remote state backends. If you’re scaling beyond beginner Terraform GCP experiments, you can modularize your codebase to handle dev, staging, and production. ControlMonkey helps teams automate and govern these environments so every infrastructure as code GCP deployment stays compliant and drift-free.
GCP Terraform Authentication Guide for Secure GKE Deployments
When your delivery pipeline relies on Google Kubernetes Engine, GCP Terraform authentication is the key link that keeps your Git commits secure and your production stable. Automating identity and certificate handling with cloud governance tools removes copy-pasted secrets, eliminates role sprawl, and keeps every Terraform apply reproducible. For a quick start, see how the ControlMonkey GCP Terraform Import Engine finds unmanaged resources. It turns them into code and shows cloud cost-saving opportunities. No manual state changes are needed.
Human user accounts may seem convenient, yet they often come with browser cookies, forgotten passwords, and unclear audit trails. Terraform runs belong to machines, so treat them that way. Purpose-built service accounts deliver:
This Terraform authentication on GCP flow keeps long-lived keys out of repos, rotates them on your schedule, and aligns with broader cloud governance best practices.
GCP Terraform Authentication with PEM-Encoded Certificates
When Terraform provisions GKE, it stores the cluster’s CA root in cluster_ca_certificatea base64 PEM string.
Downstream modules that expect a Terraform GCP cluster certificate PEM-encoded value can consume the output directly—no extra fetch is required, which streamlines pipelines and reduces costs.
Guard the PEM + valid token carefully: in tandem with a token, it grants API-server access.
Common GCP Terraform Authentication Misconfigurations
Even with solid gcp terraform authentication in place, four slip-ups surface again and again:
1. Hard-coded service-account keys.
Burying JSON keys in repos or CI variables that never rotate hands attackers a permanent backdoor and undermines your terraform gcp authentication strategy.
Follow Google’s guidance to rotate keys at least every 90 days and prefer short-lived tokens whenever possible. For step-by-step remediation, which walks through vaulting and automatic key rotation.
2. Over-broad IAM scopes.
Granting the roles/owner hammer where a tiny wrench would suffice violates least-privilege principles, inflates spending, and magnifies the blast radius.
Google’s IAM docs recommend assigning the narrowest predefined or custom roles required for a task, Terraform’s google_project_iam_member resource makes right-sizing trivial – use it.
3. Expired or mismatched PEM certificates.
A stale cluster_ca_certificate leads to x509: certificate signed by unknown authority errors that brick kubectl and Helm. Whenever you rotate GKE control-plane certs or recreate a cluster, refresh the PEM in state (or output) so downstream modules stay in sync.
4. Local developer credentials sneaking into CI.
Builds that rely on a laptop’s gcloud config break the moment that machine is offline and leave zero audit trail. Always export GOOGLE_CREDENTIALS from a vetted service account in the runner, and consider enforcing terraform validate checks that block plans using user tokens.
Secure GCP Terraform Authentication Best Practices
By codifying gcp terraform authentication from tightly scoped service accounts to refreshed PEM certificates, you transform identity management from an anxious manual chore into a repeatable, auditable control. The payoff is crystal-clear change history, faster incident response, and a security posture that scales with every new GKE cluster.
Ready to apply these patterns across your estate? See how ControlMonkey automates drift detection, policy enforcement, and key rotation in one unified workflow book a ControlMonkey demo today. Questions or feedback? Drop a comment below or book a call with us.
A 30-min meeting will save your team 1000s of hours
A 30-min meeting will save your team 1000s of hours
Yuval is a software engineer at ControlMonkey with a strong focus on DevOps and cloud infrastructure. He specializes in Infrastructure as Code, CI/CD pipelines, and drift detection. Drawing from real-world conversations with engineering teams, Yuval writes about practical ways to automate, scale, and secure cloud environments with clarity and control.
The safest option is using a service account with the right IAM role. Skip user logins and hard-coded keys – they’re messy and insecure.
Instead, store keys properly, rotate them often, and let Terraform pull them in through environment variables or a secret manager.
Google suggests at least every 90 days, but most DevOps teams set up automatic rotation or use short-lived tokens so they don’t have to think about it. The shorter the lifespan, the lower the risk.
Yes and it’s a good idea. Workload Identity Federation lets Terraform authenticate without static keys, using OIDC or identities from AWS/Azure.
It’s cleaner, safer, and avoids the hassle of key management.
GCP Terraform authentication is the process of allowing Terraform to securely access Google Cloud resources. Instead of relying on manual user keys, Terraform uses service accounts, IAM roles, and short-lived credentials to deploy and manage infrastructure safely.
Yes. ControlMonkey automates service account key rotation, drift detection, and policy enforcement. It ensures that Terraform authentication on GCP is secure, compliant, and reproducible across all environments.
GCP Compute Engine Terraform 2025: Create a VM Instance
Daniel Alfasi
Backend Developer and AI Researcher
When teams need to spin up infrastructure quickly, nothing beats gcp compute engine terraform for consistent, declarative deployments. By combining Terraform’s state management with Google’s robust APIs, you can treat every terraform gcp instance like code, repeatable in any environment. Whether your goal is a small lab box or a production-ready cluster, you’ll find that learning to create a Compute Engine VM with Terraform pipelines pays off immediately.
The snippet below shows the absolute minimum you need to define a terraform gcp instance. Once applied, Terraform talks to the Google Cloud API and delivers a ready-to-use terraform vm gcp without clicking around the console.
Before running terraform apply, execute terraform init to pull the GCP provider and lock versions, and terraform plan to preview changes. After one apply, you create compute engine terraform resources that can be shared across projects, audited in version control, and destroyed just as easily.
Configuring Machine Types, Zones, and Metadata in GCP Compute Engine Terraform
Scaling a terraform vm gcp is as simple as swapping the machine_type field—e2-medium for a web server, c3-standard-8 for a test runner. Need to burst into another region? Change zone and Terraform builds a twin. Because each parameter is codified, you can replicate or refactor any terraform gcp instance with zero drift.
Teams can quickly experiment, knowing that peer reviews will help catch any problems before they start creating compute engine terraform resources in production. This kind of consistency is one of the main reasons we decided to standardize on GCP compute engine terraform for all our temporary workloads.
If you store state in Cloud Storage with a backend block, colleagues can collaborate safely, avoiding conflicting writes. Pair it with a service account that has roles/compute.admin plus read access to the bucket for least-privilege security.
Provisioning Startup Scripts and SSH in Terraform GCP Instances
A common pattern when authoring terraform vm gcp blueprints is to attach a startup script that installs packages, configures logging, and registers the node with your CI system.
You can keep the script inline for fast demos, or reference an external file with file(“scripts/startup.sh”) approaches that work identically across every terraform gcp instance you deploy. In fact, the first time you create compute engine terraform resources with scripts attached, you’ll realise how much manual setup disappears. That cemented for our team the value of gcp compute engine terraform repeatability.
Conclusion: Why Standardize on GCP Compute Engine Terraform
With roughly twenty lines of code, you’ve gone from nothing to a reproducible VM, all without leaving your terminal. Ready for production? Check out CMK’s full-featured GCP Compute Module for built-in firewall rules, SSH key management, monitoring hooks, and many best-practice defaults.
Clone it and start shipping infrastructure today! Questions or feedback? Drop a comment below or book a call with us.
A 30-min meeting will save your team 1000s of hours
A 30-min meeting will save your team 1000s of hours
Backend Developer at ControlMonkey, passionate about Terraform, Terragrunt, and AI. With a strong computer science background and Dean’s List recognition, Daniel is driven to build smarter, automated cloud infrastructure and explore the future of intelligent DevOps systems.
to create a VM, define a google_compute_instance resource in your Terraform configuration, specifying parameters like machine type, zone, and boot disk. After running terraform init, terraform plan, and terraform apply, Terraform provisions the VM in Google Cloud Compute Engine. This makes the process reproducible, version-controlled, and easy to scale.
Using Terraform for Compute Engine gives you infrastructure as code. You can version, review, and reuse VM definitions across projects, avoid manual drift, and standardize deployments with peer-reviewed code. Teams gain faster provisioning, repeatability, and stronger security when pairing Terraform with service accounts and remote state.
Before applying Terraform, make sure the Compute Engine API is enabled in your GCP project. You can do this via the GCP Console or by running gcloud services enable compute.googleapis.com. Without it, Terraform cannot create VM resources.
Add or modify the tags block in your google_compute_instance resource. Running terraform apply updates the tags across the instance, making it easy to manage firewall rules or group resources dynamically.
GCP PAM Integration with Terraform: Can You Automate It?
Yuval Margules
Backend Developer
When your delivery pipeline relies on Google Kubernetes Engine, GCP Terraform authentication is the key link that keeps your Git commits secure and your production stable. Automating identity and certificate handling with cloud governance tools removes copy-pasted secrets, eliminates role sprawl, and keeps every Terraform apply reproducible. For a quick start, see how the ControlMonkey GCP Terraform Import Engine finds unmanaged resources. It turns them into code and shows cloud cost-saving opportunities. No manual state changes are needed.
Why GCP Terraform Authentication Matters for Security
Human user accounts may seem convenient, yet they often come with browser cookies, forgotten passwords, and unclear audit trails. Terraform runs belong to machines, so treat them that way. Purpose-built service accounts deliver:
This Terraform authentication on GCP flow keeps long-lived keys out of repos, rotates them on your schedule, and aligns with broader cloud governance best practices.
Generating PEM-Encoded Cluster Certificates
When Terraform provisions GKE, it stores the cluster’s CA root in cluster_ca_certificatea base64 PEM string.
Downstream modules that expect a Terraform GCP cluster certificate PEM-encoded value can consume the output directly—no extra fetch is required, which streamlines pipelines and reduces costs.
Guard the PEM + valid token carefully: in tandem with a token, it grants API-server access.
Common Misconfigurations in Terraform GCP Authentication
Even with solid gcp terraform authentication in place, four slip-ups surface again and again:
1. Hard-coded service-account keys.
Burying JSON keys in repos or CI variables that never rotate hands attackers a permanent backdoor and undermines your terraform gcp authentication strategy.
Follow Google’s guidance to rotate keys at least every 90 days and prefer short-lived tokens whenever possible. For step-by-step remediation, which walks through vaulting and automatic key rotation.
2. Over-broad IAM scopes.
Granting the roles/owner hammer where a tiny wrench would suffice violates least-privilege principles, inflates spending, and magnifies the blast radius.
Google’s IAM docs recommend assigning the narrowest predefined or custom roles required for a task, Terraform’s google_project_iam_member resource makes right-sizing trivial—use it.
3. Expired or mismatched PEM certificates.
A stale cluster_ca_certificate leads to x509: certificate signed by unknown authority errors that brick kubectl and Helm. Whenever you rotate GKE control-plane certs or recreate a cluster, refresh the PEM in state (or output) so downstream modules stay in sync.
4. Local developer credentials sneaking into CI.
Builds that rely on a laptop’s gcloud config break the moment that machine is offline and leave zero audit trail. Always export GOOGLE_CREDENTIALS from a vetted service account in the runner, and consider enforcing terraform validate checks that block plans using user tokens.
Secure GCP Terraform Authentication Best Practices
By codifying gcp terraform authentication from tightly scoped service accounts to refreshed PEM certificates, you transform identity management from an anxious manual chore into a repeatable, auditable control. The payoff is crystal-clear change history, faster incident response, and a security posture that scales with every new GKE cluster.
Ready to apply these patterns across your estate? See how ControlMonkey automates drift detection, policy enforcement, and key rotation in one unified workflow book a ControlMonkey demo today.
A 30-min meeting will save your team 1000s of hours
A 30-min meeting will save your team 1000s of hours
Yuval is a software engineer at ControlMonkey with a strong focus on DevOps and cloud infrastructure. He specializes in Infrastructure as Code, CI/CD pipelines, and drift detection. Drawing from real-world conversations with engineering teams, Yuval writes about practical ways to automate, scale, and secure cloud environments with clarity and control.
GCP Terraform authentication is the process of allowing Terraform to securely access Google Cloud resources. Instead of relying on manual user keys, Terraform uses service accounts, IAM roles, and short-lived credentials to deploy and manage infrastructure safely.
Hard-coding JSON keys in repositories or CI variables creates long-lived secrets that attackers can exploit. A better approach is to rotate keys regularly, store them in a secure vault, or use short-lived tokens with Google’s authentication flows.
Yes. ControlMonkey automates service account key rotation, drift detection, and policy enforcement. It ensures that Terraform authentication on GCP is secure, compliant, and reproducible across all environments.