Imagine you are using your favorite IaC tool – Terraform, to deploy infrastructure for three environments: development, staging, and production. Each environment needs its own configurations, resource names, tags, and other customizations, however the underlying architecture remains the same. Without Terraform variables, you would create copies of the same configurations with minor changes in values. Therefor, Terraform variables allow you to parameterize your code to be flexible, maintainable, and reusable. Mastering the use of variables is essential for creating configurations that are both reusable and flexible to changing requirements.
📚 Related Reading:
- 🗺️ Terraform Map Usage Explained: Learn how to define and use key-value pairs for dynamic tagging, environments, and configurations.
- 🔁 Terraform tolist() Function Guide: Convert complex data types into lists for cleaner and more flexible modules.
- 🐛 Terraform Errors Explained: Understand, prevent, and fix the most common Terraform issues.
What Are Terraform Variables?
Terraform variables act as placeholders that allow you to parameterize your infrastructure configuration without modifying the underlying code. Similar to variables in programming languages, you declare them with names and assign values that Terraform interpolates during execution. You can create a variable to set an AWS region, instance type, or S3 bucket name. You can then use this variable throughout your Terraform scripts.
Similar to most programming languages, Terraform variables have various types.
- Strings: Text values
- Numbers: Numeric values
- Booleans: true/false values
- Lists: Ordered collections of values
- Maps: Collections of key-value pairs
- Objects: Complex structured data
- Sets: Unordered collections of unique values
Here is how you define a variable in Terraform:
variable "instance_type" {
  description = "The type of EC2 instance to deploy"
  type        = string
  default     = "t2.micro"
}
You can then reference the variable across your code:
resource "aws_instance" "web_server" {
  ami           = "ami-0c55b159cbfafe1f0"
  instance_type = var.instance_type
}
Using Terraform Variables in AWS Deployments
Managing Terraform variables effectively is essential in cloud environments such as AWS, where infrastructure spans multiple services and environments. Variables allow you to maintain consistency and standardize your complex AWS environments. For example, almost all AWS resources support tagging. You can enforce mandatory tags for all resources and use variables to configure the tag values.
Identifying variables
A good starting point is identifying the environment-specific (Infrastructure-related) data and naming conventions suitable for your deployments. Let’s take a scenario where you deploy an application for different customers on AWS. Each customer requires dedicated infrastructure. Some customers require several environments and have requirements on which region they need their application deployed.
We can recognize the following variables change based on the customer and environment:
- Customer Name
- Region
- Environment Name
Environment name and Customer Name are not AWS-related concepts. So we can categorize them for naming conventions.
The region is environment-specific and AWS related. Apart from the region, what else can we parameterize? Well, that depends on what AWS resources you deploy. To keep it simple, let’s say this application runs on an EC2 instance and needs access to an S3 bucket. So, at a minimum, we should create a VPC, an EC2, an S3 bucket, and an IAM Policy.
We will use customer name as a prefix and environment as a suffix for resource names. Therefor, this helps us create distinct and easily identifiable resources and ensures resource names are not repeated across deployments. Also note that resources such as S3 buckets and IAM Policies are global and cannot have the same name across regions.
variable "customer_name" {
  description = "Customer Name"
  type        = string
}

variable "environment" {
  description = "Environment Name"
  type        = string
  default     = "dev"
}
We would need to create different VPCs without CIDR overlap, and we will also need to change the instance type for each customer. Likewise, we will create some AWS-related variables that are also customer—and environment-specific.
Note that you can maintain all your variables in a separate file, typically named variables.tf
Identifying Locals
Terraform locals are a type of variable that you declare for internal calculations and derived values. You cannot provide them externally. If you want to construct a new variable based on some values, you should use locals.
Let’s use locals to satisfy the following requirements;
- We use tags in many of our resources. Locals can be used to create a single local variable that holds all our tags
- We will prefix all our resource names with “-”.
- We want to create two EC2 instances if the environment is prod
locals {
  common_tags = {
    Customer    = var.customer_name
    Environment = var.environment
    ManagedBy   = "Terraform"
    Project     = "${var.customer_name}-${var.environment}"
  }

  name_prefix = "${var.customer_name}-${var.environment}"

  is_production = var.environment == "prod" ? true : false

  instance_count = local.is_production ? 2 : 1
}
Creating reusable scripts
In this paragraph we will show variables and locals in our script.
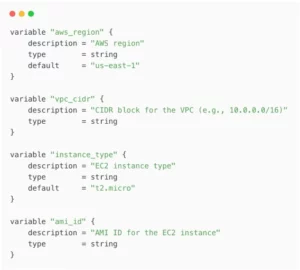
First Step: Define your variables
variable "customer_name" {
  description = "Customer Name"
  type        = string
}

variable "environment" {
  description = "Environment Name"
  type        = string
  default     = "dev"
}

variable "aws_region" {
  description = "AWS region"
  type        = string
  default     = "us-east-1"
}

variable "vpc_cidr" {
  description = "CIDR block for the VPC (e.g., 10.0.0.0/16)"
  type        = string
}

variable "instance_type" {
  description = "EC2 instance type"
  type        = string
  default     = "t2.micro"
}

variable "ami_id" {
  description = "AMI ID for the EC2 instance"
  type        = string
}
Step 2: Local values and tags
locals {
  common_tags = {
    Customer    = var.customer_name
    Environment = var.environment
    ManagedBy   = "Terraform"
    Project     = "${var.customer_name}-${var.environment}"
  }

  name_prefix      = "${var.customer_name}-${var.environment}"
  is_production    = var.environment == "prod" ? true : false
  instance_count   = local.is_production ? 2 : 1
}
Step 3: Configure the provider and networking resources
provider "aws" {
  region = var.aws_region
}

resource "aws_vpc" "main" {
  cidr_block = var.vpc_cidr
  tags = merge(local.common_tags, {
    Name = "${local.name_prefix}-vpc"
  })
}

resource "aws_subnet" "main" {
  vpc_id     = aws_vpc.main.id
  cidr_block = var.vpc_cidr
  tags = merge(local.common_tags, {
    Name = "${local.name_prefix}-subnet"
  })
}
Create a security group
resource "aws_security_group" "allow_ssh" {
  name        = "${local.name_prefix}-sg"
  description = "Allow SSH inbound traffic"
  vpc_id      = aws_vpc.main.id

  ingress {
    description = "SSH from anywhere"
    from_port   = 22
    to_port     = 22
    protocol    = "tcp"
    cidr_blocks = ["0.0.0.0/0"]
  }

  egress {
    from_port   = 0
    to_port     = 0
    protocol    = "-1"
    cidr_blocks = ["0.0.0.0/0"]
  }

  tags = merge(local.common_tags, {
    Name = "${local.name_prefix}-sg"
  })
}
Step 5: Launch EC2 instance(s)
resource "aws_instance" "web" {
  count         = local.instance_count
  ami           = var.ami_id
  instance_type = var.instance_type
  subnet_id     = aws_subnet.main.id
  vpc_security_group_ids = [aws_security_group.allow_ssh.id]

  tags = merge(local.common_tags, {
    Name = "${local.name_prefix}-instance-${count.index + 1}"
  })
}
✅ Last Step: Create an S3 bucket and IAM policy
resource "aws_s3_bucket" "data" {
  bucket = "${local.name_prefix}-data"
  tags = merge(local.common_tags, {
    Name = "${local.name_prefix}-data"
  })
}

resource "aws_iam_policy" "s3_access" {
  name        = "${local.name_prefix}-s3-access"
  description = "Policy to allow access to the customer's S3 bucket"

  policy = jsonencode({
    Version = "2012-10-17"
    Statement = [
      {
        Action = [
          "s3:GetObject",
          "s3:ListBucket"
        ]
        Effect   = "Allow"
        Resource = [
          aws_s3_bucket.data.arn,
          "${aws_s3_bucket.data.arn}/*"
        ]
      }
    ]
  })
}
Notice how we used the common_tags and name_prefix locals in all our resources. We declared them as values for arguments in our resources. We also used the count meta-argument to conditionally set the number of EC2 instances based on our environment.
Declaring Outputs
Outputs are another kind of variable. You can use outputs to print the actual infrastructure information provisioned by your configurations.
output "vpc_id" {
  value       = aws_vpc.main.id
  description = "The ID of the VPC"
}

output "instance_id" {
  value       = aws_instance.web.id
  description = "The ID of the EC2 instance"
}

output "s3_bucket_name" {
  value       = aws_s3_bucket.data.bucket
  description = "The name of the S3 bucket"
}
Declaring Outputs Provisioning with Terraform Variables
We can apply this script by substituting values;

Our script is now reusable and flexible, but there is still a problem. Depending on our deployment, we want to vary the values we use for each variable. We should also version-control which values we use for each deployment.
Terraform has a neat way to handle this requirement — learn how to automate your deployments. You can create a .tfvars file that sets these variables and overrides defaults. You can maintain this file in your version control.
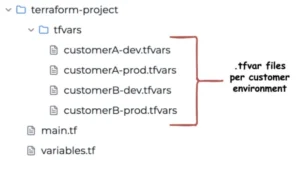
Here is our .tfvars file. Let’s call it customerA-dev.tfvars.
customer_name = "controlmonkey"
aws_region    = "us-east-1"
environment   = "dev"
vpc_cidr      = "10.2.0.0/16"
ami_id        = "ami-084568db4383264d4"
Let’s apply it with the command;
terraform apply -var-file=” ./tfvars/customerA-dev.tfvars ”
Furthermore, let’s say we have another customer – CustomerB, and we should deploy their “prod” environment. Our “ customerB-prod.tfvars ” file would be
customer_name   = "customerB"
aws_region      = "ap-northeast-1"
environment     = "prod"
vpc_cidr        = "10.5.0.0/16"
ami_id          = "ami-084568db4383264d4"
instance_type   = "t2.medium"
Notice we did not provide instance_type for customerA. That is because we have set a default value for that variable.
4 Best Practices for Using Terraform Variables
1) Group related variables:
Organize variables by function or resource type.
See how top teams enforce Terraform best practices at scale
You’ve learned the theory — now see how a unified IaC platform automates variable governance, drift prevention, and enforceable policies across all environments.
2) Always include descriptions
Document what each variable is for:
variable "vpc_cidr" {
  description = "CIDR block for the VPC (e.g., 10.0.0.0/16)"
  type        = string
}
3) Set sensible defaults:
Provide reasonable default values when appropriate:
variable "environment" {
  description = "Deployment environment"
  type        = string
  default     = "dev"
}
4) Validate inputs:
Use validation rules to prevent errors:
variable "instance_type" {
  type    = string
  default = "t2.micro"

  validation {
    condition     = contains(["t2.micro", "t3.small", "t3.medium"], var.instance_type)
    error_message = "Instance type must be t2.micro, t3.small, or t3.medium."
  }
}
5)Use variable files for environment-specific values:
Create separate .tfvars files for dev, staging, and production.
Common Terraform Variables Pitfalls to Avoid
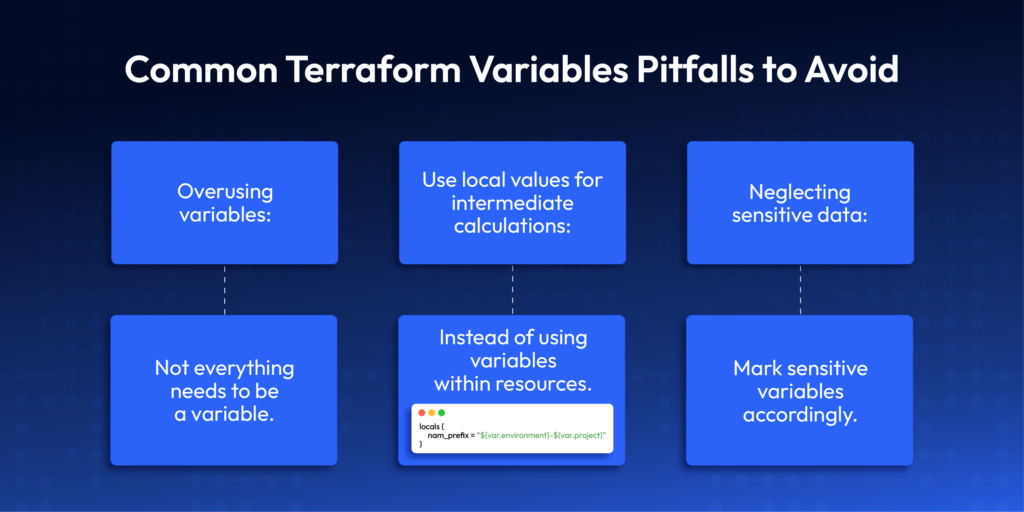
1️⃣ Overusing Terraform variables:
despite this article, not everything needs to be a variable.
2️⃣ Use local values for intermediate calculations:
When you can instead of using variables within resources:
locals {
  name_prefix = "${var.environment}-${var.project}"
}
3️⃣Neglecting sensitive data:
Lastly it is important to mark sensitive variables accordingly.
variable "database_password" {
  description = "RDS database password"
  type        = string
  sensitive   = true
}
Terraform Variables Conclusion
The power of Terraform variables is in transforming your static infrastructure code into dynamic and reusable configurations. By using variables, you can keep deployments consistent in different environments. You can find configuration drift early. Working with best practices will help you avoid common mistakes. This will help you create secure Infrastructure as Code (IaC) configurations. One more thing you should look into is to detect configuration drift early. These can grow with your organization’s needs.
With ControlMonkey, you can automate managing Terraform variables. It helps you follow best practices and makes deployments easier for different environments. Enjoy AI-driven efficiency and multi-cloud compliance. Request a demo or learn more in our resource library.