Terraform is a popular open-source Infrastructure as Code(IaC) tool built by HashiCorp to help organizations automate their infrastructure management for target environments.
In this blog, we will guide you on how to manually import AWS resources to Terraform code.
Take a look at this Google trend analysis comparing Terraform to other Infrastructure as Code (IaC) tools like AWS Cloud Development Kit (CDK), CloudFormation, and Pulumi.
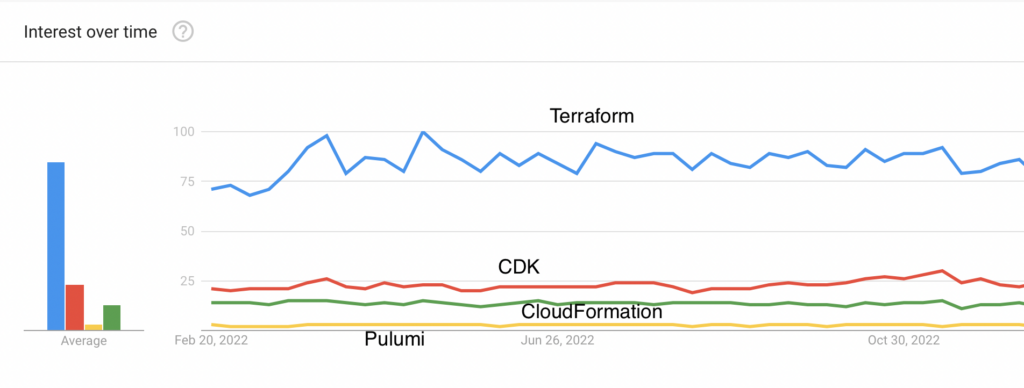
This graph reflects these tools’ global web search trends over the past twelve months. Now, if you are wondering why Terraform is so popular, these are the top reasons why Terraform transcends others in popularity:
- It offers extensive community support
- It provides consistent Multi-Cloud Support
- It’s a vendor-agnostic tool
What is Terraform and Why Use Terraform Import?
Now that we’ve covered why Terraform is a widespread Infrastructure as Code (IaC) tool in the market, let’s dive into what Terraform is and its main components.
In simple terms, Terraform (by Hashicorp) is an IaC tool that leverages a declarative syntax and desired-state model to deploy infrastructure to target environments. But what exactly does that mean?
- Declarative Syntax – Declare only the expected configuration of the resources and let Terraform suggest how to get there instead of giving step-by-step instructions (imperative way) to deploy infrastructure. Terraform uses HCL or JSON language to write the declarative configuration.
- Desired-State Model – Terraform leverages the APIs of the target environments (e.g., AWS, Azure) to compare the desired state declared in the declarative configuration vs the actual state in the target environment.
Terraform Components
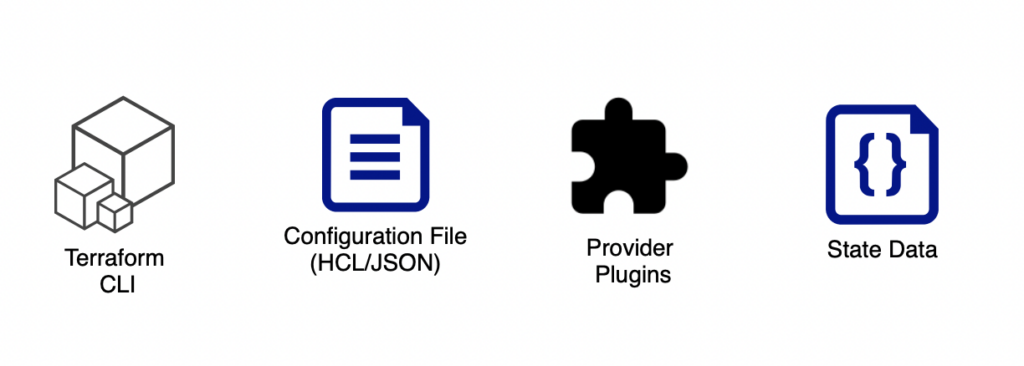
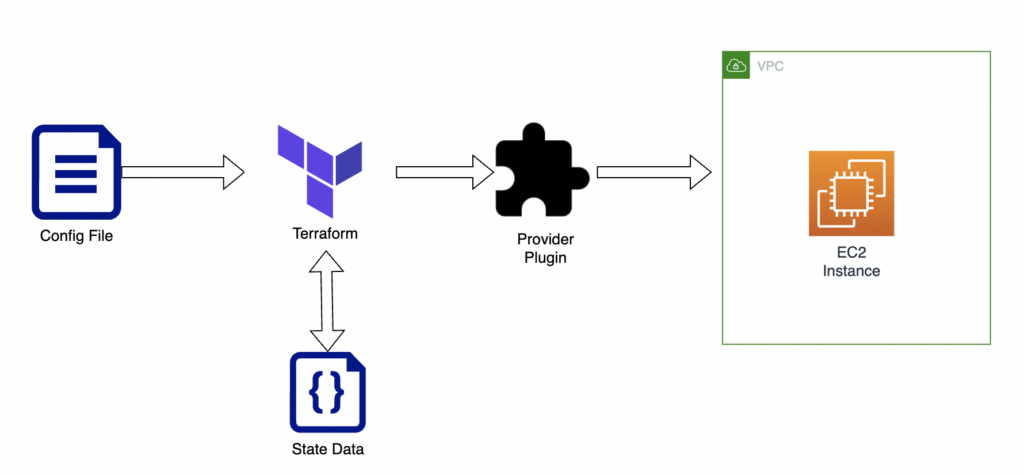
Terraform has four main components, as shown in the above image.
- Terraform CLI – An executable that contains commands for managing resources.
- Configuration File – This is where you define resources using the HCL or JSON language.
- Provider Plugins – These plugins connect to resource providers such as AWS, Azure, GCP, etc.
- State Data – After updating the resources, Terraform updates the state of the resources in the terraform.tfstate file. During the next update, Terraform compares the current state of the resources and the last updated state in the state file to identify the difference. Then, Terraform updates only the difference.

Terraform Workflow Before Import
How do the above four components connect in Terraform?
Imagine you want to create an EC2 instance in the AWS cloud platform with Terraform. The following are the steps that you’d typically follow:
- Install Terraform CLI for your operating system.
- Create a Terraform config file (e.g., main.tf ) with HCL and define EC2 configuration as a resource.

- Define “aws” as the provider, such that Terraform downloads and uses the AWS provider plugin to deploy resources to AWS.
- Initialize terraform project with terraform init and deploy the resources with terraform apply. Optionally, you can use terraform plan to validate the suggested deployment plan from Terraform.
- When you issue terraform apply command, Terraform checks if a state file is already available (during the initial deployment, there will not be a state file). If a state file exists, it will compare the existing terraform configuration against the state file configuration to find the difference and deploy it to Terraform. (See the diagram above).
- Once the deployment is complete, Terraform updates the latest state of the AWS resources in the state file. (See the diagram above).
Terraform Import
The typical terraform workflow is straightforward when you provision resources from scratch.
However, if there are already created resources outside Terraform, you can use the “Terraform Import” command to track and manage them under Terraform.
For example, imagine you have an EC2 instance created manually using the AWS console user interface. Let’s use Terraform Import to track that resource in Terraform so that the subsequent updates to the EC2 can be issued via Terraform.
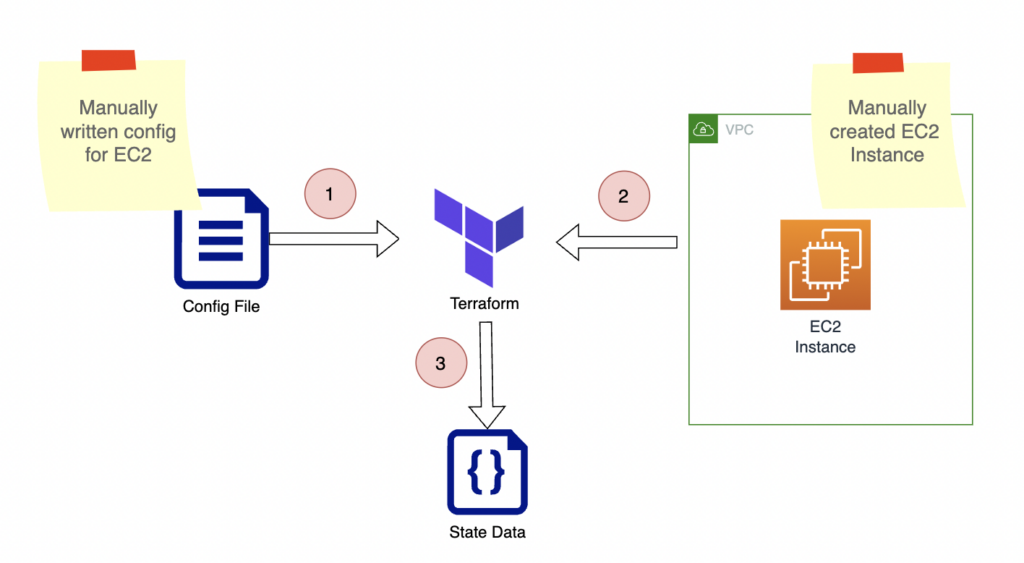
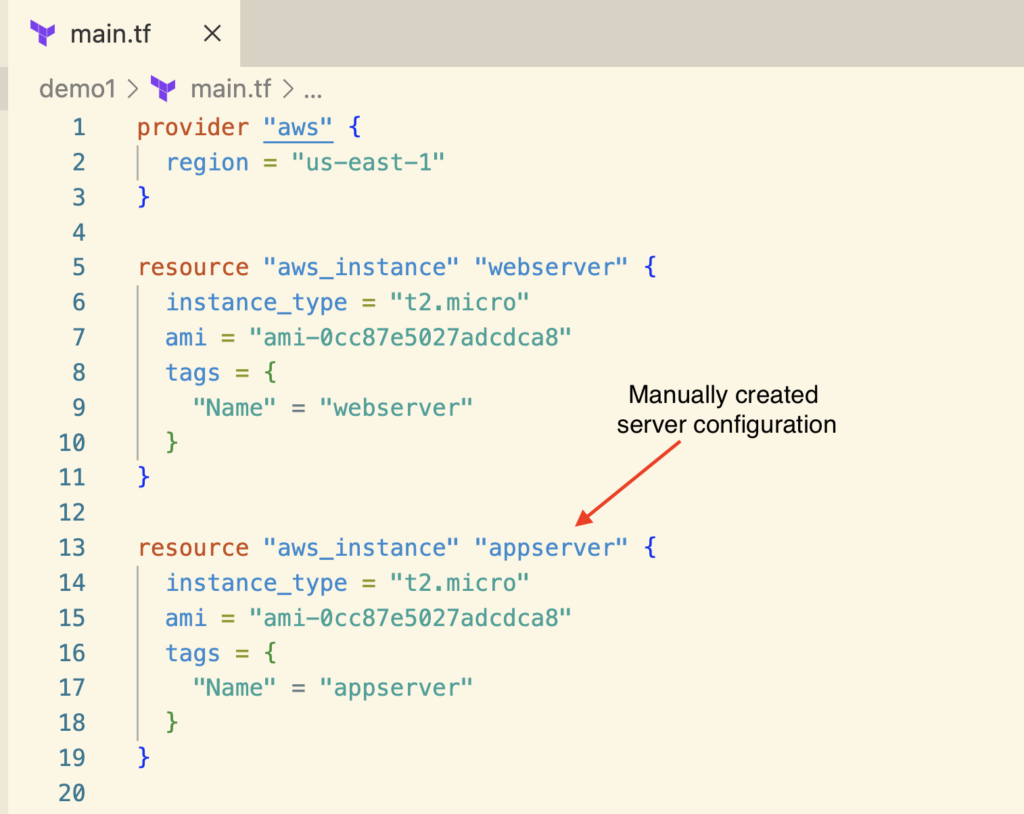
First, you need to update the EC2 instance details in the Terraform configuration file as if Terraform created it in the first place.
This work is manual since Terraform doesn’t generate the terraform configuration with terraform import command.
It’s essential to include all the configuration of the existing resource in the terraform configuration file for Terraform to manage the existing resource accurately.
Next, you can run the “Terraform Import” command. The import command will scan the resource by its id or name in the target environment, capture its configuration, and map it to the terraform resource you have defined.
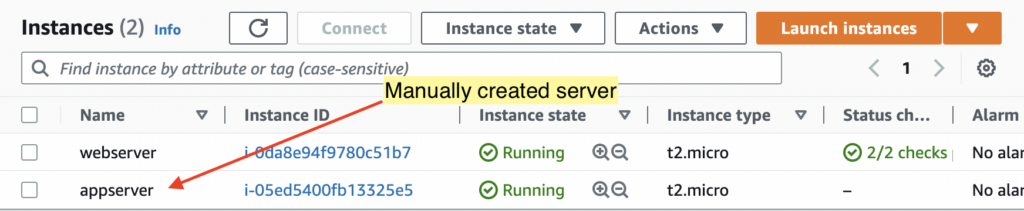
terraform import aws_instance.<logical_name> <ec2_instance_id>In the example above, let’s use the logical_name as “appserver” and the manually created EC2 instance id “i-05ed5400fb13325e5”. Therefore the import command is:
terraform import aws_instance.appserver i-05ed5400fb13325e5If the import has been successful, you should see a message similar to this in the console.
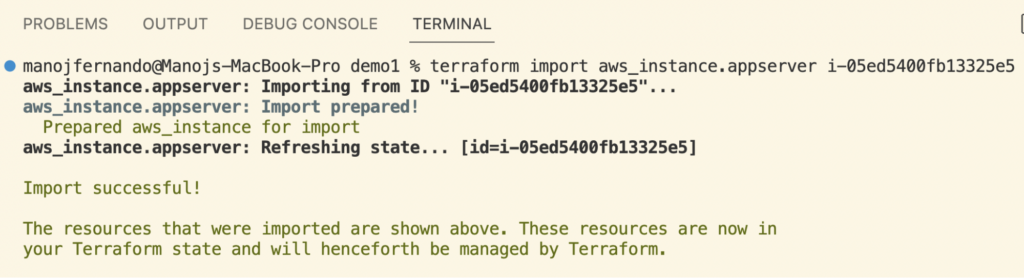
Once the import is successful, Terraform updates the imported EC2 instance’s current state data in the state file.
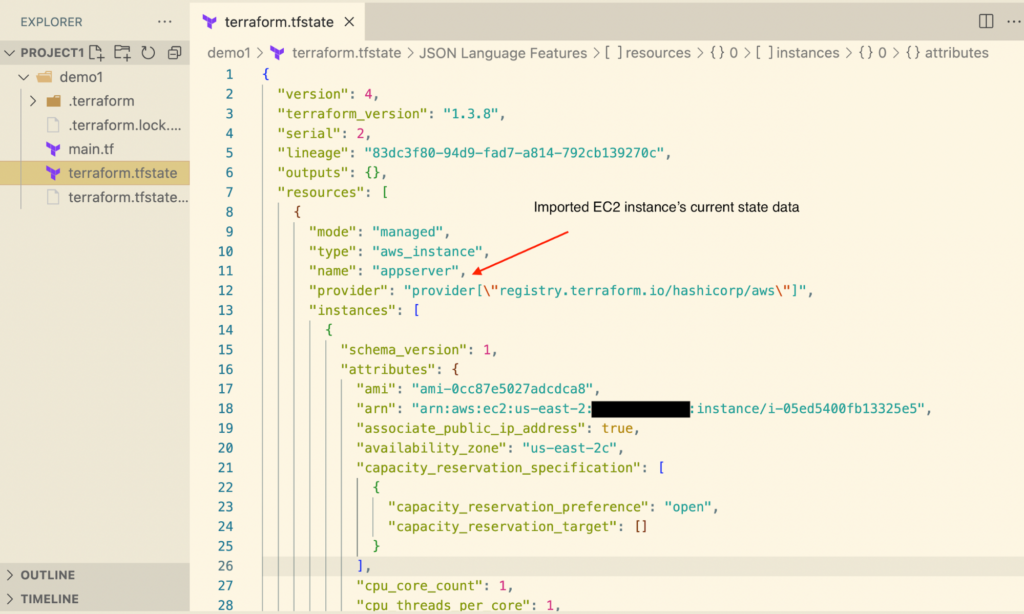
Now that you have a Terraform configuration file for your EC2 instance and a Terraform state file with the imported EC2 instance, subsequent updates to the EC2 instance can be managed with Terraform.
4 Challenges in Terraform Import
Terraform import is a helpful tool for importing and tracking the resources created outside Terraform, and it works great with simple use cases. However, importing complex resources or working in a team can sometimes be challenging. Let’s explore some of those challenges:
1. Error-prone Manual Configuration
One of the biggest challenges when using terraform import is that it does not generate the corresponding configuration automatically. You must manually create the configuration for the imported resource, which can be time-consuming and error-prone.
Here are the steps for performing the task manually:
- Open the AWS console and look for the specific resource.
- Open the Terraform AWS documentation and look for the relevant resource type.
- Start copying the attributes one by one.
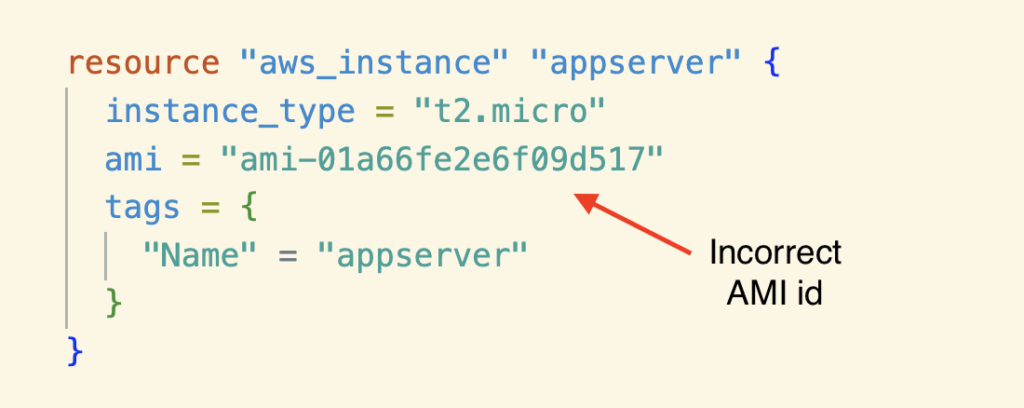
As discussed above, when importing an EC2 instance, you must add the manual Terraform configuration before running the import command.
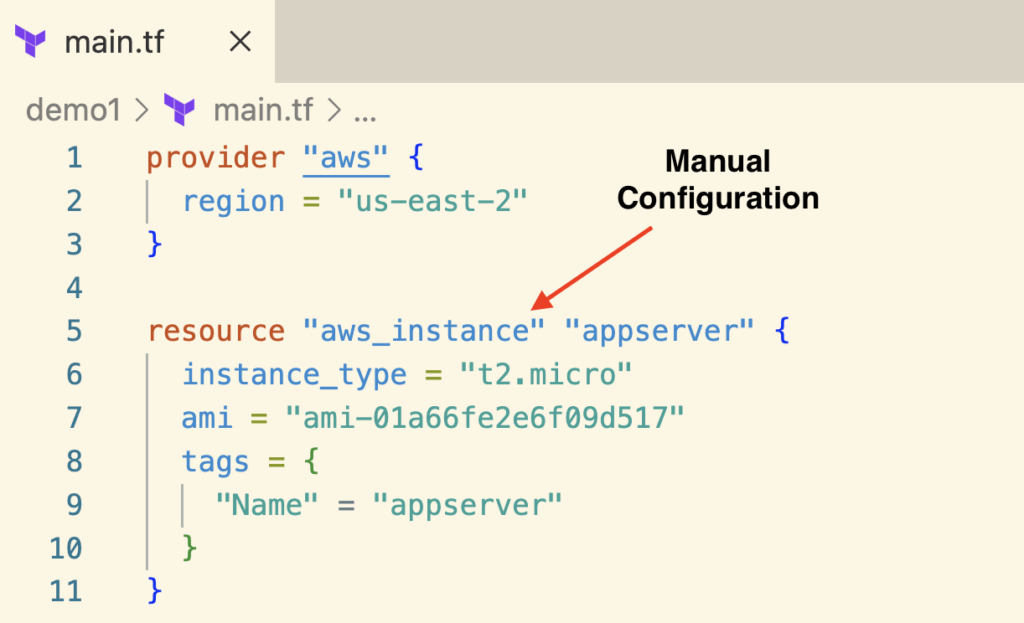
Now, this is a simple import, so the configuration is straightforward. Even in this example, if you provide an incorrect AMI id and run the “terraform import” followed by “terraform apply,” Terraform will destroy your existing EC2 instance in AWS.

Suppose you import complex resources with dependencies, like a VPC with VPC constructs such as internet gateway, route tables, security groups, IAM roles, and the EC2 instances in the VPC. In that case, you may make more configuration mistakes due to the manual process.

2. Require Exact Resource Ids
Another challenge is that terraform import requires you to know the exact resource ID of the resource you’re trying to import. Each Terraform resource in the AWS provider expects a specific physical ID when importing; some resources even expect to get a tuple of identifiers.
For example, when importing aws_autoscaling_policy, it expects to get the autoscaling group and scaling policy names.
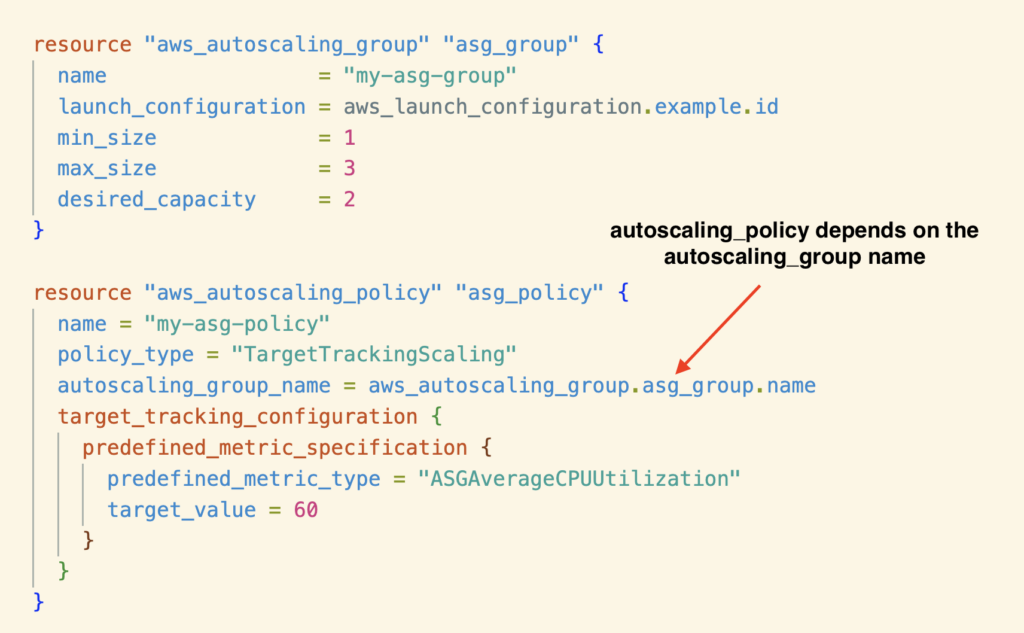
In the example above, autoscaling_policy has a dependency on the autoscaling_group name. Therefore, you must import autoscaling_group first, or Terraform will throw an error.
Importing resources according to their dependencies is always recommended to ensure a successful import.
To import the autoscaling_group and the autoscaling_policy, you must know the actual names of these resources from the AWS console.
terraform import aws_autoscaling_group.asg_group <asg_group_name>terraform import aws_autoscaling_policy.asg-policy <asg_group_name>/<asg_policy_name>So the more dependent the resources are, the more you must refer to the actual resource ids or names and execute the import command multiple times.
3. Handling Drifts
After running Terraform Import, you should run the Terraform Plan command to ensure no drifts between the Terraform configuration file you wrote manually and the real-world resource.
A drift means a discrepancy between the desired state, your configuration file, and the actual state in the just-created state file.
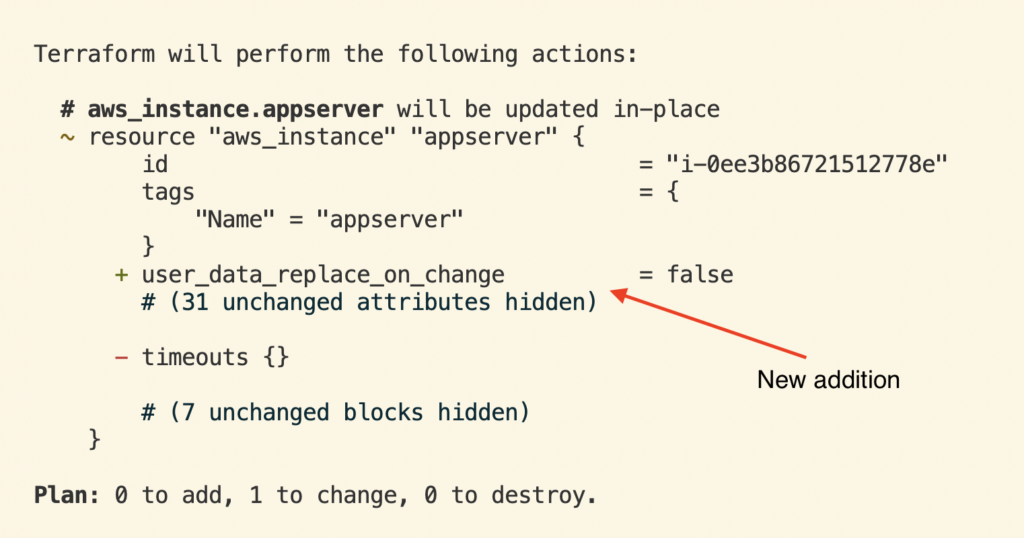
If the “Terraform Plan” command response contains any create/update/delete changes, there’s a drift. The physical resource will be overwritten if you run the “Terraform Apply” command.
In the above example, if the user_data_replace_on_change attribute is not set in the Terraform configuration, it will receive a default value when running “Terraform Apply.”
Have a look at the following description in the documentation for user_data_replace_on_change.

Another challenge is “Chasing default attribute values” in the imported resources. So, before importing a resource, you should read its documentation to identify all the attributes that receive default values.
If you haven’t added these attributes to the Terraform Configuration file, the “Terraform Plan” command will indicate a drift.
As you may agree, referring to the documentation when importing a resource and scanning its attributes is tedious. It gets worse if you are to import a bunch of resources that were manually created.
4. Destruction of resources
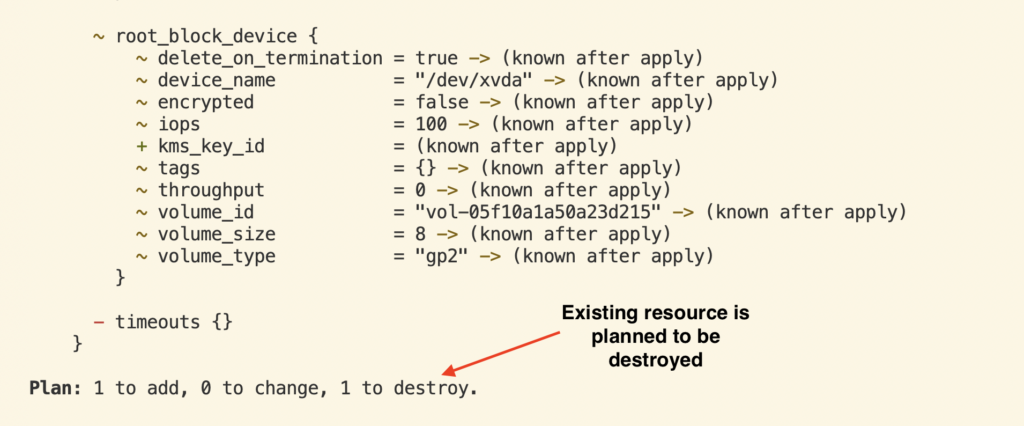
There is a risk of destroying the existing resource if you make a mistake in the Terraform configuration of the resource.
Like the example above, if you mistakenly give a different AMI id, Terraform destroys the existing EC2 instance and creates a new one.
When you run the “Terraform Import” command, it succeeds without warning.

But if you do a “Terraform Plan,” you see the warning that the resource will be destroyed. At this point, you can prevent it from happening by not running “Terraform Apply.”
Running “Terraform Apply” with –auto-approve in your CI/CD or terraform could be a big problem.
All the challenges we described here refer to a single resource. How would you handle importing a whole environment with thousands of resources?
4 Best Practices in Terraform Import
So how do you mitigate some of the challenges mentioned in the above section? Look at the following best practices when importing resources with Terraform Import.
1. Selectively Import Resources
Creating a list of items you plan to import to Terraform is essential. When you have a list, you can identify the resources with too many dependencies, those frequently used, and those that team members and other teams often update.
With that, you can decide to select the resources you must import and minimize the risks mentioned above.

2. Keep your state file in a shared storage
It’s generally recommended to keep your Terraform state file in a shared storage location rather than on your local machine for a few reasons:
Consistency: A shared state file ensures that everyone uses the same state of the infrastructure. If each team member has a copy of the state file, it can be challenging to ensure consistency across different environments and prevent drift.
Backup and Recovery: A shared storage location provides a central point for backing up and recovering your state file. If your local machine crashes or your state file becomes corrupted, storing a backup in a shared location can save you time and effort.
Remote Execution: Storing state files on shared storage makes running Terraform in a remote environment, such as a build server or a continuous integration/continuous deployment (CI/CD) pipeline, easier.
Overall, using a shared storage location for your Terraform state file helps ensure consistency, collaboration, and ease of use, making it a critical best practice when using Terraform for infrastructure management.
3. Team communication
For example, suppose team members are unaware that a resource has been imported. In that case, they may accidentally overwrite it when making changes to the Terraform configuration, which can cause the destruction of the existing resources or overwrite the current state of the resources, leading to data loss.
When working with a team, Terraform import can introduce risks if not used carefully.
Establishing clear guidelines for importing resources and communicating them to all team members is crucial to mitigate such risks. All the team members must know which resources have been imported and how they should be managed.
4. Documenting Terraform Imports
Keeping good documentation about imported terraform resources is vital in the long run. If new members join the team in the future, they can refer to the documentation and learn about imported resources and the process of managing those resources.
Automated Terraform Import
Manually importing AWS resources to Terraform by using the ‘Terraform Import’ command requires a lot of care and attention, which normally translates to a considerable amount of time and effort.
ControlMonkey’s ‘Terraform Import Engine’ seamlessly identifies which AWS resources are not managed by Terraform, and with a single click, generates Terraform code for them.
Our Generative Algorithm Engine helps DevOps teams shift 1000s of AWS resources to Terraform and saves 80% of the manual import process.
Maximize the Terraform coverage of your AWS environments, while saving precious DevOps time.
Book a Demo to learn more.

A 30-min meeting will save your team 1000s of hours
A 30-min meeting will save your team 1000s of hours
Author