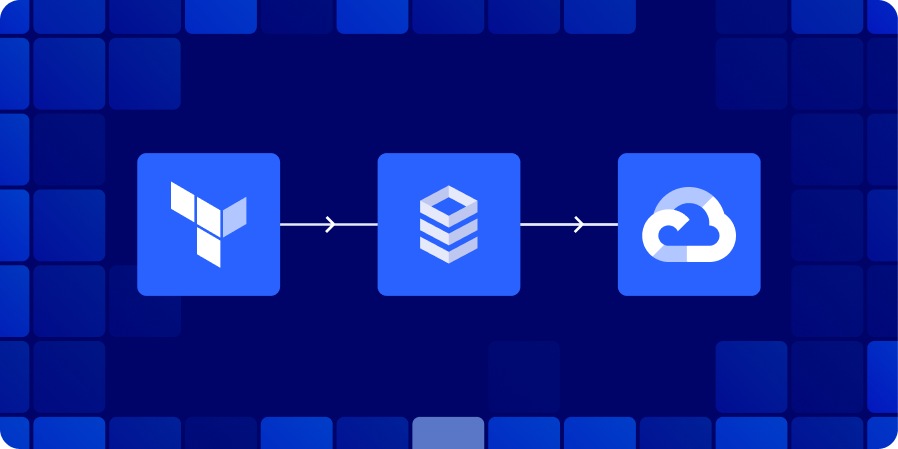
Choosing GCP Cloud SQL Terraform lets you declare, commit, and reproduce every database across dev, staging, and prod without console clicks or forgotten flags. Instead of treating databases as special snowflakes, you check in code, run a pipeline, and watch Cloud Build create identical services.
By organizing your database layer with the application infrastructure, adding a new service is easy. You just merge a pull request and let the pipeline handle the rest. Even developers who don’t know GCP can create compliant environments in minutes. They can be sure that every instance meets the same standards.
For many organizations, the task boils down to gcp database provisioning terraform define what the instance should look like, and Terraform makes it so. Because state captures every change, rollbacks are one command away, and peer-reviewed pull requests replace risky maintenance.
Required Terraform Config for Cloud SQL
Below is the leanest snippet to launch a Postgres-15 terraform cloud sql instance (swap the engine string for MySQL-8-0).
It totals fewer than forty lines yet delivers a managed database, user, and network-aware settings:
Running this file through gcp cloud sql terraform normally produces a ready-to-connect endpoint in under five minutes.
Handling Passwords and Connections Securely
Hard-coding credentials inside Git is never okay. A better pattern pulls the password from Secret Manager at plan time, or injects it through TF_VAR_db_password in CI. Because values never hit the state file, secrets stay private while gcp database provisioning terraform still completes unattended. Pair the Cloud SQL Auth Proxy with IAM-based service accounts to eliminate static passwords altogether.
Optional Settings and Maintenance Tips
Production needs more than defaults. Enable automated backups, point-in-time recovery, and a maintenance window in the same file. Add ip_configuration.authorized_networksto the whitelist office CIDRs, or go private-IP-only for the proxy. You can even tweak flags, such as availability_type = "REGIONAL” to get synchronous replicas. Re-applying the plan updates the live terraform cloud sql instance and warns if a console edit drifted from code.
For advanced shops, the open-source Terraform SQL module from ControlMonkey includes encryption keys, log exports, and monitoring policies. This provides a flexible but clear starting point.
Conclusion
By utilizing a single HCL file, GCP Cloud SQL Terraform transforms the database configuration from an unreliable process into a reliable pipeline. Fewer late-night emergencies, clearer audits, and safer changes are the payoff. Ready for enterprise-grade features?
Grab ControlMonkey battle-tested terraform sql module, plug in your project ID, and run terraform to apply your next compliant Cloud SQL environment.
A 30-min meeting will save your team 1000s of hours
A 30-min meeting will save your team 1000s of hours
Yuval is a software engineer at ControlMonkey with a strong focus on DevOps and cloud infrastructure. He specializes in Infrastructure as Code, CI/CD pipelines, and drift detection. Drawing from real-world conversations with engineering teams, Yuval writes about practical ways to automate, scale, and secure cloud environments with clarity and control.
Yes. While Terraform provides the foundation for Infrastructure as Code, scaling Cloud SQL management across multiple environments can become complex. Cloud automation platforms such as ControlMonkey add guardrails, drift detection, disaster recovery snapshots, and policy enforcement on top of Terraform. This ensures your GCP Cloud SQL instances remain compliant, secure, and resilient without adding manual overhead.
Terraform GCP Provider: 5 Best Practices from Real Projects
Daniel Alfasi
Backend Developer and AI Researcher
When I first started managing projects on GCP, I quickly realized that clicking through the console didn’t scale. Each change felt like a one-off task that was hard to track and impossible to reproduce. That’s when I began using the Terraform GCP Provider.
Also called the Google provider, it connects Terraform to Google Cloud. Instead of writing API calls, I could define infrastructure once and deploy it consistently across environments.
The shift brought immediate benefits: automation through CI/CD pipelines, version-controlled infrastructure in Git, and the ability to scale changes safely across teams. What used to be manual and error-prone became repeatable and auditable.
5 Best Practices for Terraform GCP Provider
In practice, the GCP Provider became the bridge between my Terraform configurations and Google Cloud’s APIs. It turned infrastructure management into a process that was consistent, automated, and resilient. Here my 5 top tips to you
1. Managing GCP Resources with Terraform GCP Provider
Let’s examine some of the best practices for managing GCP resources with the Terraform GCP Provider on Terraform Google Cloud
a. Least-Privilege Service Accounts
When provisioning resources with Terraform, it should use a service account that has the necessary permissions to perform actions on the GCP project. You can have dedicated service accounts for Terraform with limited authorization. For instance, provide Terraform only enough authorization to create Compute Engine resources within one project if your .tf only provisioning that. You can add more permissions as your IaC evolves.
b. Project Segmentation
Your organization may be working on multiple software products owned by different teams. These applications could have multiple environments. You can organize GCP projects by environment and/or by team. This isolates resources, simplifies access control, and aids cost tracking. For instance, create separate projects, such as myapp-dev and myapp-prod, if you are creating projects per environment.
c. Labeling for Cost Awareness
Tag resources with labels for better cost allocation. Correctly labeling your infrastructure will help you track your costs accurately in GCP’s billing reports.
resource "google_compute_instance" "instance1" {
  name = "my-vm"
  machine_type = "e2-micro"
  labels = {
      env = "dev"
      team = "team1"
      owner = "controlmonkey"
      }
      # ... other configurations
    }
2. Managing State Files with Terraform GCP Provider
The Terraform state file contains the current state of your infrastructure. Terraform requires information in the Terraform state to identify the resources it manages and plan actions for creating, modifying, or destroying resources.
Storing it locally is risky collaborative teams can overwrite it, and it’s not encrypted by default. Instead, you can use a remote backend to host your state file. When using GCP, a popular option is to use GCP Cloud Storage to version, encrypt, and store your Terraform state. You can control access to the state using IAM permissions.
Make sure you have enabled encryption and versioning on your GCS bucket. GCS backend supports state locking (Concurrency Control) natively.
3. Modularizing Terraform GCP Provider Code
Terraform modules make your code DRY (Don’t Repeat Yourself) and accelerate deployments. You can start by identifying common patterns in your existing infrastructure and converting them to modules.
For instance, you can create generic compute, networking, storage, and security config modules. Pass that type of module, parameterized with variables, and reuse across multiple projects or environments within the same project.
Terraform modules bring consistency, collaboration, efficiency, and scalability to GCP infrastructure as code.
Consider the following when you modularize your Terraform code:
Store your module code in a separate repository and manage it using version control. Tag releases in a consistent manner.
When using third-party modules, opt for well-documented modules from reputable registries.
Use variables and locals to parameterize your Terraform modules. Add variable validations and defaults to fit your most common use cases.
Document your modules!
4. Optimizing DevOps with Terraform GCP Provider
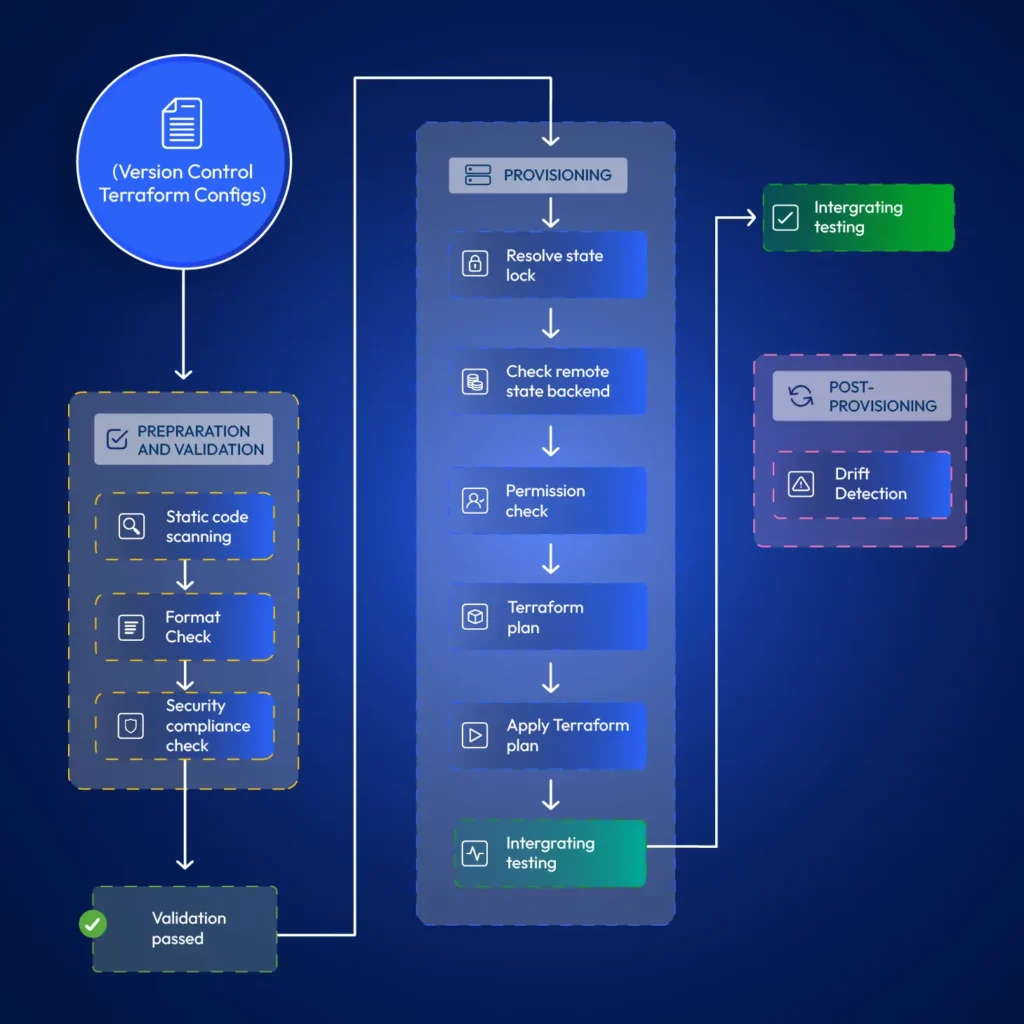
Automation is crucial for effectively managing cloud infrastructure. It reduces manual efforts and significantly improves deployment frequency and speed. Automating Terraform provisioning actively resolves state lock conflicts, permission issues, and speeds up provisioning with cached modules. You can bake steps such as static code scanning, format checks, and drift detection into your automations.
See how teams enforce Terraform best practices on GCP at scale
Many headaches, such as state lock conflicts and permission issues, can be circumvented when using automation with Terraform. Additionally, pipelines maintain detailed logs. It helps you to track changes and pinpoint when they occurred.
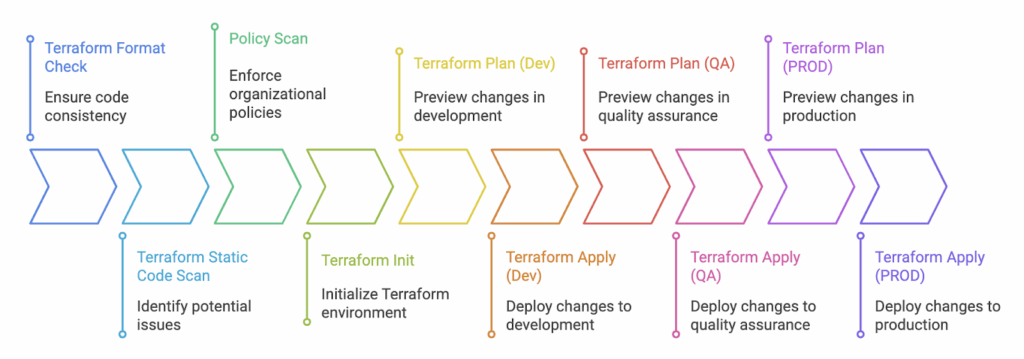
For simplicity, you can use a managed CI/CD service such as Google CodeBuild.A simple automation of Terraform would be checking formatting, config verification, planning, and applying changes. Here is a sample minimal codebuild.yml
Consider including the following steps or integrations when setting up your automations;
Add format checks: Terraform has an in-built terraform fmt command that you can use to validate the configuration.
Validate configurations: You can use the terraform validate command to validate the static HCL configuration files.
Incorporate Static Code Analysis: Utilize tools such as Checkov and TFSec with any CI/CD tool to identify known security issues in your Terraform configurations.
Gated Promotions: Deploy to a dev project, test in staging, and promote to prod after approval.
Integrate Drift Detection: Identify when actual infrastructure changes outside your automations. A simple Terraform plan that runs periodically can help you with this. Tools such as ControlMonkey provide advanced drift remediation capabilities.
5. Troubleshooting Terraform GCP Provider Issues
Sometimes, you may encounter unexpected errors with Terraform when using it on GCP. Some of them are from the Terraform GCP (Google Cloud Platform) provider, which we will examine in this section.
API Quota Errors: GCP Provider translates your code into API requests. GCP has specific quotas on the number of requests it will serve within a given time frame. You may at times notice errors in the form of 429 Too Many Requests. In such cases, check quotas in GCP’s Console (IAM & Admin > Quotas) and request an increase. To reduce the load, you may also consider reducing Terraform’s parallelism.
terraform apply -parallelism=3
IAM Binding Errors: Terraform should have permission to create, modify, and delete resources you declare in your Terraform scripts. Verify the service account you use for Terraform has the necessary roles required to provision your infrastructure. For example, to provision GKE, the role roles/container.admin would be required.
Errors from Deleted GCP Resources: When you remove resources without using Terraform, it will generate errors because those resources remain listed in the state.terraform state rm <resource_type>.<resource_name>
Debudding:
You may encounter different errors or warnings when applying Terraform. It would be helpful to know what Terraform is doing underneath, so you can precisely pinpoint the issue.
Consider setting the Terraform log level to get detailed output on Terraform’s actions. You can enable this by setting the environment variable. TF_DEBUG=debug.
Conclusion
The Terraform GCP Provider is the bridge between your code and Google Cloud APIs. By using best practices, you can create secure, scalable, and strong GCP environments. These practices include least-privilege accounts, remote state, modular code, and automation.
Start small, experiment, and grow with confidence. AIf you need to manage Terraform on a large scale, platforms like ControlMonkey provide guardrails. They also offer drift detection and compliance enforcement right away.
Backend Developer at ControlMonkey, passionate about Terraform, Terragrunt, and AI. With a strong computer science background and Dean’s List recognition, Daniel is driven to build smarter, automated cloud infrastructure and explore the future of intelligent DevOps systems.
Assuming you have already installed Terraform, you can install the gcloud CLI to authenticate with GCP. Alternatively, you can download a service account credential file. Next, you can create a .tf file that specifies the Google provider and configure it to use your credentials and project. You can then define the resources you need to create. Run terraform init, plan, and apply to deploy.
Azure AKS Terraform Tutorial: Fast Kubernetes Cluster Setup
Daniel Alfasi
Backend Developer and AI Researcher
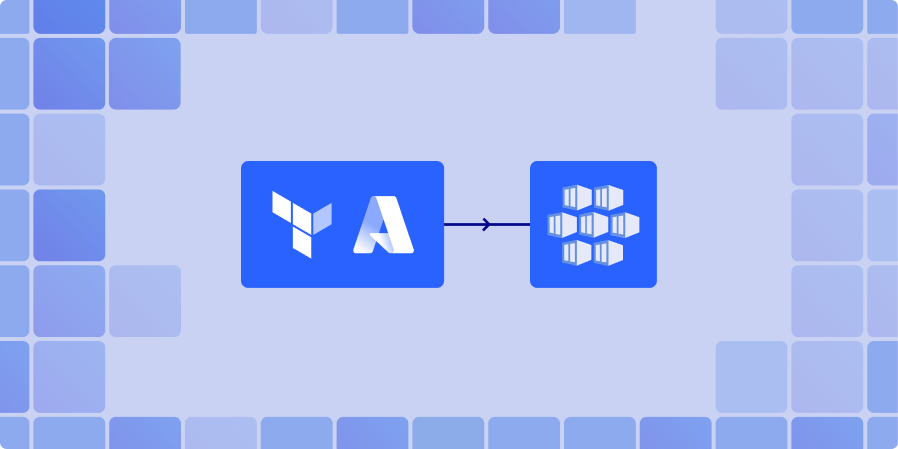
Azure Kubernetes Service (AKS) is Microsoft’s managed Kubernetes platform, designed to simplify deploying and managing containerized applications. Need a fast, repeatable way to spin up Kubernetes on Azure? Azure AKS Terraform workflows give you that superpower. By declaring your cluster as code, you avoid click-ops, reduce errors, and can version every change. In short, azure aks terraform lets teams clone environments in minutes instead of hours while keeping costs and configurations under control. If you want a hands-off, reliable Terraform on Azure AKS pipeline, read on.
Prerequisites for Azure AKS Terraform Setup
Before touching code, make sure you have:
Azure CLI – authenticated to your subscription.
Terraform (≥1.6) installed locally or in CI.
A service principal (or managed identity) with Contributor rights.
Basic access to an Azure subscription where your terraform azure cluster will live.
With these four pieces in place, you’re ready for a smooth terraform azure cluster rollout.
Run terraform init,terraform plan, and terraform apply – in under five minutes you’ll have a basic azure kubernetes deployment terraform. Key fields are the default_node_pool, which define compute, and identity, which wire up RBAC for your terraform azure cluster.
Using the Terraform AKS Module for Azure Kubernetes
While the direct resource definition works, most teams prefer the terraform aks module. This official module abstracts away repetitive configuration and enforces good defaults, making your azure kubernetes deployment terraform easier to maintain. The terraform aks module wraps networking, role assignments, and monitoring into sensible defaults. Because the terraform aks module has some main benefits.
Cleaner configuration files.
Built-in defaults for networking, RBAC, and scaling.
Easier upgrades and maintainability.
Customizing the AKS Cluster with Module Parameters
Here’s a richer azure kubernetes deployment terraform that sets node size, count, tags, and Kubernetes version, all via the module:
With just a few variables, you now have an autoscaling terraform azure cluster ready for workloads. Tweaking the module’s inputs lets you match any production spec while staying inside a tidy, reusable azure aks terraform codebase.
Conclusion
Provisioning a reusable Terraform codebase for AKS clusters eliminates manual setup and ensures consistent deployments across environments. With Terraform and the hardened AKS module, you define clusters as code, gain version control, and recreate environments on demand.
Whether you start with a minimal config or leverage the terraform azure cluster module, Terraform gives you repeatability, scalability, and maintainability for your Kubernetes workloads. Book a demo with ControlMonkey to see how its Azure AKS blueprints add policy guard-rails, drift detection, cost insights, and automated remediation without rewriting a single HCL line.
A 30-min meeting will save your team 1000s of hours
A 30-min meeting will save your team 1000s of hours
Backend Developer at ControlMonkey, passionate about Terraform, Terragrunt, and AI. With a strong computer science background and Dean’s List recognition, Daniel is driven to build smarter, automated cloud infrastructure and explore the future of intelligent DevOps systems.
The quickest method is to start with the official Terraform AKS module. It provides preconfigured defaults for networking, RBAC, and scaling. With just a few lines of configuration, you can provision a secure AKS cluster in under five minutes.
Yes. AKS clusters defined in Terraform can be deployed from GitHub Actions, GitLab CI, or Azure DevOps pipelines. Storing configurations in Git enables version control, automated testing, and repeatable deployments across multiple environments.
Absolutely. Modules allow you to encapsulate and reuse resource configurations. For example, you can create a reusable module for a storage account or a virtual network and call it across multiple environments like dev, staging, and prod.
Instead of clicking around the Azure Portal, Terraform lets you declare everything in code. That way, changes are versioned, reviewed, and repeatable. It’s easier to track what’s running in each environment, and governance becomes part of the pipeline instead of an afterthought.
ControlMonkey adds automation and guardrails on top of Terraform so AKS clusters can scale safely. It handles drift detection, policy enforcement, and cost insights automatically. That means your team spends less time fixing issues and more time shipping features, while knowing every AKS cluster follows the same standards.
To scale Terraform is essential for modern DevOps teams managing infrastructure across distributed environments. As physical boundaries no longer limit access to talent, organizations are using Terraform. This helps them manage teams around the world and improve cloud operations. By leveraging Infrastructure as Code (IaC), businesses can enhance collaboration, automate infrastructure management, and maintain consistency—regardless of where their teams are located.
Forming distributed DevOps teams is a natural choice to enhance business agility. This approach has numerous benefits—24/7 operations, cost efficiency, global talent access, and business continuity and resilience, to name a few.
However, when working as a distributed team, you can run into challenges such as: collaboration, maintaining consistency, change management, access control, versioning and implementing auditing across cloud infrastructure.
How to Scale Terraform for Multi-Team Collaboration
Collaboration makes distributed DevOps possible and allows teams to operate at scale.
Collaborating on the infrastructure directly raises many concerns since there is no transparency on what changes other members are working on. The solution to this problem is to use Infrastructure as Code (IaC).
IaC is integral for collaboration, where multiple developers can contribute to improving the configurations. The syntax and structure of IaC depends on the IaC tool that you use. Terraform is a popular IaC tool, which is cloud-agnostic. Mastering Terraform allows teams to apply the same skills across projects involving infrastructure in different cloud platforms. Terraform provides the required features and functionalities that support collaboration among multiple users and teams.
Key capabilities needed to scale Terraform effectively: from registry-backed modules to secure remote state, declarative versioning, and workspace segmentation.
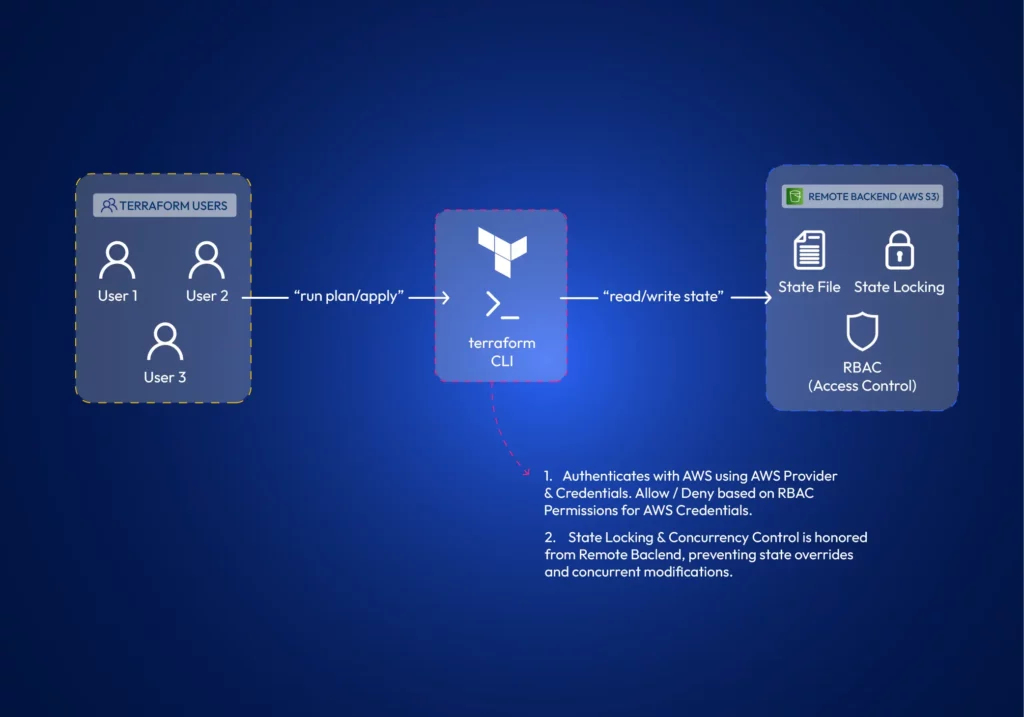
Remote State Management to Scale Terraform at Scale
Terraform state contains details about the infrastructure it manages and its current status. It’s how Terraform keeps track of changes it needs to do to existing infrastructure. Every team member requires a copy of the state file to make changes to existing infrastructure. Terraform supports different state backends, such as AWS S3 or other cloud-agnostic solutions to store and share the state. Many remote backends offer state-locking mechanisms, which prevent concurrent modifications by multiple team members, ensuring infrastructure integrity.
Workspaces (and Projects)
Workspaces allow teams to manage multiple isolated environments (such as development, staging, and production) within a single Terraform configuration. Teams can work on different environments in isolation. Terraform projects allow administrators to scope and assign workspace access to teams or developers. In larger environments, teams often use scoped workspaces and project-based access to isolate environments and assign permissions.
Declarative Syntax
What really distinguishes between developers is how they think and the logic they apply to solve a problem.
To print numbers from 1 to 5 in the console, a developer could use a for loop, a while loop, or just type the print command 5 times. Collaboration raises questions about consistency and standards.
Luckily, Terraform is declarative. You do not have to say “how”, but rather “what” to do. This is helpful for collaboration since the actual logic of deploying the resources is not a part of IaC. It is taken care of by Terraform.
Here is how you would define creating an AWS S3 bucket with Terraform;
Just to compare how it would be without Terraform, here is a shell script to do the same operation without Terraform;
#!/bin/bash

# Configure AWS CLI
aws configure set region us-west-2

# Check if bucket already exists
BUCKET_EXISTS=$(aws s3api head-bucket --bucket controlmonkey-data-lake 2>&1 || echo "not exists")

# Create bucket only if it doesn't exist
if [[ $BUCKET_EXISTS == *"not exists"* ]]; then
echo "Creating S3 bucket..."
aws s3api create-bucket \
--bucket controlmonkey-data-lake \
--region us-west-2 \
--create-bucket-configuration LocationConstraint=us-west-2

# Add tags to the bucket
aws s3api put-bucket-tagging \
--bucket controlmonkey-data-lake \
--tagging "TagSet=[{Key=Environment,Value=Production}]"

echo "Bucket created successfully"
else
echo "Bucket already exists, skipping creation"
fi
A simpler code is generally better for collaboration.
Reusable Modules to Scale Terraform Consistently Across Environments
With Terraform, you can encapsulate common infrastructure patterns into modules. Teams can develop modules separately and reuse them to ensure they deploy infrastructure components in a consistent and compliant manner.
Terraform supports remotely hosting these modules in private registries such as JFrog Artifactory, Terraform Registry, or Git. Therefore, multiple teams can effectively utilize them.
5 Ways to Scale Terraform for Teams
We have already identified the Terraform features that allow collaboration. Let’s explore how to properly architect Terraform projects for effective collaboration across distributed teams.
Using identical Terraform versions across all teams & members.
The Terraform version should be an organizational policy. Using different terraform versions can cause several major issues;
Terraform syntax might not be backward compatible between certain versions.
Deprecated features might work in older versions but fail in newer ones.
State-file changes. The internal state format can change between major versions, leading to state corruption or inability to read state files.
Another thing to watch out for is that the terraform core executable comes in both amd64 and arm formats. Terraform providers are architecture-specific binary plugins. A provider compiled for amd64 won’t work on ARM systems and vice versa. It’s best practice to install amd64 on both systems (You can install it on ARM systems using environment variable TFENV_ARCH ). Otherwise, some team members may be unable to use providers defined in the code if provider developers haven’t compiled them for their specific architecture.
Decomposed and Modular Infrastructure:
Using Terraform modules helps establish the principle of separation of concerns. Teams can develop Terraform modules in isolation. Terraform modules minimize dependencies between different parts of the system, reducing the potential impact of changes (the blast radius).
Granular access control is a theme when working with distributed teams. When you architect your modules, you need to be concerned about how you manage the module source code and how you publish modules. When developing module source code, it is best practice to have separate git repositories per each module. Distributed teams can focus on different modules. With this approach, you can granularly control the read-write permissions per repo. Further, suppose you use git as the module registry itself. In that case, having monolithic repos causes the whole git repository to be copied to the .terraform directory, regardless of whether you only refer to a single path (a module) within the repository.
The developed modules should be versioned and shared with the Distributed Teams. Terraform Registry or a compatible artifact registry can store Terraform modules so other teams can refer to them in their infrastructure configurations. Access controls can be implemented in registries as well.
Remote State & Environment Isolation Strategies
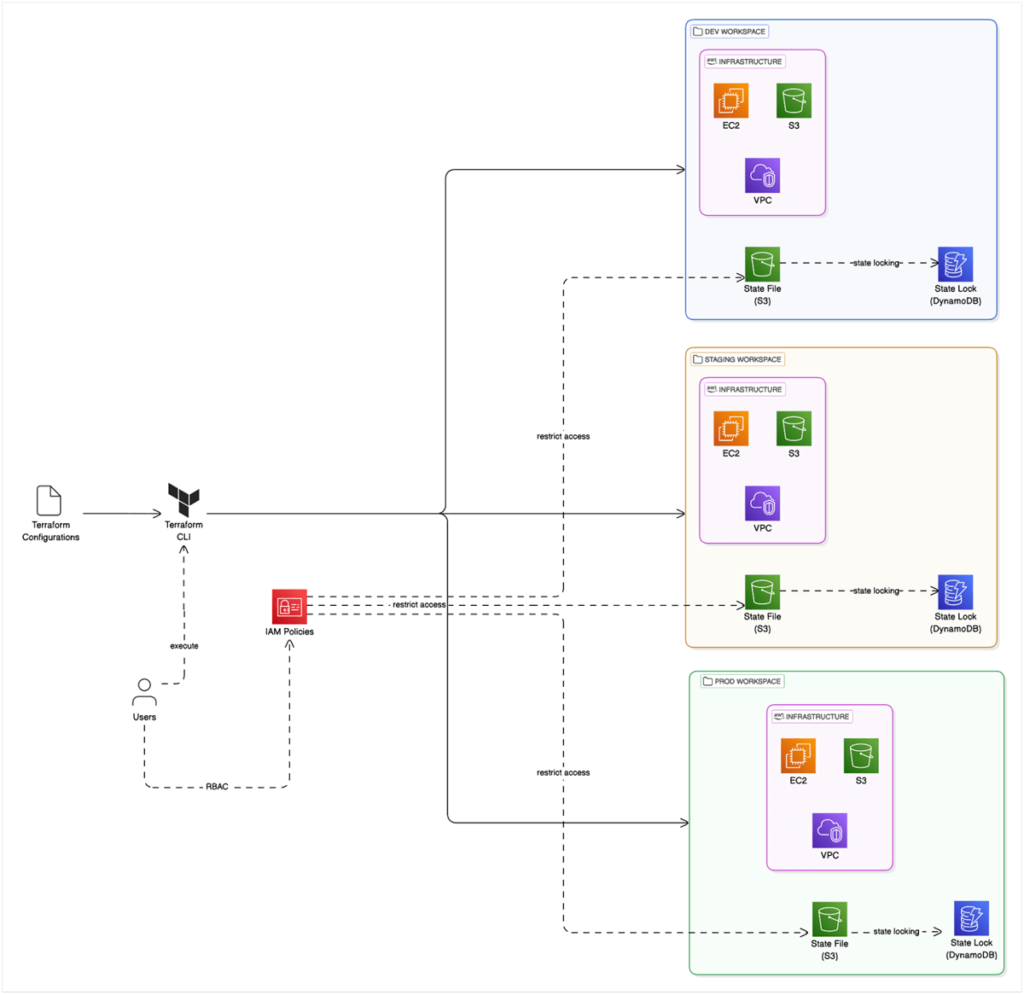
We have already discussed Terraform’s capabilities to store state remotely and its features such as state locking, versioning, and RBAC access to state. However, the Terraform state is also important in environment isolation.
Teams can utilize Terraform workspaces to isolate environments. Terraform Workspaces automatically manages a separate state file per environment (Note: State files do not require distinct S3 buckets; instead, you can use different keys). In this example, we are using Terraform in AWS and leveraging IAM policies to control access to environments.
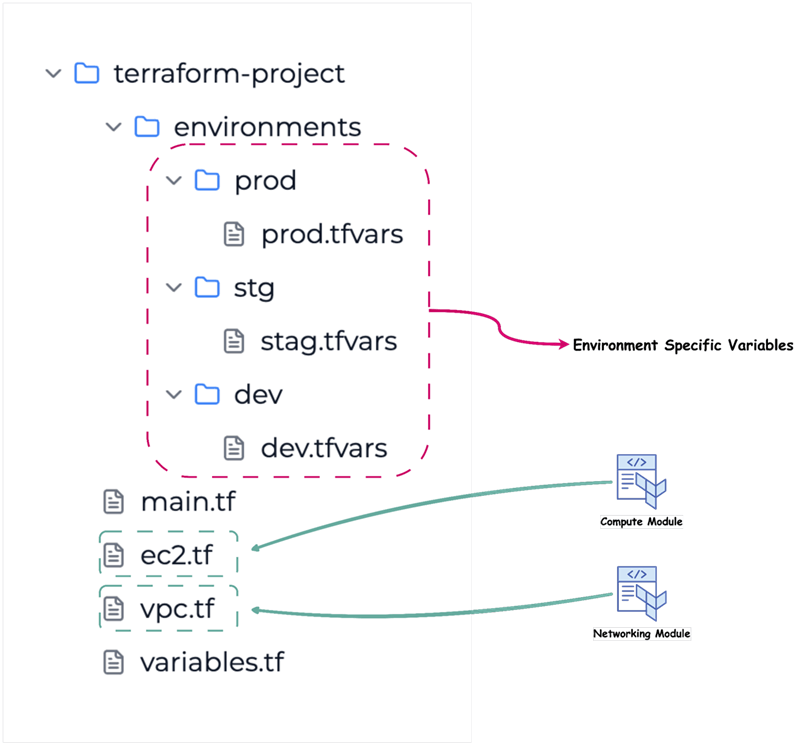
However, another approach is to use a directory structure that isolates environments.
Workflow Organization for Teams
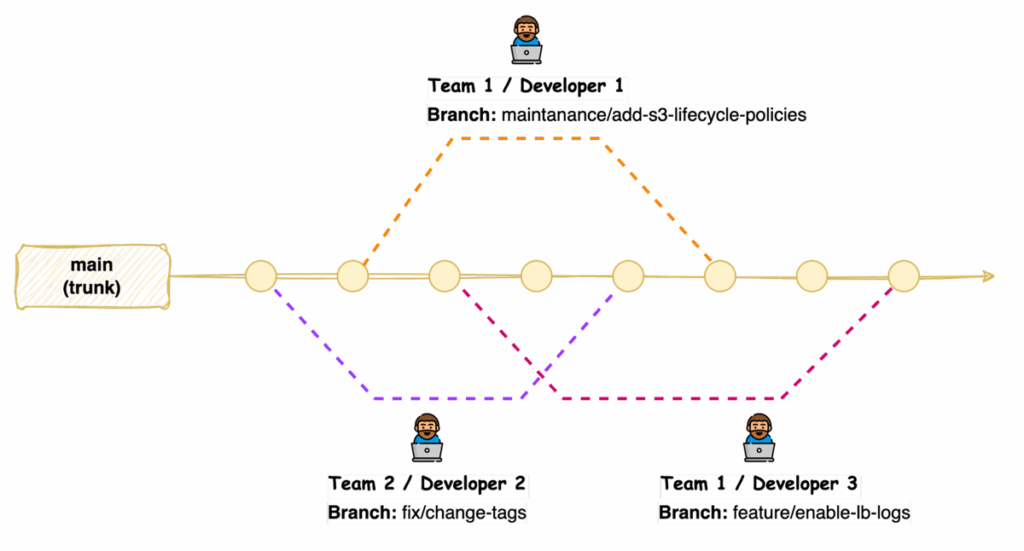
Workflow is essentially how the team or teams operate. When working as a distributed team, there should be a defined set of standards when using source control and changes. First, teams should use a branching strategy, such as GitFlow or GitHub Flow to manage different environments and features.
Another strategy for Terraform code is “trunk-based development”. This strategy suits better since infrastructure can have only one version deployed. Workflow should focus on facilitating code reviews, controlling the promotion of changes through the development lifecycle, and drift detection when infrastructure changes outside of your sources.
With trunk-based development, developers merge directly to the main branch after reviewing their code.
Distributed teams can benefit from implementing code review processes, which allow team members to provide feedback, identify potential issues, and ensure adherence to coding standards before changes are applied to the infrastructure.
The basis of change management is to ensure that all changes go through Terraform. You can explore implementing centralized auditing and implementing policy-as-code to manage change at scale.
Enhancing and maintaining the security of Terraform-managed infrastructure becomes an issue when multiple teams are involved, with frequent updates to Terraform modules and live configurations. Static code analysis tools such as Checkov, tfsec, or Terrascan can be used as part of the workflow.
Using Pipelines to Automate Terraform at Scale
It is typical for developers to test Terraform modules locally. However, when promoting changes to live environments, it is best practice if the developer’s duty ends at merging code to the relevant git branch. Automation for terraform provisioning can resolve issues around state locks, permission issues, faster provisioning (cached modules) and allow implementing stages such as static code scanning, format checks, drift detection, etc. Also, pipelines retain a log that teams can refer to later, allowing them to discover when exactly some changes happened.
3 Best Practices for Distributed Teams – Tips for managing infrastructure with geo-scattered teams.
Communication and Collaboration
Clear and documented communication channels are important for distributed teams working with Terraform. Teams should define protocols for infrastructure-related discussions, updates, and issue resolution, ensuring all members know about changes and potential impacts. There can be two levels of communication. When working on internal developments, teams can use channels such as Slack, Teams, or other communication tools the organization uses. However, these channels are unsuitable for change management.
Change management is critical. When promoting changes to live environments, distributed teams should choose a time window with minimal impact on the business and maintain a mechanism to approve and track those changes. Teams generally use tools such as ServiceNow for this purpose.
Standardization
You can achieve standardization by using consistent coding styles and naming conventions across all Terraform configurations. Doing so improves readability, maintainability, and collaboration within distributed teams. Organizations need to enforce using standardized Terraform modules from a private registry ensuring that infrastructure components are deployed in a consistent and compliant manner. Tools such as AWS Config can help you enforce rules on cloud infrastructure if you are using Terraform with AWS.
Version Control
Terraform configurations should be stored in version control, and it should be maintained as the reference to the actual infrastructure. This allows for tracking changes over time, collaborating effectively through branching and merging, and enabling easy rollbacks to previous configurations if necessary. There is no way to version control infrastructure itself, except for resources such as AWS Task Definitions or Launch Templates if using Terraform in AWS environments. Version control is limited to IaC only, not the actual infrastructure.
Security and Access Control in Terraform Workflows – Managing permissions and secrets.
Least Privilege
Least privilege in Terraform Workflows involves granting only the necessary permissions to users, teams, and automation processes required to provision and manage infrastructure resources. When using Terraform with AWS, teams can use IAM roles with scoped permissions instead of credentials.
Secure Handling of API Keys and Credentials
Teams should never include passwords, secrets, or other sensitive data in Terraform code. They may appear in the state file, so make sure that the state file is not readable by unauthorized personnel. Terraform can integrate with dedicated secrets management tools like AWS Secrets Manager.
If using Terraform in AWS, you can retrieve secrets using a data block;
data "aws_secretsmanager_secret_version" "api_key" {
secret_id = aws_secretsmanager_secret.api_key_secret.id
}
Policy Enforcement as Code
You can implement policy enforcement as code within your Terraform workflows. For example, when using Terraform in AWS environments, you may want to ensure that you add mandatory tags to all resources you create in your Terraform configurations. You can use policy-as-code tools such as Open Policy Agent (OPA) to define and enforce security and compliance rules. These tools allow you to define and enforce organizational rules for security and compliance across all Terraform configurations.
Limit Direct Access and Enforce Code Reviews
In any organization using DevOps, teams utilize R&D environments for development and separate live environments (dev, staging, and prod) for customer applications. Changes to R&D environments can be made without peer reviews. Developers will have more permissions in R&D environments. This includes permissions to modify infrastructure directly through a cloud console or CLI.
However, peer reviews should be mandatory for all infrastructure code changes in live environments. All changes to live environments should happen only through Terraform.
Monitor and Audit Practices to Scale Terraform for Compliance
Distributed DevOps teams must ensure compliance, track resource deployments, and troubleshoot issues effectively. This requires governance and visibility over infrastructure.
Teams can vaguely track infrastructure changes using cloud-built tools like CloudTrail in AWS. If using Terraform with AWS, you can configure CloudWatch for applicable resources through Terraform itself. However, multi-cloud monitoring platforms such as DataDog can reduce manual configurations and help distributed teams gain end-to-end visibility into their infrastructure. Setting up alerts for critical infrastructure changes, security-related events, and potential compliance violations is good practice.
Another vital aspect is saving Terraform run logs. If you have CI/CD configured, you can use the logs from CI/CD tool for this purpose. You can evaluate platform features such as run history and audit logs if you’re considering automation platforms to manage Terraform provisioning.
Conclusion: How to Scale Terraform for Distributed DevOps Teams
Terraform as an IaC tool requires thoughtful implementation with best practices in mind for infrastructure management within distributed DevOps teams. Terraform comes packed with features required to configure it in a way that promotes collaboration across geo-separated teams. Proper configuration of terraform with AWS or other cloud providers is required to ensure that infrastructure management becomes a competitive advantage rather than a logistical challenge. Terraform is a tool, but using end-to-end solutions such as ControlMonkey can help organizations operate distributed DevOps teams at scale while automatically incorporating all the best practices and advanced features such as drift detection, compliance enforcement and access control baked in.
If you’re scaling Terraform across distributed DevOps teams, ControlMonkey can help streamline operations, enforce compliance, and simplify collaboration without added overhead.
A 30-min meeting will save your team 1000s of hours
A 30-min meeting will save your team 1000s of hours
Ori Yemini is the CTO and Co-Founder of ControlMonkey. Before founding ControlMonkey, he spent five years at Spot (acquired by NetApp for $400M). Ori holds degrees from Tel Aviv and Hebrew University.
Terraform is free to use. Your costs would be from the AWS resources you provision. Some platforms provide advanced features for managing Terraform at scale, but may come with additional costs. ControlMonkey is an alternative solution that works as an automation platform for Terraform, with advanced features to provision and govern cloud infrastructure.
You can establish emergency procedures that allow critical changes directly to infrastructure. However, you must ensure proper documentation and retrospective updates to the Terraform code.
As Terraform usage grows, teams often struggle with state file conflicts, inconsistent configurations, limited access control, and managing module reuse. Scaling Terraform requires standardizing workflows, isolating environments using workspaces, enforcing RBAC, and leveraging CI/CD for safer deployments.
To scale Terraform effectively, split infrastructure into reusable modules and organize them by service or environment. Store modules in a shared registry, isolate states per workspace or environment, and implement automation pipelines for testing and deployment. This structure reduces bottlenecks and supports cross-team development.
Related Resources on scaling your Iac and Terraform
OpenTofu vs Terraform: IaC Comparison for DevOps Teams
Yuval Margules
Backend Developer
Governed by the Linux Foundation, OpenTofu is a vendor-neutral, fully open-source infrastructure-as-code (IaC) platform created by the community as a successor to HashiCorp’s Terraform. OpenTofu was initiated in response to HashiCorp’s change of Terraform’s license from the Mozilla Public License (MPL) to the Business Source License (BSL). As organizations utilize cloud infrastructure and automation, OpenTofu aims to give teams an open, scalable IaC platform, and early adopters report stable production use. When evaluating opentofu vs terraform, teams benefit from OpenTofu’s full compatibility with Terraform, letting them tap the same provider ecosystem and community know-how.
Feature-by-Feature: Opentofu vs Terraform – Performance, Usability, Extensibility
Category
Terraform
OpenTofu
Performance
Proven in large-scale production deployments and backed by a vast plugin ecosystem
Comparable performance, with community-driven optimizations that match Terraform at scale
Usability
Rich documentation, extensive tutorials, and a mature community though the breadth of features can challenge newcomers
The community-driven project aims to lower the onboarding barrier for new users
Extensibility
Extensive plugin ecosystem and robust provider support
Compatible with Terraform modules and supports the same providers.
Integration
Excellent support for integrating with tools like Jenkins and GitHub Actions
Designed to drop-in to existing Terraform workflows and CI/CD pipelines (e.g., GitHub Actions
Early community benchmarks comparing Opentofu vs terraform show comparable performance for both tools at all scales. Terraform’s commercial add-ons (e.g., Terraform Cloud) bundle governance features, while OpenTofu users can integrate similar controls via open-source or third-party options. OpenTofu’s focus on community-driven development allows it to be agile and more user-focused. While OpenTofu uses the same syntax as Terraform, new IaC users may face a steeper learning curve due to relatively limited documentation and IDE tooling compared to Terraform.
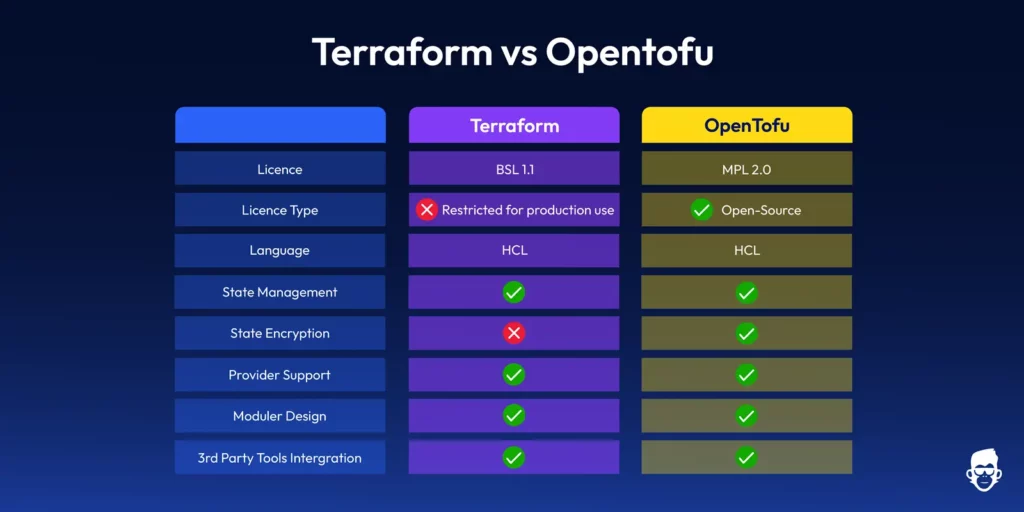
Side-by-side comparison of Terraform vs OpenTofu features, including licensing, state management, encryption, and provider support
Licensing and Community – Open-Source vs. Controlled Ecosystems
In the opentofu vs terraform debate, the biggest divider is licensing model.HashiCorp backs Terraform, which is licensed under the Business Source License (BSL) from version 1.6 onward. Earlier versions (up to 1.5) remain under the Mozilla Public License (MPL 2.0). Which offers an open-source approach but has a commercial version (Terraform Cloud) with premium features and support. OpenTofu is stewarded by the Linux Foundation and released under the Mozilla Public License 2.0 (MPL-2.0), ensuring neutral governance and free use. This fully open model of transparency gives users full control over the tool, from code contributions to updates and modifications.
HashiCorp curates the Terraform ecosystem and offers an official SaaS platform (Terraform Cloud), and OpenTofu gives a space where community contributions drive the tool’s evolution.
OpenTofu vs Terraform? Choosing the Right Tool for Your Team
Terraform: A natural fit if your workflows already rely on the wider HashiCorp stack (Vault, Consul, Terraform Cloud) or if you prefer a single-vendor SaaS for policy and governance. Commercial support and bundled features reduce lift in regulated environments.
OpenTofu: Best when you prioritise MPL-2.0 licensing, vendor neutrality, and the freedom to self-host or customise. API compatibility with Terraform means you can adopt it without rewriting modules or pipelines.
Pros and Cons – Strengths and Trade-Offs of Each Tool
Category
Terraform
OpenTofu
Pros
– Mature tool with a large user base. – Extensive provider support. – Reliable integrations with CI/CD tools. – Enterprise-ready (with Terraform Cloud).
– Fully open-source with transparent development. – Agile and responsive to community needs. – Easier to adopt for new users. – Seamless compatibility with Terraform.
Cons
– Commercial version introduces complexity. – Difficult for beginners due to the steep learning curve.
– Smaller community compared to Terraform. – Fewer integrations and support options.
Long-Term Strategy – Futureproofing Your Infrastructure Workflows
Terraform and OpenTofu provide the essential tools to build scalable, repeatable infrastructure. However, the futureproofing of your infrastructure workflows may depend on your team’s strategy:
Terraform: When your company requires enterprise-level support in the long term run, Terraform Cloud and Enterprise, can provide solid governance, security, and operational tools.
OpenTofu: OpenTofu is an ideal provision infrastructure solution for DevOps engineers who must maintain their open-source environment. OpenTofu provides flexibility through its MPL-2.0 open-source license, allowing teams to modify and extend the codebase while remaining vendor-neutral. However, it lacks some of the integrated governance and collaboration features found in Terraform Cloud or Enterprise.
Conclusion – Making an Informed, Practical Choice for Your Team
The terraform vs opentofu decision ultimately hinges on your team’s priorities and appetite for open-source governance.. Terraform is a very established tool in the IaC environment, offering maturity, support, and scalability. On the other hand, OpenTofu offers a refreshing open-source alternative with a strong focus on community collaboration and flexibility. If your team values community-driven development, full transparency, and minimal vendor lock-in, OpenTofu might be the better choice. Terraform is reliable if you use it at an enterprise level and need a tool with wide support.
If your team is evaluating OpenTofu vs Terraform, let ControlMonkey streamline your migration and daily workflows. Book a demo today.
A 30-min meeting will save your team 1000s of hours
A 30-min meeting will save your team 1000s of hours
Yuval is a software engineer at ControlMonkey with a strong focus on DevOps and cloud infrastructure. He specializes in Infrastructure as Code, CI/CD pipelines, and drift detection. Drawing from real-world conversations with engineering teams, Yuval writes about practical ways to automate, scale, and secure cloud environments with clarity and control.
Many small teams appreciate OpenTofu’s lightweight, community-centric model, i.e., community-maintained and open-source software users. However, complete documentation and Terraform support make it a reasonable choice for already established teams that are familiar with its ecosystem.
It is possible to migrate from Terraform to OpenTofu since OpenTofu supports Terraform’s providers and modules. Migration is generally straightforward for Terraform users because OpenTofu supports the same state files, providers, and modules.
Terraform Azure Automation: Guide to Cloud Infrastructure
If you’ve worked with Azure, chances are you’ve provisioned cloud infrastructure manually—whether it’s a storage account, Azure Front Door, or a Kubernetes cluster. Clicking through the Azure Portal may work for a single resource, but what happens when you need to replicate this across multiple environments like dev, staging, and production? This is where Terraform Azure Automation: comes in. By using Infrastructure as Code (IaC), you can automate resource provisioning consistently, reduce manual errors, and streamline cloud governance. Let’s explore how to build scalable automation in Azure with Terraform, including best practices for modules and variables.
So, let’s take a look at how you can write an automation script in Terraform to spin up Azure infrastructure.
Let’s look at how you can provision these resources using Terraform.
Step 01: Installing Terraform
To install Terraform, you’ll need to install a Package Manager. If you’re using MacOS, use Homebrew; or if you’re using Windows, use Chocolatey.
Use the following command to install Terraform:
# MacOS
brew tap hashicorp/tap
brew install hashicorp/tap/terraform

# Windows
choco install terraform
Once the installation has been completed, run the following command to verify your installation: terraform version
If you’ve installed it successfully, you should see the output:
Caption: Terraform installation verification
Step 02: Manage Azure Terraform State and Drift
Next, you’ll need to configure a location to manage your state. Many organizations prefer to self manage their state due to compliance reasons.
For example, you wouldn’t want your configuration information moving in and out of Azure. Instead, you’d want to manage it within Azure.
To achieve this, you’ll need to configure Azure Storage to store your state.
What is Terraform State and Drift?
Now, you might wonder – what is Terraform State?
Simply put, it’s how Terraform determines the difference between the Terraform script and the resources currently provisioned in Azure.
For example, if your storage account is set to Locally Redundancy Storage redundancy mode, and you modify your Terraform script to change the mode to Zone Redundancy Storage, the Terraform state will identify this change by comparing what’s deployed in the cloud vs what’s defined in your script and will apply the difference to the cloud to help keep the state up to date.
Now, let’s configure Terraform State and provision our infrastructure on Azure using Terraform.
To do so, create the following directories using the command:
# Create a directory named "azure-samples"
mkdir azure-samples

# Change into the "azure-samples" directory
cd azure-samples

# Create two subdirectories: one for reusable Terraform modules, and one for environments
mkdir modules
mkdir environments

# Move into the "environments" directory
cd environments

# Create a subdirectory for the "development" environment
mkdir development

# Move into the "development" directory
cd development

# Create an empty Terraform file called "provider.tf"
touch provider.tf
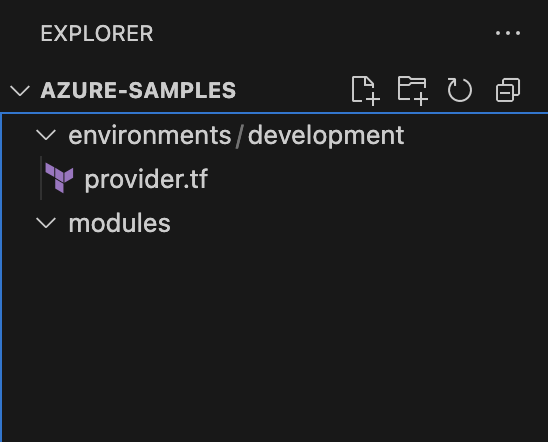
Upon doing so, you’ll see the directory structure:
Figure: Expected directory structure
Creating a Service Principal for Terraform
Next, you can start defining your Azure resources using HCL. Before doing so, ensure you’ve installed the Azure CLI and logged in.
Now, you will have to create a service principal with the Contributor role in the active directory of the subscription you’re working on.
Note: A Service Principal is an application within Azure Active Directory with the authentication tokens Terraform needs to perform actions on your behalf.
By doing so, Terraform can authenticate with the Azure account and modify the subscription you’re working on.
To do so, run the following command:
az ad sp create-for-rbac --role="Contributor"
--scopes="/subscriptions/<SUBSCRIPTION_ID>"
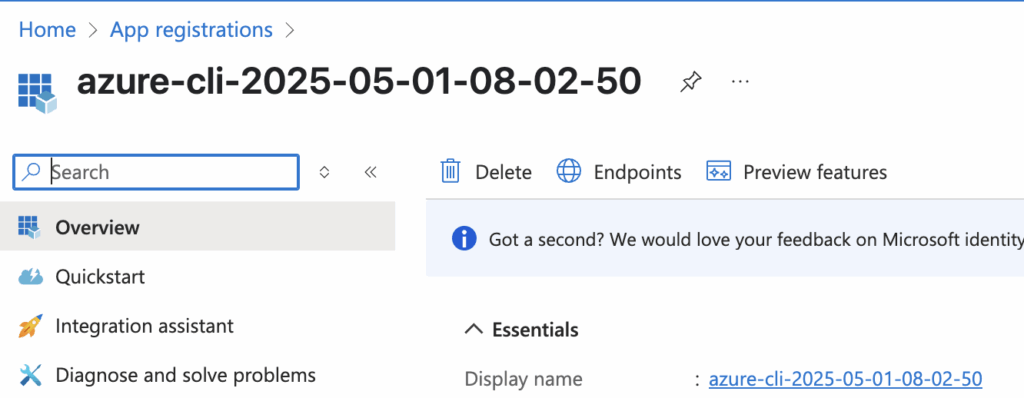
You’ll be able to see your app registration created on the Azure Console:
Figure: The created app registration
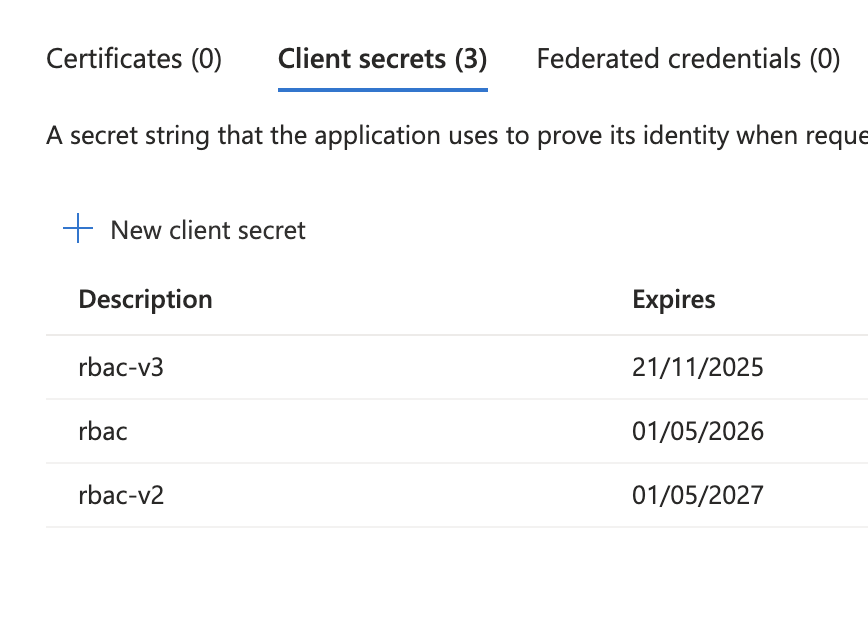
Next, head over to your App Registration’s Certificate and Secrets and copy the Client Secret and the Client ID:
Next, you will need to update your environment variables to ensure that Terraform can authenticate with Azure to provision the infrastructure. Go ahead and update your environment as follows:
export ARM_TENANT_ID=<<YOUR-TENANT-ID>>
export ARM_CLIENT_ID=<<CREATED-CLIENT-ID>>
export ARM_CLIENT_SECRET=<<CREATED-CLIENT-SECRET>>
export ARM_SUBSCRIPTION_ID=<<YOUR-SUBSCRIPTION-ID>>
Next, open the provder.tf and include the following snippet:
terraform {
required_providers {
azurerm = {
source = "hashicorp/azurerm"
version = "~>3.0"
}
}
backend "azurerm" {
resource_group_name = "tfstate"
storage_account_name = "lakindustfstateaccount"
container_name = "tfstate"
key = "terraform.tfstate"
}
}

provider "azurerm" {
features {}
}
Note: Ensure that you’ve created the Resource Group, Storage Account and the Storage Container before proceeding with the rest of the article.
This Terraform configuration specifies Azure as both the provider and backend for state storage. It sets provider authentication using provided credentials and stores Terraform state remotely in Azure Blob Storage.
Next, run the command on the development directory:
terraform init
This will initialize your workspace and install all the required providers.
Upon doing so, you can start provisioning your Azure resources.
Creating the Terraform Azure Automation Infrastructure
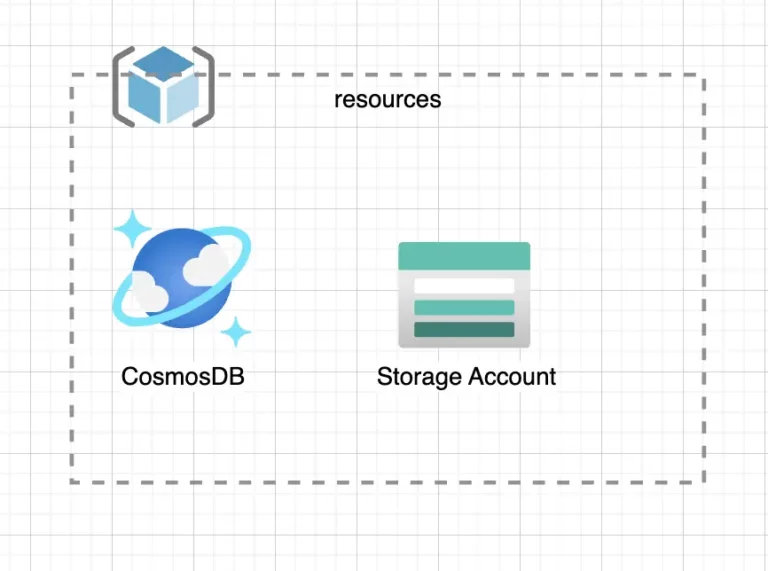
Let’s create the:
Resource Group
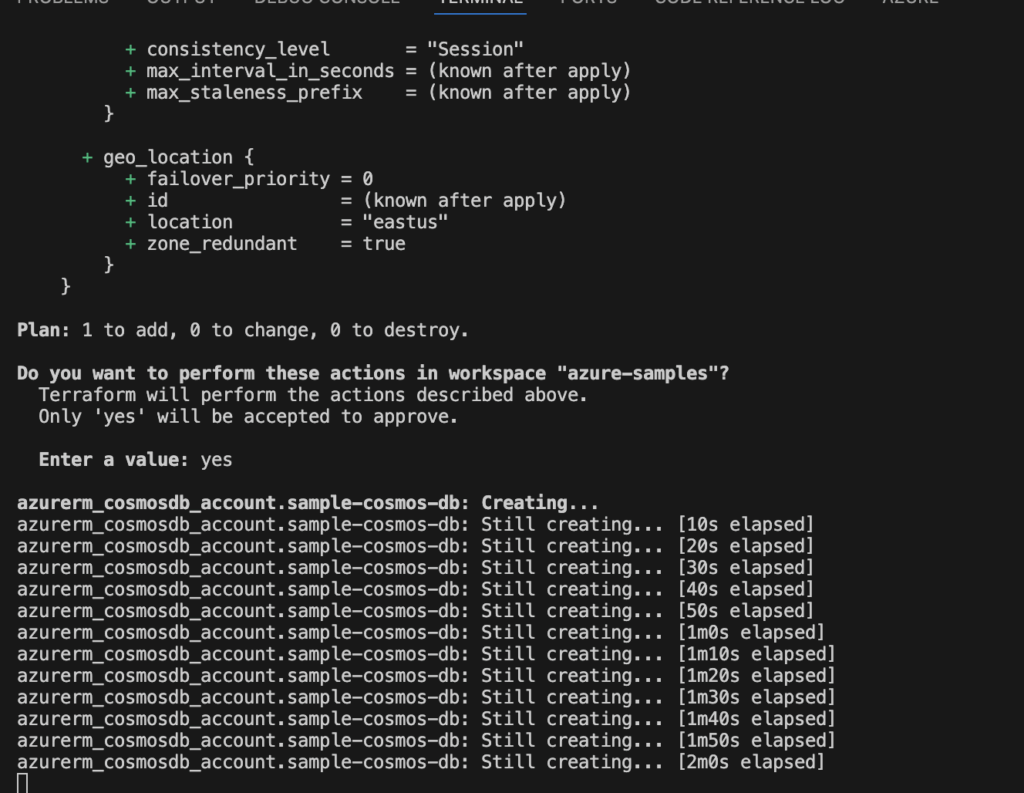
CosmosDB Instance
Storage Account
To do so, create a new file – main.tf. This is where your infrastructure will reside in. Update the main.tf with the snippet:
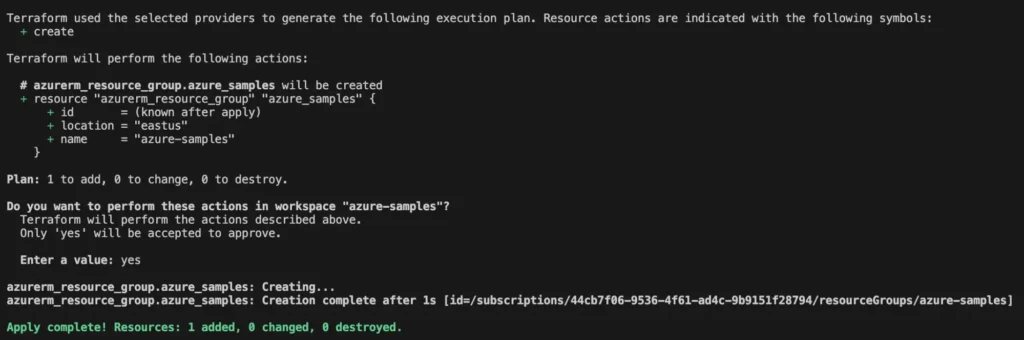
The snippet above creates a Resource Group named “azure-samples”. The resource group will act as a container for all resources you create in Azure.
To provision the resource group, run the following:
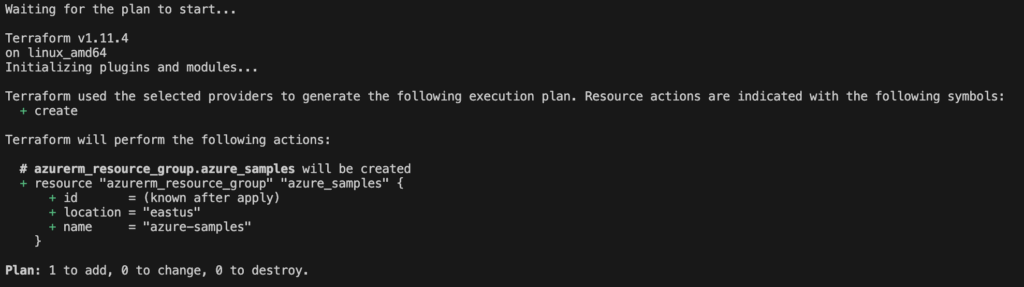
terraform plan
This will plan an update to showcase the resources that will be created/modified or destroyed after the run is complete. In this instance, you’ll see the output:
Figure: Viewing the Terraform plan
To apply this, run the command:
terraform apply
This will provision the resource group in the subscription you’ve provided as shown below:
Applying the changes on Terraform
You can visit your resource groups on the Azure console to see the created resource group:
Figure: Viewing the resource group in the Azure console
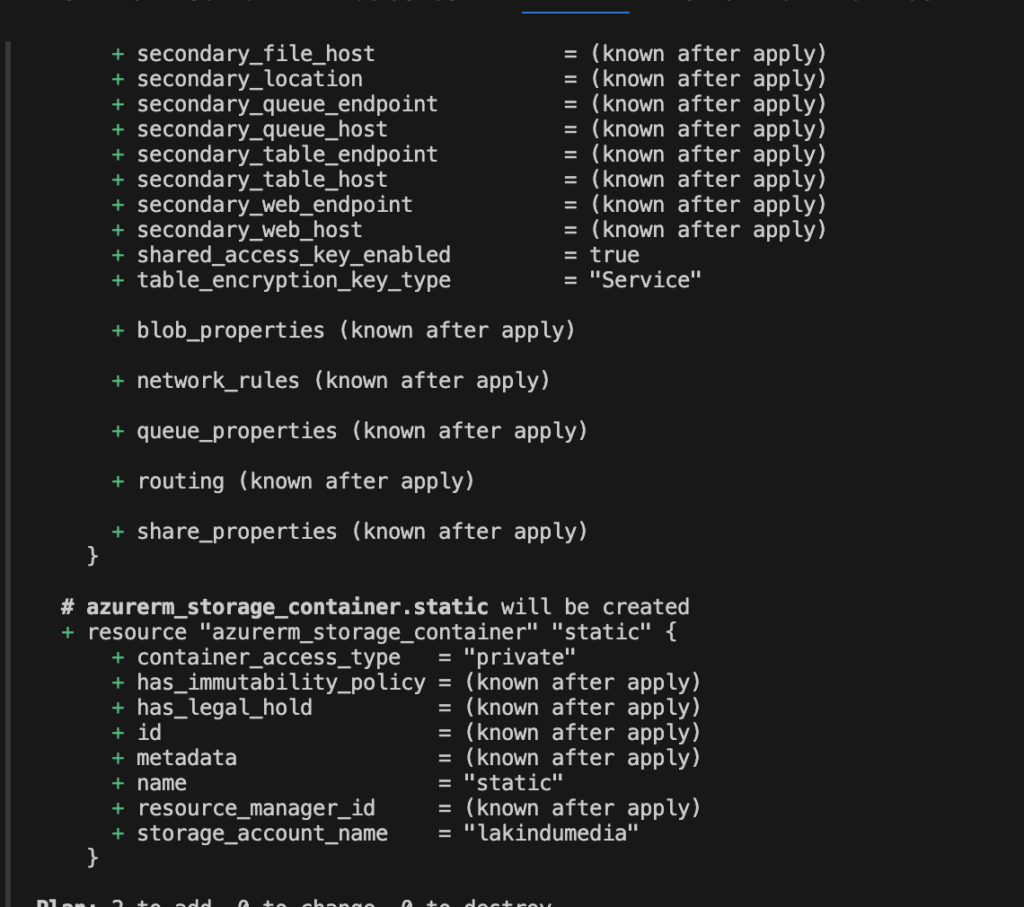
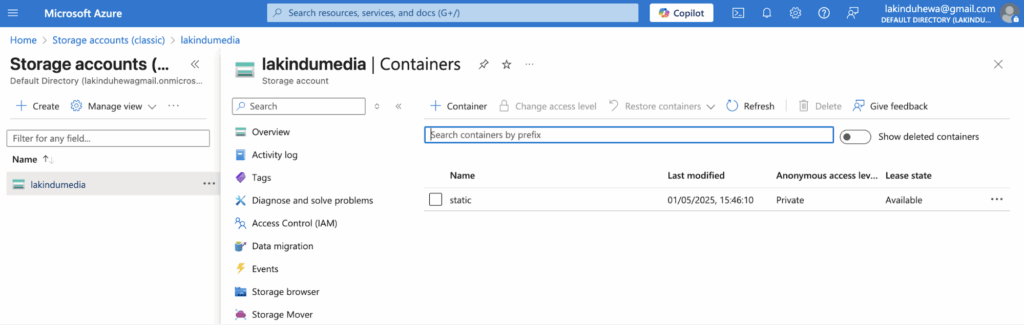
As earlier, you can apply the changes to provision the storage account with a container named “static”, as shown below:
Caption: Viewing the plan for Storage Account creation
After the Terraform script has executed, you can view the storage account on the Azure console:
Caption: Viewing the provisioned storage account and container on the Azure console
Terraform Modules for Azure Automation
Previously, you created one storage account, a container, and a CosmosDB Account. But, imagine if you had to create 10 storage accounts and 2 CosmosDB accounts.
You’d have to duplicate your code and create the necessary infrastructure in such cases. But, by doing so, you’ll introduce repetition in your codebase and reduce the readability and maintainability. This is where Terraform Modules come into play.
Using Terraform Modules can help you create reusable infrastructure components to keep things short and simple when defining infrastructure using HCL. For instance, you can convert your existing Azure Storage Account to a module by:
Creating a directory called – “storage_account” under modules
Creating the “main.tf” and “output.tf” files. These files will help define the resource, its inputs, and its outputs.
Upon doing so, you can re-run terraform init to initialize your module. Next, you can define a storage account with containers using your module with more cleaner and elegant code in your main.tf file:
As you can see, the module simplifies the process of creating a module by creating a reusable block with simple configurations.
Think of it like creating a class in object oriented programming.
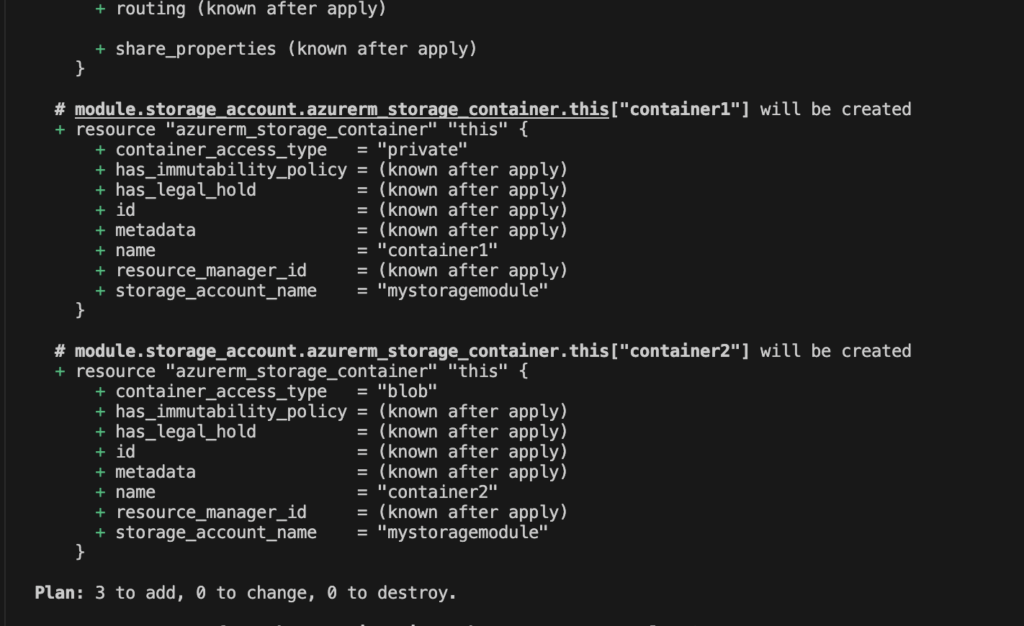
You can run terraform apply to provision this resource.
Figure: Viewing the plan for the storage account using the module
As shown above, it plans to create the resources as intended with a storage account and two containers in it.
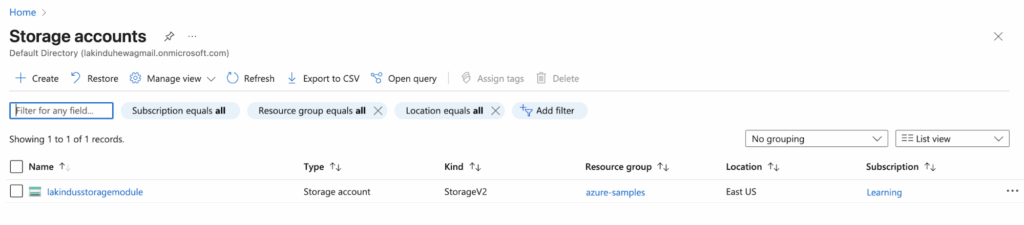
Next, you can view the resource in the Azure console:
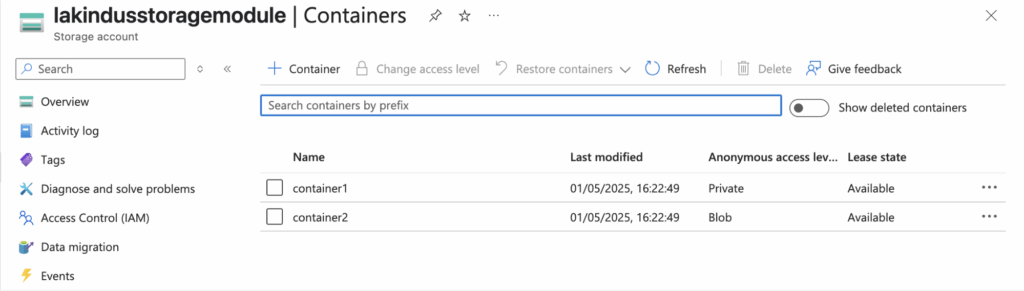
Figure: Provisioning a storage account with a module
Figure: Provisioned storage containers using the module
Optimizing costs with Terraform Azure Automation
Now that we’re familiar with creating resources on Azure using Terraform let’s look at how you can optimize your Azure costs.
Use Terraform Plan to review waste
Running a terraform plan helps you preview changes before applying them.
By doing so, teams can spot unintended additions, over-provisioned resources, or duplication early.
Regular plan reviews in CI/CD pipelines ensure only necessary, cost-effective infrastructure is deployed, preventing waste and maintaining control over cloud resource sprawl.
Avoid Orphaned Azure Resources in Terraform
Orphaned resources are those no longer referenced in your Terraform code but still exist in the cloud, often incurring hidden costs.
Regularly run terraform state list and compare with actual infrastructure, or use drift detection tools to identify and clean up unused or abandoned assets.
Use tools like Control Monkey to view your Terraform stack and manage the resources using a GUI Console.
If these aren’t configured or used, they can still generate costs. Review what Terraform creates by default, disable unnecessary features, and explicitly remove unused defaults to avoid accumulating charges for resources that serve no purpose.
Best Practices on Terraform Azure Automation
When you’re working on Azure using Terraform, there are some best practices that you can adopt to ensure maximum efficiency. Key best practices include:
Leverage modules to keep your code clean and improve reusability on your stack.
Use a remote backend for the state to ensure that teams can collaborate on your Terraform stack.
Tag your resources to keep track of ownership.
Concluding thoughts about Terraform Azure Automation
Working with Terraform significantly improves your efficiency in maintaining cloud resources, especially if you have to work on multiple environments.
If you want to try this out yourself, check out the source code on this GitHub Repository.
Use Terraform with Control Monkey so that you can automatically get updates on Drift and monitor your infrastructure with ease.
Terraform is an open-source Infrastructure as Code (IaC) tool that lets you define and provision Azure infrastructure using code. You write declarative configuration files (usually in .tf) to define resources like virtual machines, storage accounts, and networks, then apply them to Azure using the terraform apply command.
Yes. Terraform needs to authenticate with Azure to provision resources. You can authenticate using the Azure CLI, a Service Principal, or via Managed Identity when running Terraform in an Azure-hosted environment (like Azure DevOps or a VM).
Absolutely. Modules allow you to encapsulate and reuse resource configurations. For example, you can create a reusable module for a storage account or a virtual network and call it across multiple environments like dev, staging, and prod.
You can manage environments using separate state files, or directory-based structures with different variable files. This ensures each environment maintains its infrastructure without conflicts.
By default, Terraform stores the state file locally. However, for collaboration and safety, it’s recommended to use remote state storage like Azure Blob Storage, which allows team access and state locking using an Azure Storage Account with a shared backend configuration.