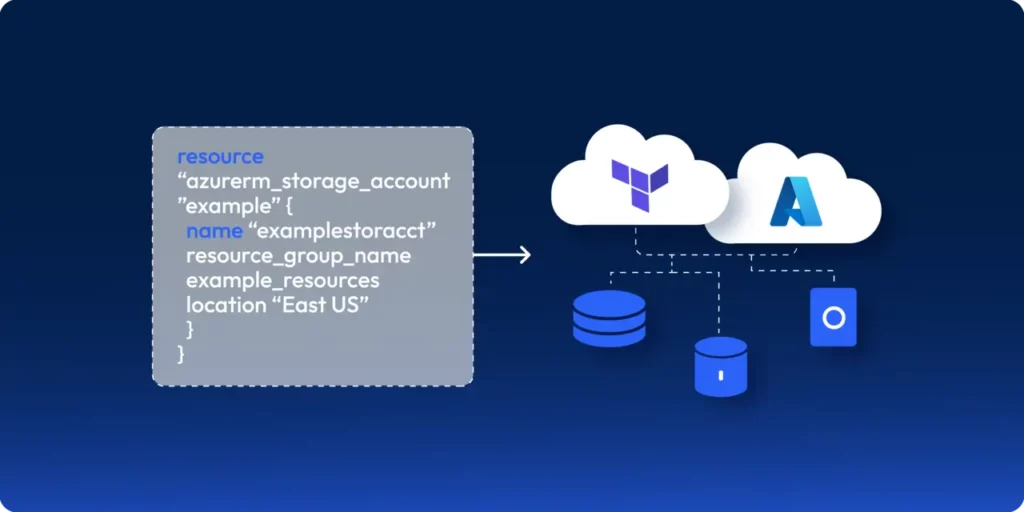
If you’ve worked with Azure, chances are you’ve provisioned cloud infrastructure manually—whether it’s a storage account, Azure Front Door, or a Kubernetes cluster. Clicking through the Azure Portal may work for a single resource, but what happens when you need to replicate this across multiple environments like dev, staging, and production? This is where Terraform Azure Automation: comes in. By using Infrastructure as Code (IaC), you can automate resource provisioning consistently, reduce manual errors, and streamline cloud governance. Let’s explore how to build scalable automation in Azure with Terraform, including best practices for modules and variables.
So, let’s take a look at how you can write an automation script in Terraform to spin up Azure infrastructure.
New to Azure and Iac?
- Terraform for Azure: A Beginner’s Overview – step by step guide on Terraform and Azure. Entry level
- Azure Terraform Tutorial: Optimize Deployments for Cost & Speed – how to fine-tune your Terraform code and deployment process to reduce costs
- Running Multi-Region Cloud with Terraform – Running Cross Could and Multi Region? Free eGuide.
Terraforming with Azure
Let’s consider the Azure architecture showcased below:
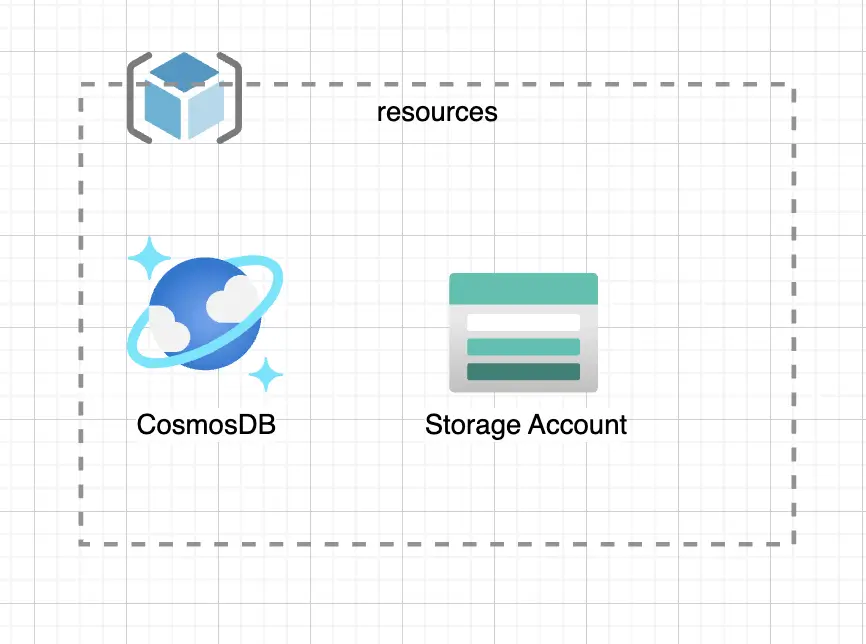
Consider a scenario where you want to provision a CosmosDB Instance and an Azure Storage Account inside a Resource Group called “resources”.
Let’s look at how you can provision these resources using Terraform.
Step 01: Installing Terraform
To install Terraform, you’ll need to install a Package Manager. If you’re using MacOS, use Homebrew; or if you’re using Windows, use Chocolatey.
Use the following command to install Terraform:
|
1 2 3 4 5 6 |
# MacOS brew tap hashicorp/tap brew install hashicorp/tap/terraform # Windows choco install terraform |
Once the installation has been completed, run the following command to verify your installation:
terraform version
If you’ve installed it successfully, you should see the output:

Caption: Terraform installation verification
Step 02: Manage Azure Terraform State and Drift
Next, you’ll need to configure a location to manage your state. Many organizations prefer to self manage their state due to compliance reasons.
For example, you wouldn’t want your configuration information moving in and out of Azure. Instead, you’d want to manage it within Azure.
To achieve this, you’ll need to configure Azure Storage to store your state.
What is Terraform State and Drift?
Now, you might wonder – what is Terraform State?
Simply put, it’s how Terraform determines the difference between the Terraform script and the resources currently provisioned in Azure.
For example, if your storage account is set to Locally Redundancy Storage redundancy mode, and you modify your Terraform script to change the mode to Zone Redundancy Storage, the Terraform state will identify this change by comparing what’s deployed in the cloud vs what’s defined in your script and will apply the difference to the cloud to help keep the state up to date.
So, if the Terraform State differs from what is actually running in the cloud, it leads to Terraform Drift. To stay ahead of Terraform Drift, consider using Control Monkey to manage your Terraform stack.
Step 03: Writing the Terraform Scripts
Now, let’s configure Terraform State and provision our infrastructure on Azure using Terraform.
To do so, create the following directories using the command:
|
1 2 3 4 5 6 7 8 9 10 11 12 13 14 15 16 17 18 19 20 21 |
# Create a directory named "azure-samples" mkdir azure-samples # Change into the "azure-samples" directory cd azure-samples # Create two subdirectories: one for reusable Terraform modules, and one for environments mkdir modules mkdir environments # Move into the "environments" directory cd environments # Create a subdirectory for the "development" environment mkdir development # Move into the "development" directory cd development # Create an empty Terraform file called "provider.tf" touch provider.tf |
Upon doing so, you’ll see the directory structure:
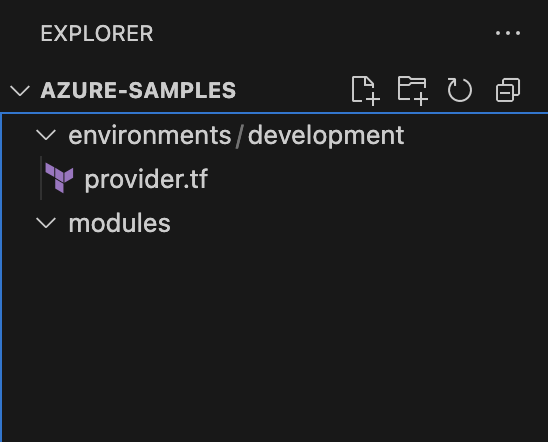
Figure: Expected directory structure
Creating a Service Principal for Terraform
Next, you can start defining your Azure resources using HCL. Before doing so, ensure you’ve installed the Azure CLI and logged in.
Now, you will have to create a service principal with the Contributor role in the active directory of the subscription you’re working on.
Note: A Service Principal is an application within Azure Active Directory with the authentication tokens Terraform needs to perform actions on your behalf.
By doing so, Terraform can authenticate with the Azure account and modify the subscription you’re working on.
To do so, run the following command:
|
1 2 |
az ad sp create-for-rbac --role="Contributor" --scopes="/subscriptions/<SUBSCRIPTION_ID>" |
You’ll be able to see your app registration created on the Azure Console:
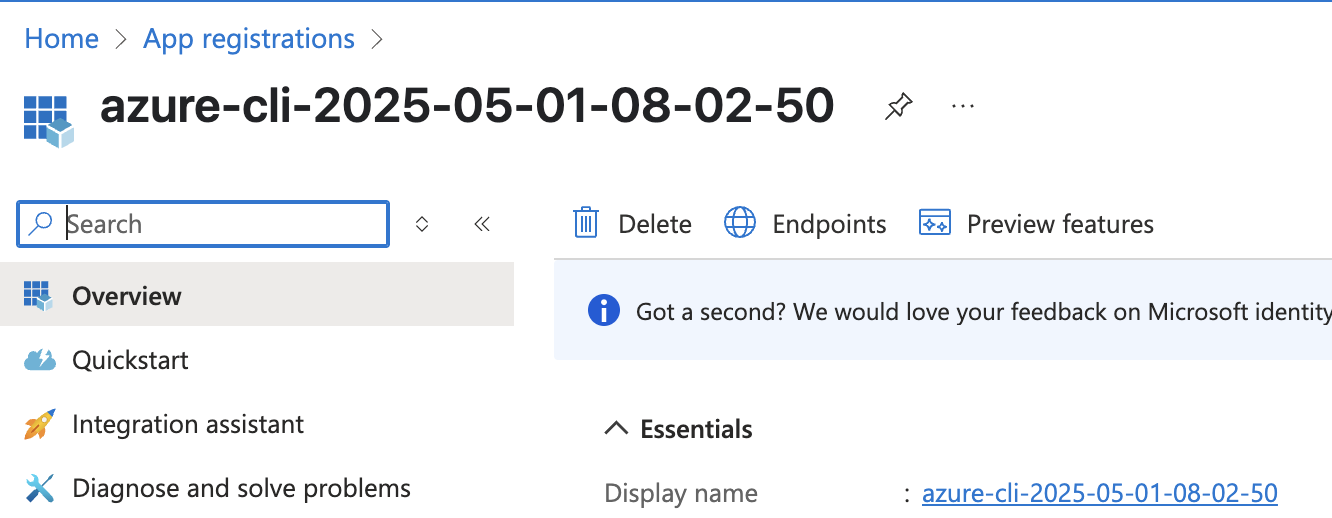
Figure: The created app registration
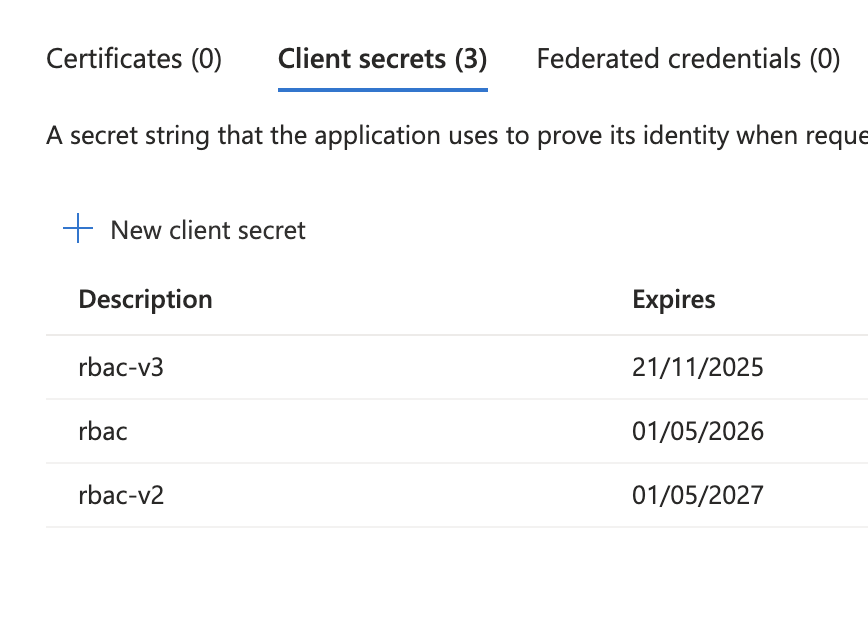
Next, head over to your App Registration’s Certificate and Secrets and copy the Client Secret and the Client ID:
Next, you will need to update your environment variables to ensure that Terraform can authenticate with Azure to provision the infrastructure. Go ahead and update your environment as follows:
|
1 2 3 4 5 6 7 8 9 10 11 12 13 14 15 16 17 18 19 20 21 22 23 |
export ARM_TENANT_ID=<<YOUR-TENANT-ID>> export ARM_CLIENT_ID=<<CREATED-CLIENT-ID>> export ARM_CLIENT_SECRET=<<CREATED-CLIENT-SECRET>> export ARM_SUBSCRIPTION_ID=<<YOUR-SUBSCRIPTION-ID>> Next, open the provder.tf and include the following snippet: terraform { required_providers { azurerm = { source = "hashicorp/azurerm" version = "~>3.0" } } backend "azurerm" { resource_group_name = "tfstate" storage_account_name = "lakindustfstateaccount" container_name = "tfstate" key = "terraform.tfstate" } } provider "azurerm" { features {} } |
Note: Ensure that you’ve created the Resource Group, Storage Account and the Storage Container before proceeding with the rest of the article.
This Terraform configuration specifies Azure as both the provider and backend for state storage. It sets provider authentication using provided credentials and stores Terraform state remotely in Azure Blob Storage.
Next, run the command on the development directory:
|
1 |
terraform init |
This will initialize your workspace and install all the required providers.
Upon doing so, you can start provisioning your Azure resources.
Creating the Terraform Azure Automation Infrastructure
Let’s create the:
- Resource Group
- CosmosDB Instance
- Storage Account
To do so, create a new file – main.tf. This is where your infrastructure will reside in. Update the main.tf with the snippet:
|
1 2 3 4 |
resource "azurerm_resource_group" "azure_samples" { name = "azure-samples" location = "East US" } |
The snippet above creates a Resource Group named “azure-samples”. The resource group will act as a container for all resources you create in Azure.
To provision the resource group, run the following:
|
1 |
terraform plan |
This will plan an update to showcase the resources that will be created/modified or destroyed after the run is complete. In this instance, you’ll see the output:
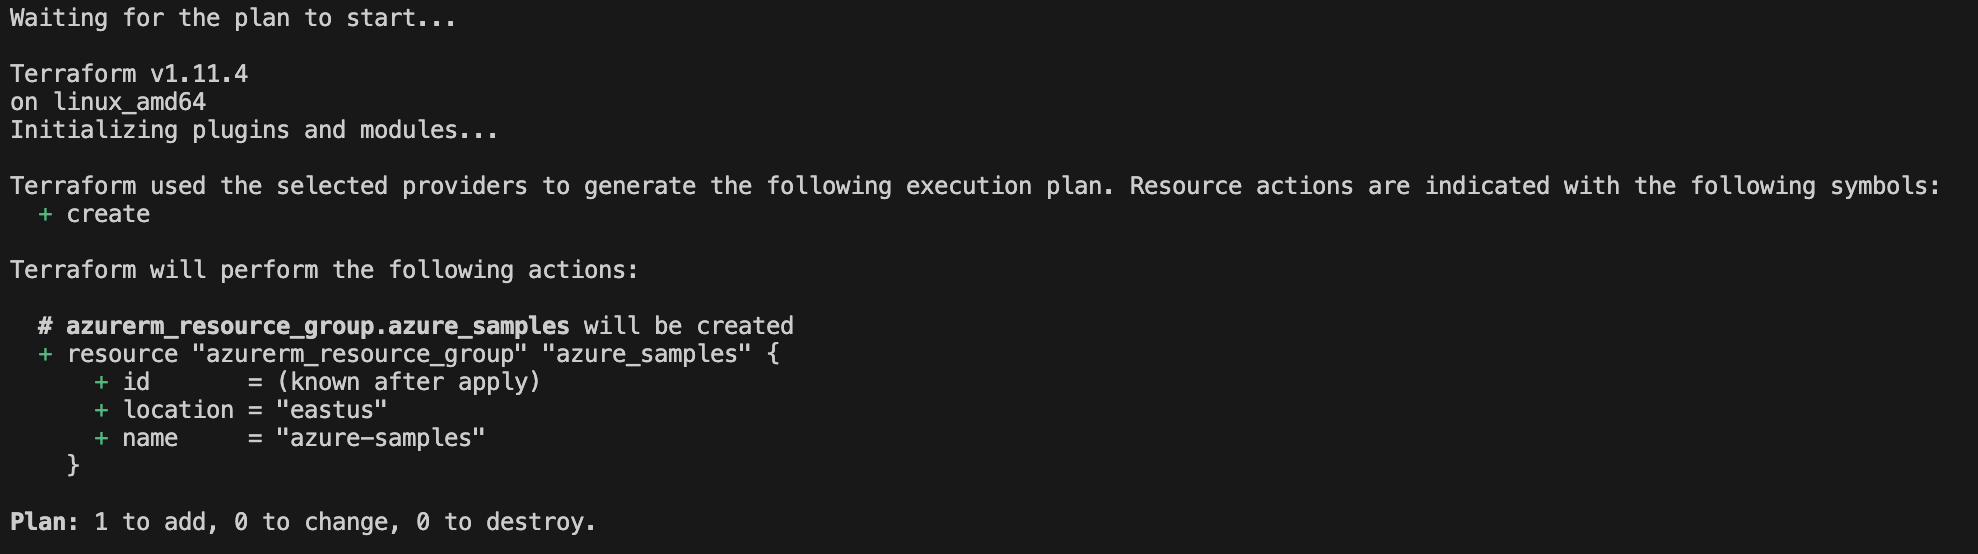
Figure: Viewing the Terraform plan
To apply this, run the command:
|
1 |
terraform apply |
This will provision the resource group in the subscription you’ve provided as shown below:

You can visit your resource groups on the Azure console to see the created resource group:
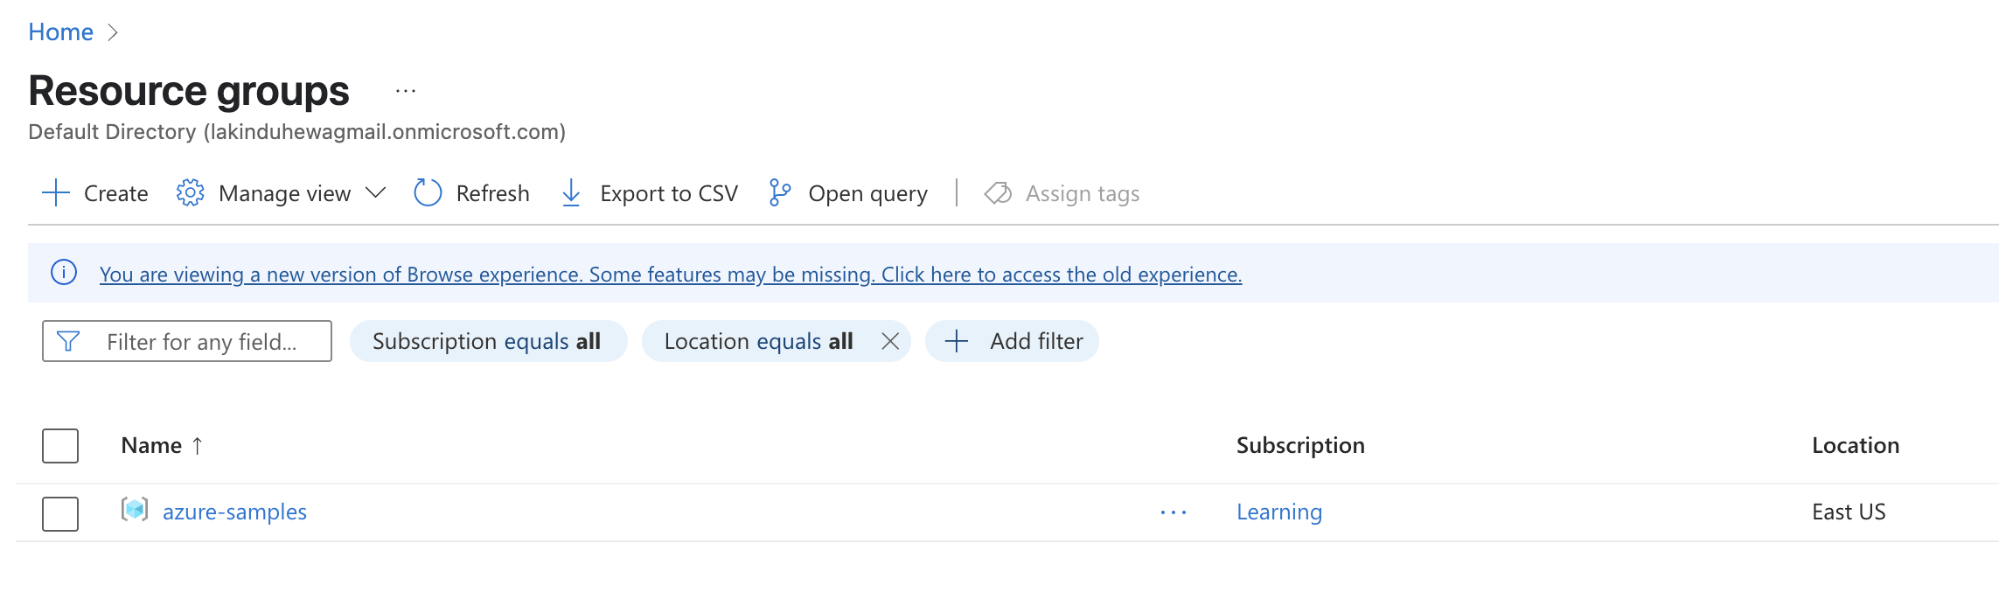
Figure: Viewing the resource group in the Azure console
Now, you can define the CosmosDB Account:
|
1 2 3 4 5 6 7 8 9 10 11 12 13 14 15 16 |
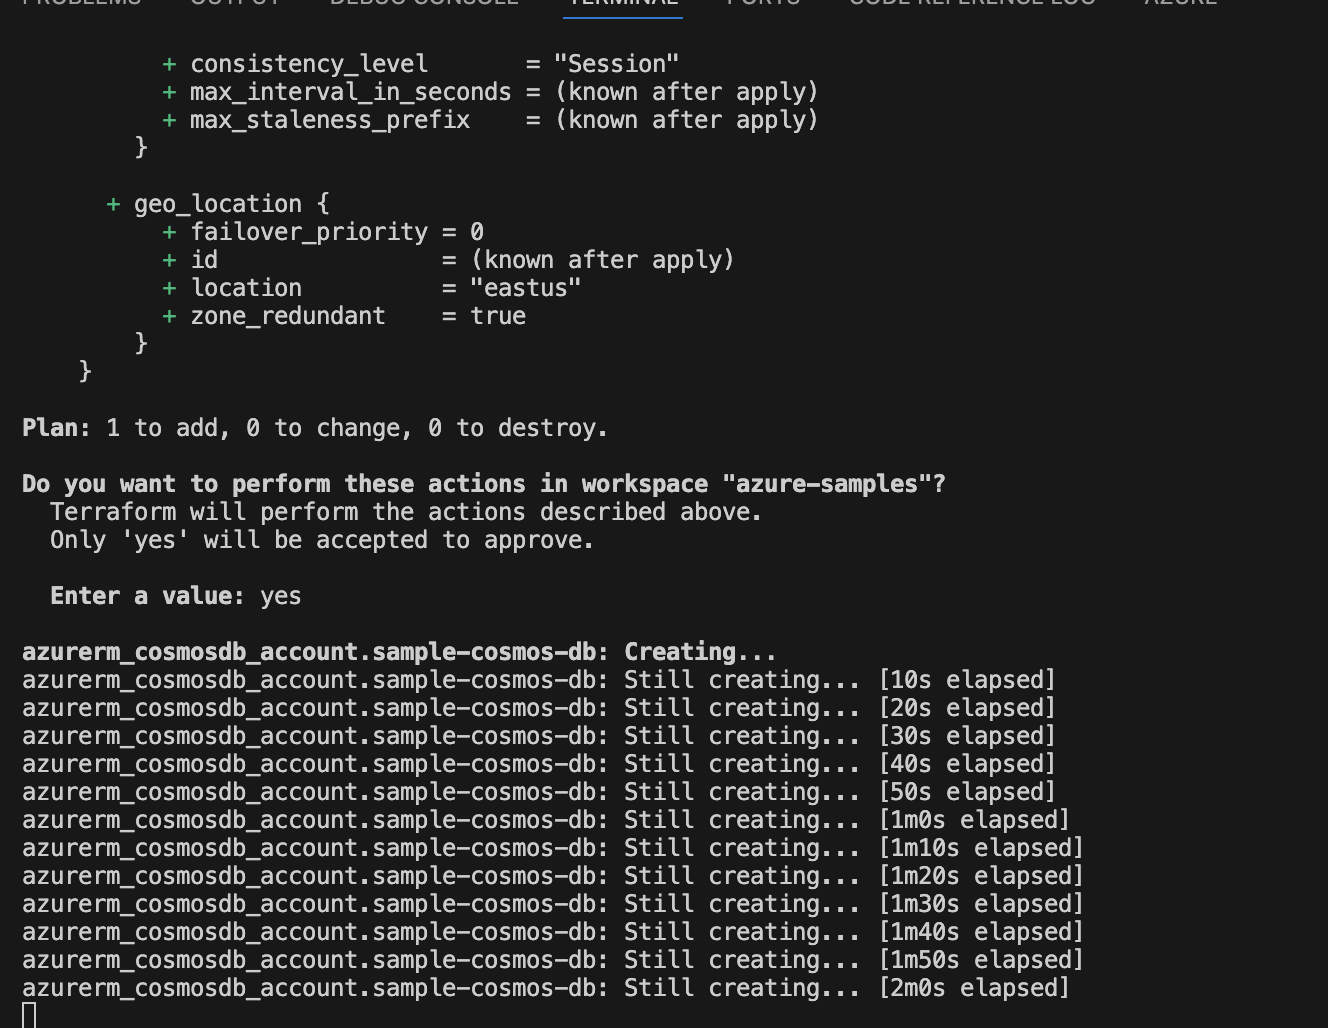
resource "azurerm_cosmosdb_account" "sample-cosmos-db" { name = "lakindu-sample-cosmos-db" resource_group_name = azurerm_resource_group.azure_samples.name geo_location { failover_priority = 0 location = "East US" zone_redundant = true } consistency_policy { consistency_level = "Session" } offer_type = "Standard" location = "East US" enable_free_tier = true public_network_access_enabled = true } |
The snippet shown above creates a publicly accessible CosmosDB account in the free tier with a single read-and-write region with zone redundancy.
You can apply the change to provision the resource. Upon doing so, you’ll see the Terraform output:
Additionally, you can visit the Azure Console to see the database being created:
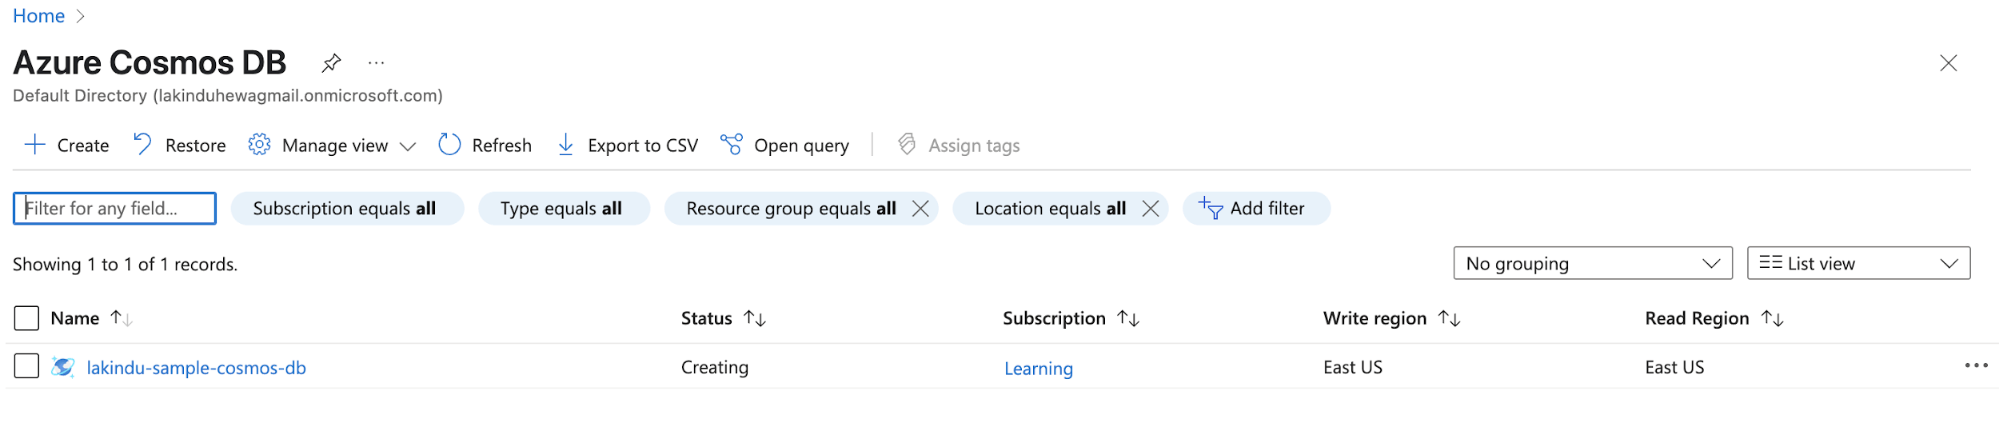
Figure: Viewing the database being created in the Azure console
Once the resource has been created, you can interact with the resource through the Azure console once created.
Next, you can provision the storage account along with a container using the snippet:
|
1 2 3 4 5 6 7 8 9 10 11 12 13 |
resource "azurerm_storage_account" "media" { name = "lakindumedia" resource_group_name = azurerm_resource_group.azure_samples.name account_tier = "Cool" account_replication_type = "LRS" location = "East US" } resource "azurerm_storage_container" "static" { name = "static" storage_account_name = azurerm_cosmosdb_account.sample-cosmos-db.name container_access_type = "private" } |
As earlier, you can apply the changes to provision the storage account with a container named “static”, as shown below:
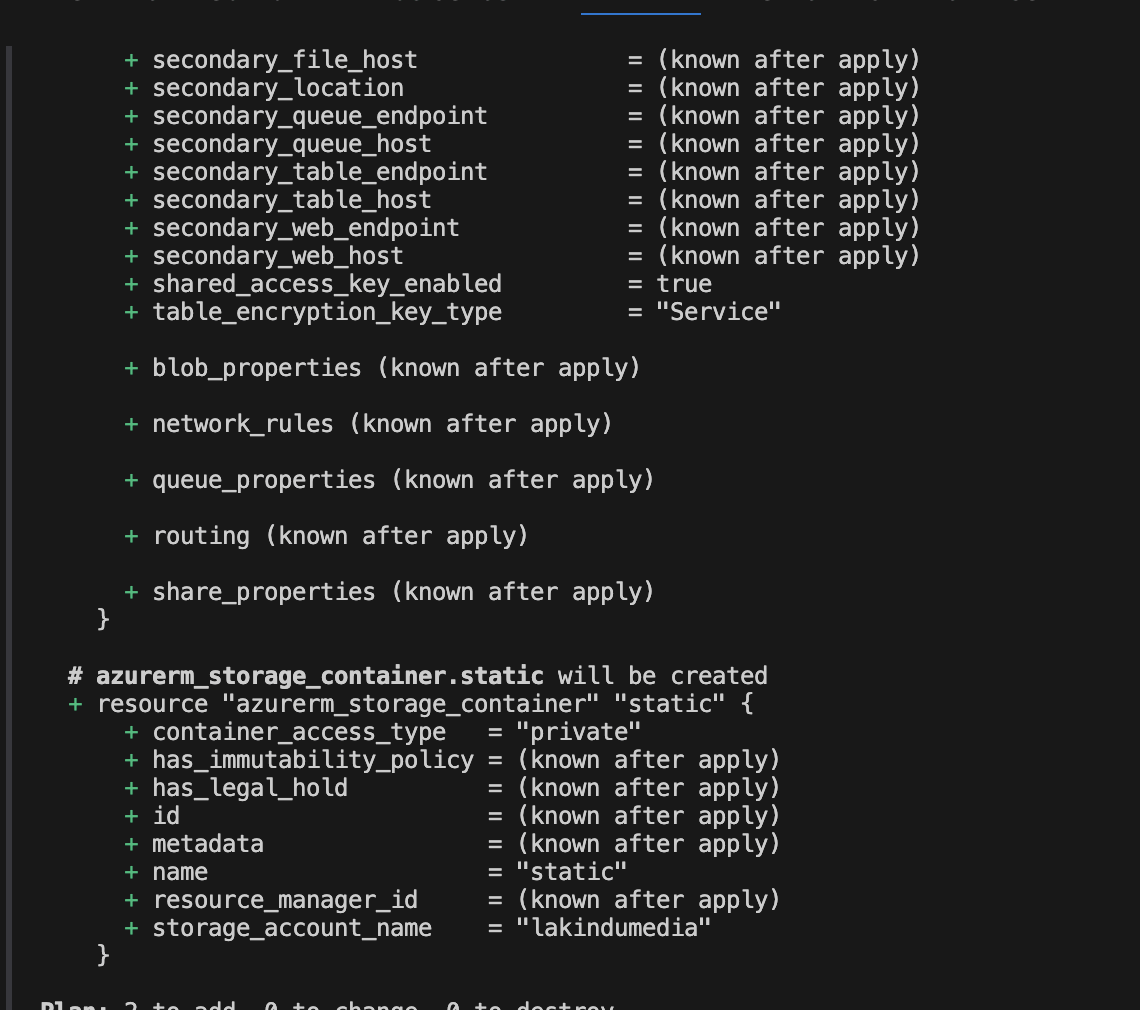
Caption: Viewing the plan for Storage Account creation
After the Terraform script has executed, you can view the storage account on the Azure console:
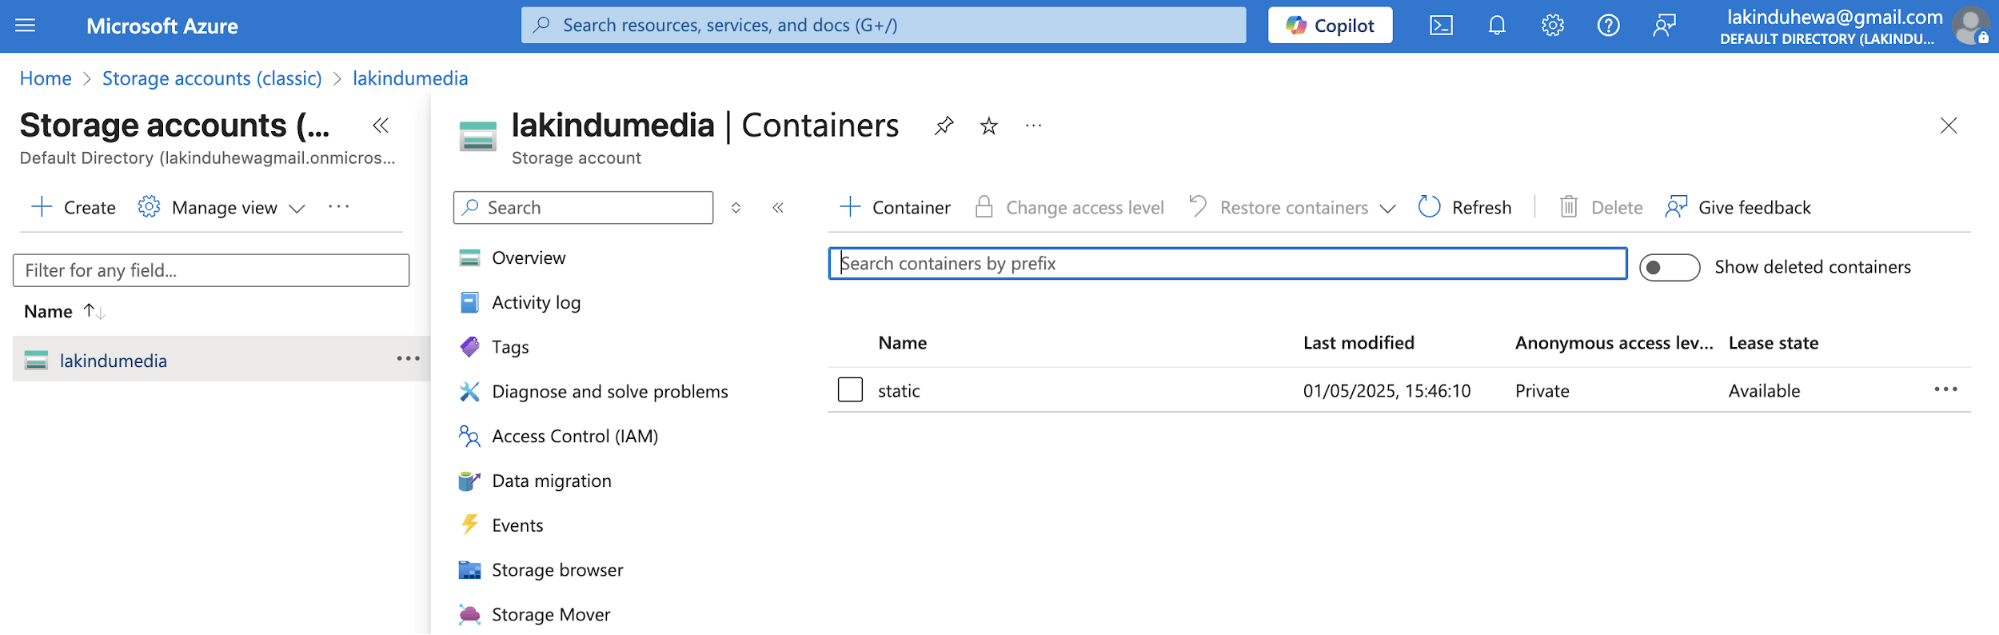
Caption: Viewing the provisioned storage account and container on the Azure console
Terraform Modules for Azure Automation
Previously, you created one storage account, a container, and a CosmosDB Account. But, imagine if you had to create 10 storage accounts and 2 CosmosDB accounts.
You’d have to duplicate your code and create the necessary infrastructure in such cases. But, by doing so, you’ll introduce repetition in your codebase and reduce the readability and maintainability. This is where Terraform Modules come into play.
Using Terraform Modules can help you create reusable infrastructure components to keep things short and simple when defining infrastructure using HCL. For instance, you can convert your existing Azure Storage Account to a module by:
- Creating a directory called – “storage_account” under modules
- Creating the “main.tf” and “output.tf” files. These files will help define the resource, its inputs, and its outputs.
The snippets for the files are showcased below:
|
1 2 3 4 5 6 7 8 9 10 11 12 13 14 15 16 17 18 19 20 21 22 |
# main.tf resource "azurerm_storage_account" "this" { name = var.storage_account_name resource_group_name = var.resource_group_name account_tier = var.account_tier account_replication_type = var.account_replication_type location = var.location } resource "azurerm_storage_container" "this" { for_each = { for container in var.containers : container.name => container } name = each.value.name storage_account_name = azurerm_storage_account.this.name container_access_type = each.value.access_type } # output.tf output "storage_account_name" { value = azurerm_storage_account.this.name } |
Upon doing so, you can re-run terraform init to initialize your module. Next, you can define a storage account with containers using your module with more cleaner and elegant code in your main.tf file:
|
1 2 3 4 5 6 7 8 9 10 11 12 13 14 15 16 17 18 |
module "storage_account" { source = "../../modules/storage_account" storage_account_name = "lakindusstoragemodule" resource_group_name = azurerm_resource_group.azure_samples.name account_tier = "Standard" account_replication_type = "LRS" location = azurerm_resource_group.azure_samples.location containers = [ { name = "container1" access_type = "private" }, { name = "container2" access_type = "blob" } ] } |
As you can see, the module simplifies the process of creating a module by creating a reusable block with simple configurations.
Think of it like creating a class in object oriented programming.
You can run terraform apply to provision this resource.
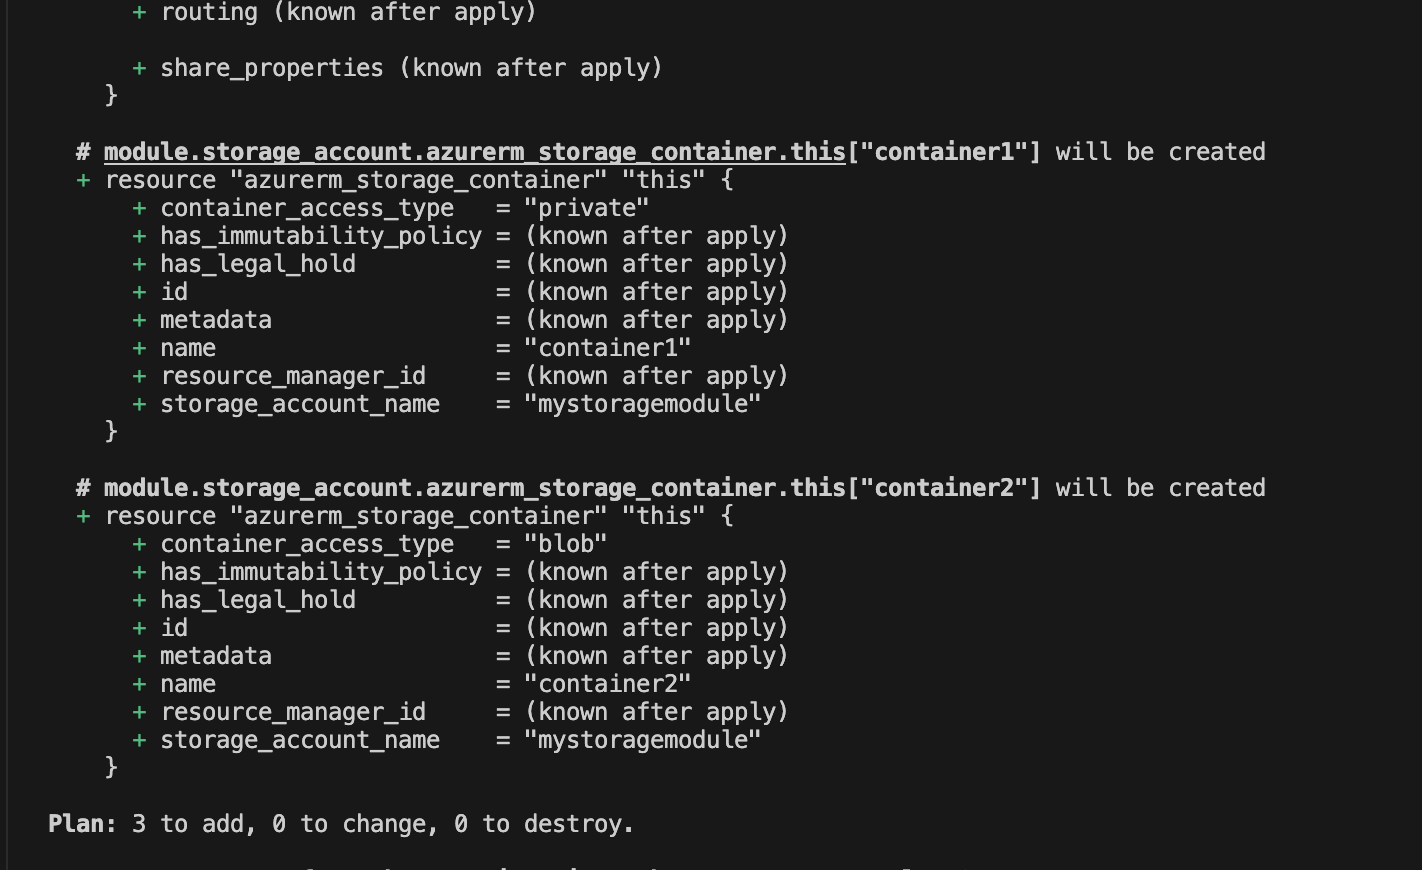
Figure: Viewing the plan for the storage account using the module
As shown above, it plans to create the resources as intended with a storage account and two containers in it.
Next, you can view the resource in the Azure console:
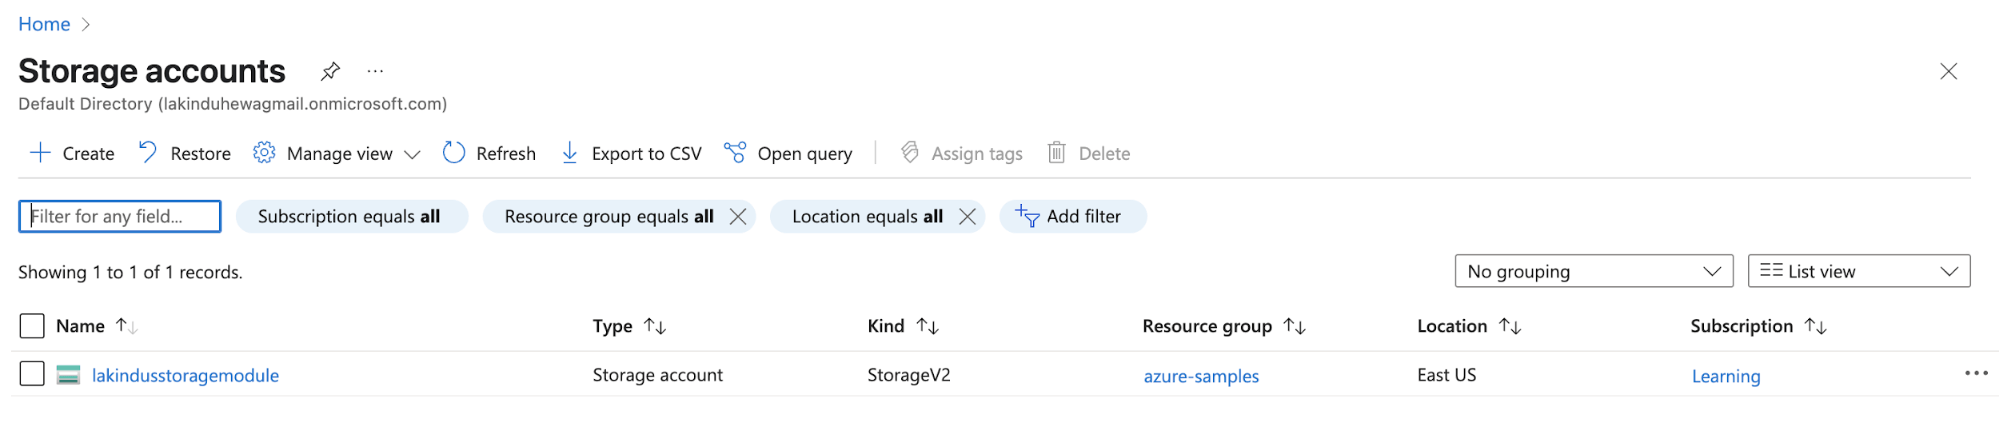
Figure: Provisioning a storage account with a module
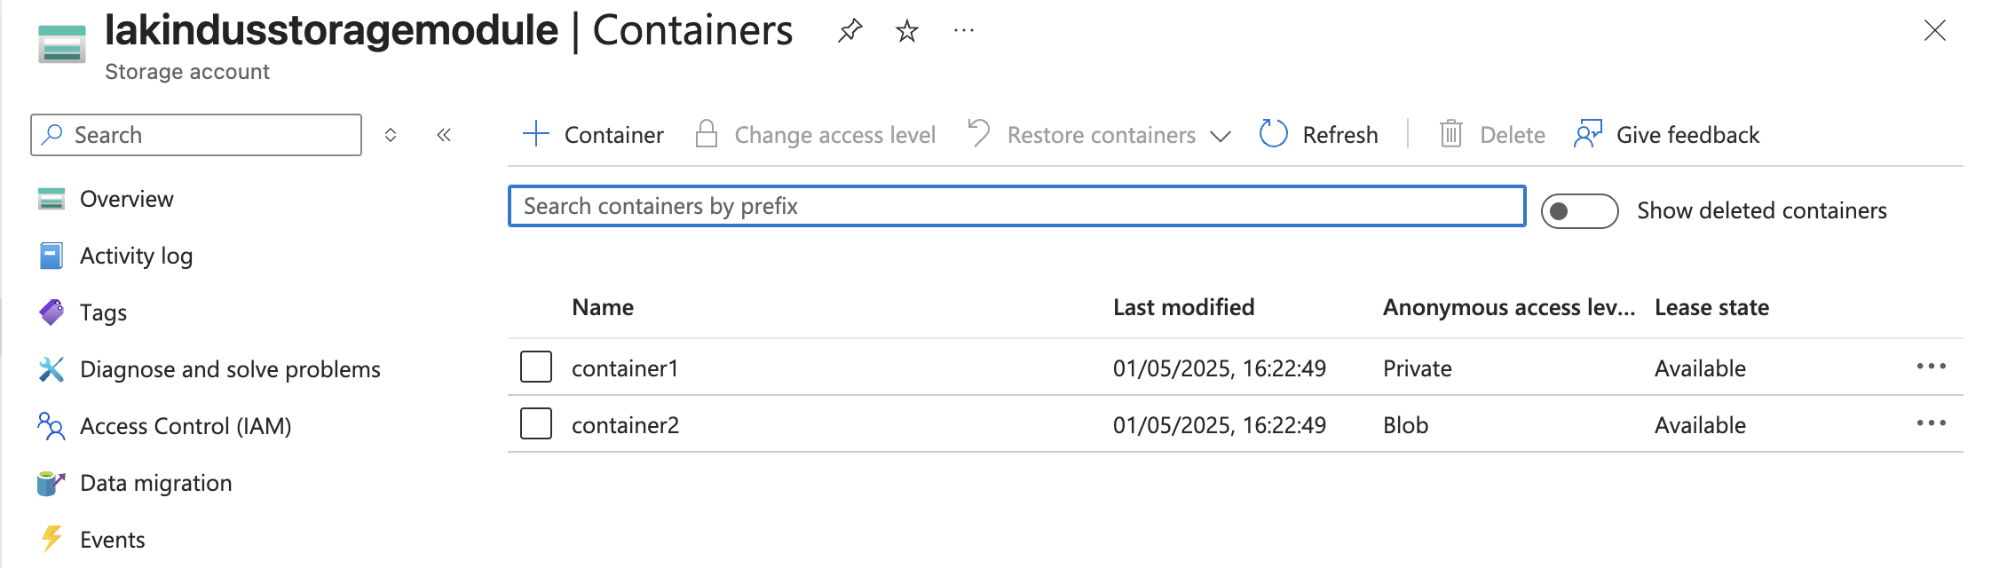
Figure: Provisioned storage containers using the module
Optimizing costs with Terraform Azure Automation
Now that we’re familiar with creating resources on Azure using Terraform let’s look at how you can optimize your Azure costs.
Use Terraform Plan to review waste
Running a terraform plan helps you preview changes before applying them.
By doing so, teams can spot unintended additions, over-provisioned resources, or duplication early.
Regular plan reviews in CI/CD pipelines ensure only necessary, cost-effective infrastructure is deployed, preventing waste and maintaining control over cloud resource sprawl.
Avoid Orphaned Azure Resources in Terraform
Orphaned resources are those no longer referenced in your Terraform code but still exist in the cloud, often incurring hidden costs.
Regularly run terraform state list and compare with actual infrastructure, or use drift detection tools to identify and clean up unused or abandoned assets.
Use tools like Control Monkey to view your Terraform stack and manage the resources using a GUI Console.
Delete Unused Default Resources
Cloud providers often create default resources (e.g., NSGs, route tables, log diagnostics).
If these aren’t configured or used, they can still generate costs. Review what Terraform creates by default, disable unnecessary features, and explicitly remove unused defaults to avoid accumulating charges for resources that serve no purpose.
Best Practices on Terraform Azure Automation
When you’re working on Azure using Terraform, there are some best practices that you can adopt to ensure maximum efficiency. Key best practices include:
- Leverage modules to keep your code clean and improve reusability on your stack.
- Use a remote backend for the state to ensure that teams can collaborate on your Terraform stack.
- Tag your resources to keep track of ownership.
Concluding thoughts about Terraform Azure Automation
Working with Terraform significantly improves your efficiency in maintaining cloud resources, especially if you have to work on multiple environments.
If you want to try this out yourself, check out the source code on this GitHub Repository.
Use Terraform with Control Monkey so that you can automatically get updates on Drift and monitor your infrastructure with ease.
Want to automate Terraform workflows with guardrails, drift detection, and real-time visibility?https://controlmonkey.io/pricing/

FAQs
Terraform is an open-source Infrastructure as Code (IaC) tool that lets you define and provision Azure infrastructure using code. You write declarative configuration files (usually in .tf) to define resources like virtual machines, storage accounts, and networks, then apply them to Azure using the terraform apply command.
Yes. Terraform needs to authenticate with Azure to provision resources. You can authenticate using the Azure CLI, a Service Principal, or via Managed Identity when running Terraform in an Azure-hosted environment (like Azure DevOps or a VM).
Absolutely. Modules allow you to encapsulate and reuse resource configurations. For example, you can create a reusable module for a storage account or a virtual network and call it across multiple environments like dev, staging, and prod.
You can manage environments using separate state files, or directory-based structures with different variable files. This ensures each environment maintains its infrastructure without conflicts.
By default, Terraform stores the state file locally. However, for collaboration and safety, it’s recommended to use remote state storage like Azure Blob Storage, which allows team access and state locking using an Azure Storage Account with a shared backend configuration.